Introduction to Nativescript
by
Supriya
- Flutter Vs React Nativescript
- React Native Vs React Nativescript
- Set up your environment
- Basic commands
- Layouts
- Components
What is Nativescript?
Native Script is an open-source framework for building cross-platform mobile apps with JavaScript
What do I need to know?
It lets users build iOS, Android, and Windows apps using JavaScript, XML and CSS
...but how?
It achieves this by combining an application framework with core modules, plugins, and Native Script runtimes.
It uses the native rendering engine of the target platform

Flutter Vs Nativescript
| Flutter | Nativescript |
|---|---|
| uses Dart, created by Google | can use your web development skills to build mobile apps. Created by Jamie Birch |
| provides better UI toolkit | has its own rendering engine to render |
| supports automated testing and takes less time | offers default testing with its own QA workflow |
React Native Vs Nativescript
| React Native | Nativescript |
|---|---|
| it relies on a JSON-serialised bridge to communicate between the native and JS contexts | runs its JS VM on the main thread, and is bridgeless, with JS-native bindings to all the platform's APIs. |
| It uses React.js as its standard UI library | Allows you to use any JavaScript framework for your UI library. |
Be a part of it!

Set up your environment
brew install node
brew install ruby@2.7
brew link ruby@2.7

#Add the following lines to your shell profile, usually ~/.bash_profile or ~/.bashrc, or if you are using zsh then ~/.zshrc config file:
# Add rubygems to the path
export PATH=/opt/homebrew/lib/ruby/gems/2.7.0/bin:$PATH
# or
export PATH=/usr/local/lib/ruby/gems/2.7.0/bin:$PATH

sudo gem install cocoapods
sudo gem install xcodeproj
Basic commands
npm install -g nativescript

ns doctor ios

# create a blank project from a template
tns create my-app -—react

# preview the app on a device
tns preview

# build and run the project on native emulators
tns run android
tns run ios
Layouts
- Absolute Layout
- Dock Layout
- Grid Layout
- Stack Layout
- Wrap Layout
- Flexbox Layout
Absolute Layout
<absoluteLayout backgroundColor="#3c495e">
  <label text="10,10" left={10} top={10} width={100} height={100} backgroundColor="#43b883"/>
  <label text="120,10" left={120} top={10} width={100} height={100} backgroundColor="#43b883"/>
  <label text="10,120" left={10} top={120} width={100} height={100} backgroundColor="#43b883"/>
  <label text="120,120" left={120} top={120} width={100} height={100} backgroundColor="#43b883"/>
</absoluteLayout>
Dock Layout
<dockLayout stretchLastChild={false} backgroundColor="#3c495e">
  <label text="left" dock="left" width={40} backgroundColor="#43b883"/>
  <label text="top" dock="top" height={40} backgroundColor="#289062"/>
  <label text="right" dock="right" width={40} backgroundColor="#43b883"/>
  <label text="bottom" dock="bottom" height={40} backgroundColor="#289062"/>
</dockLayout>
Flexbox Layout
<flexboxLayout backgroundColor="#3c495e">
  <label text="first" width={70} backgroundColor="#43b883"/>
  <label text="second" width={70} backgroundColor="#1c6b48"/>
  <label text="third" width={70} backgroundColor="#289062"/>
</flexboxLayout>
Grid Layout
<gridLayout
  columns="115, 115"
  rows="115, 115"
>
  <label text="0,0" row={0} col={0} backgroundColor="#43b883"/>
  <label text="0,1" row={0} col={1} backgroundColor="#1c6b48"/>
  <label text="1,0" row={1} col={0} backgroundColor="#289062"/>
  <label text="1,1" row={1} col={1} backgroundColor="#43b883"/>
</gridLayout>
Stack Layout
<stackLayout backgroundColor="#3c495e">
  <label text="first" height={70} backgroundColor="#43b883"/>
  <label text="second" height={70} backgroundColor="#289062"/>
  <label text="third" height={70} backgroundColor="#1c6b48"/>
</stackLayout>
Wrap Layout
<wrapLayout backgroundColor="#3c495e">
  <label
    text="first"
    width="30%"
    height="30%"
    backgroundColor="#43b883"
  />
  <label
    text="second"
    width="30%"
    height="30%"
    backgroundColor="#1c6b48"
  />
</wrapLayout>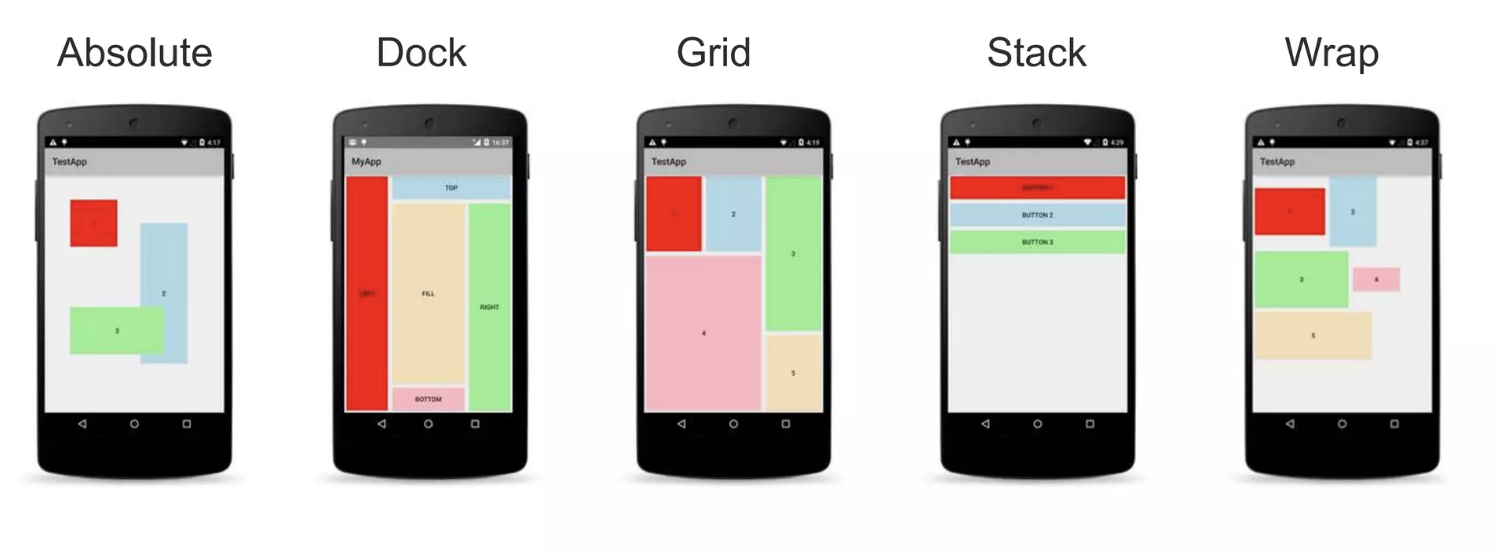
Components
- Action bar
- Action Item
- Button
- Image
- Label
- Frame
- Page
- List view
- Scroll view
- Tab view
- Web view
- Text view
Action bar
provides a toolbar at top of the activity window
<actionBar>
  <stackLayout nodeRole={"titleView"} orientation="horizontal">
    <image src="res://icon" width={40} height={40} verticalAlignment="center" />
    <label text="NativeScript" fontSize={24} verticalAlignment="center" />
  </stackLayout>
</actionBar>
Action item
<actionBar title="My App">
  <actionItem nodeRole={"actionItems"} onTap={onTapShare}
    ios={{
      systemIcon: 9,
      position: "left" as const
    }}
    android={{
      systemIcon: "ic_menu_share" as const,
      position: "actionBar" as const
    }}
  />
  <actionItem nodeRole={"actionItems"} onTap={onTapDelete}
    ios={{
      systemIcon: 16,
      position: "right" as const
    }}
    android={{
      position: "popup" as const
    }}
    text="delete"
  />
</actionBar>
Button
<button text="Button"
  onTap={(args: EventData) => {
    const button = args.object;
  }}
/>
Image
<image src="https://art.nativescript-vue.org/NativeScript-Vue-White-Green.png" stretch="none" />Label
<label textWrap={true}>
  <formattedString>
    <span>This text has a </span>
    <span color={new Color("red")}>red </span>
    <span>piece of text. </span>
    <span fontStyle="italic">Also, this bit is italic, </span>
    <span fontWeight="bold">and this bit is bold.</span>
  </formattedString>
</label>
Frame & Page
function AppContainer(){
  return (
    <frame>
      <page>
        <actionBar title="Default Page Title" />
        <gridLayout>
          <label text="Default Page Content" />
        </gridLayout>
      </page>
    </frame>
  );
}
List view
type MyItem = { text: string };

const cellFactory = (item: MyItem) => {
  return <label text={item.text} />;
};

const onItemTap = (args: ItemEventData) => {
  const index: number = args.index;
  const item: MyItem = items[index];
  console.log(`Tapped item index ${index}: "${text}".`);
};

function SingleTemplate(props: { items: MyItem[] }){
  return (
    <ListView
      items={items}
      cellFactory={cellFactory}
      onitemTap={onItemTap}
    />
  );
}
Scroll view
<scrollView orientation="horizontal">
  <stackLayout orientation="horizontal">
    <label text="this" />
    <label text="text" />
    <label text="scrolls" />
    <label text="horizontally" />
    <label text="if necessary" />
  </stackLayout>
</scrollView>
Tab view & Tab view item
<tabView
  selectedIndex={selectedIndex}
  onSelectedIndexChange={(args: SelectedIndexChangedEventData) => {
    const { oldIndex, newIndex } = args;
    console.log(`Changed from tab index ${oldIndex} -> ${newIndex}.`);
  }}
>
  <tabViewItem nodeRole="items" title="Tab 1">
    <label text="Content for Tab 1" />
  </tabViewItem>
  <tabViewItem nodeRole="items" title="Tab 2">
    <label text="Content for Tab 2" />
  </tabViewItem>
</tabView>
Web view
<webView src="<div><h1>Some static HTML</h1></div>" />

<webView src="http://nativescript-vue.org/" />
Text view
<textView text={"Multi\nLine\nText"} />

<textView editable={false}>
  <formattedString>
    <span text="You can use text attributes such as " />
    <span text="bold, " fontWeight="bold" />
    <span text="italic " fontStyle="italic" />
    <span text="and " />
    <span text="underline." textDecoration="underline" />
  </formattedString>
</textView>
shows and editable or read-only multiline text container
Thank you!
Introduction to Nativescript
By Supriya kotturu
Introduction to Nativescript
An introduction to nativescript


