GMC Setup & Product Upload (Spice Garden)

Business Scenario
You are working as a Digital Marketing Executive for Spice Garden Restaurant.
The restaurant owner wants to showcase food products and meal offers on Google platforms such as:
-
Google Shopping
-
Google Search
-
Google Images

-
YouTube
-
Google Display Network
Your task is to create a Google Merchant Center account and upload Spice Garden food products for advertising purposes.
Pre-Lab Preparation
Topic : Shopping Ad
1) Google Merchant Center
2) Upload the Product on GMC
3) Shopping Ad Setup
Task 1: Access Google Merchant Center
Open Google Chrome Browser
1
-
Launch Google Chrome browser.
-
Ensure internet connectivity is active.
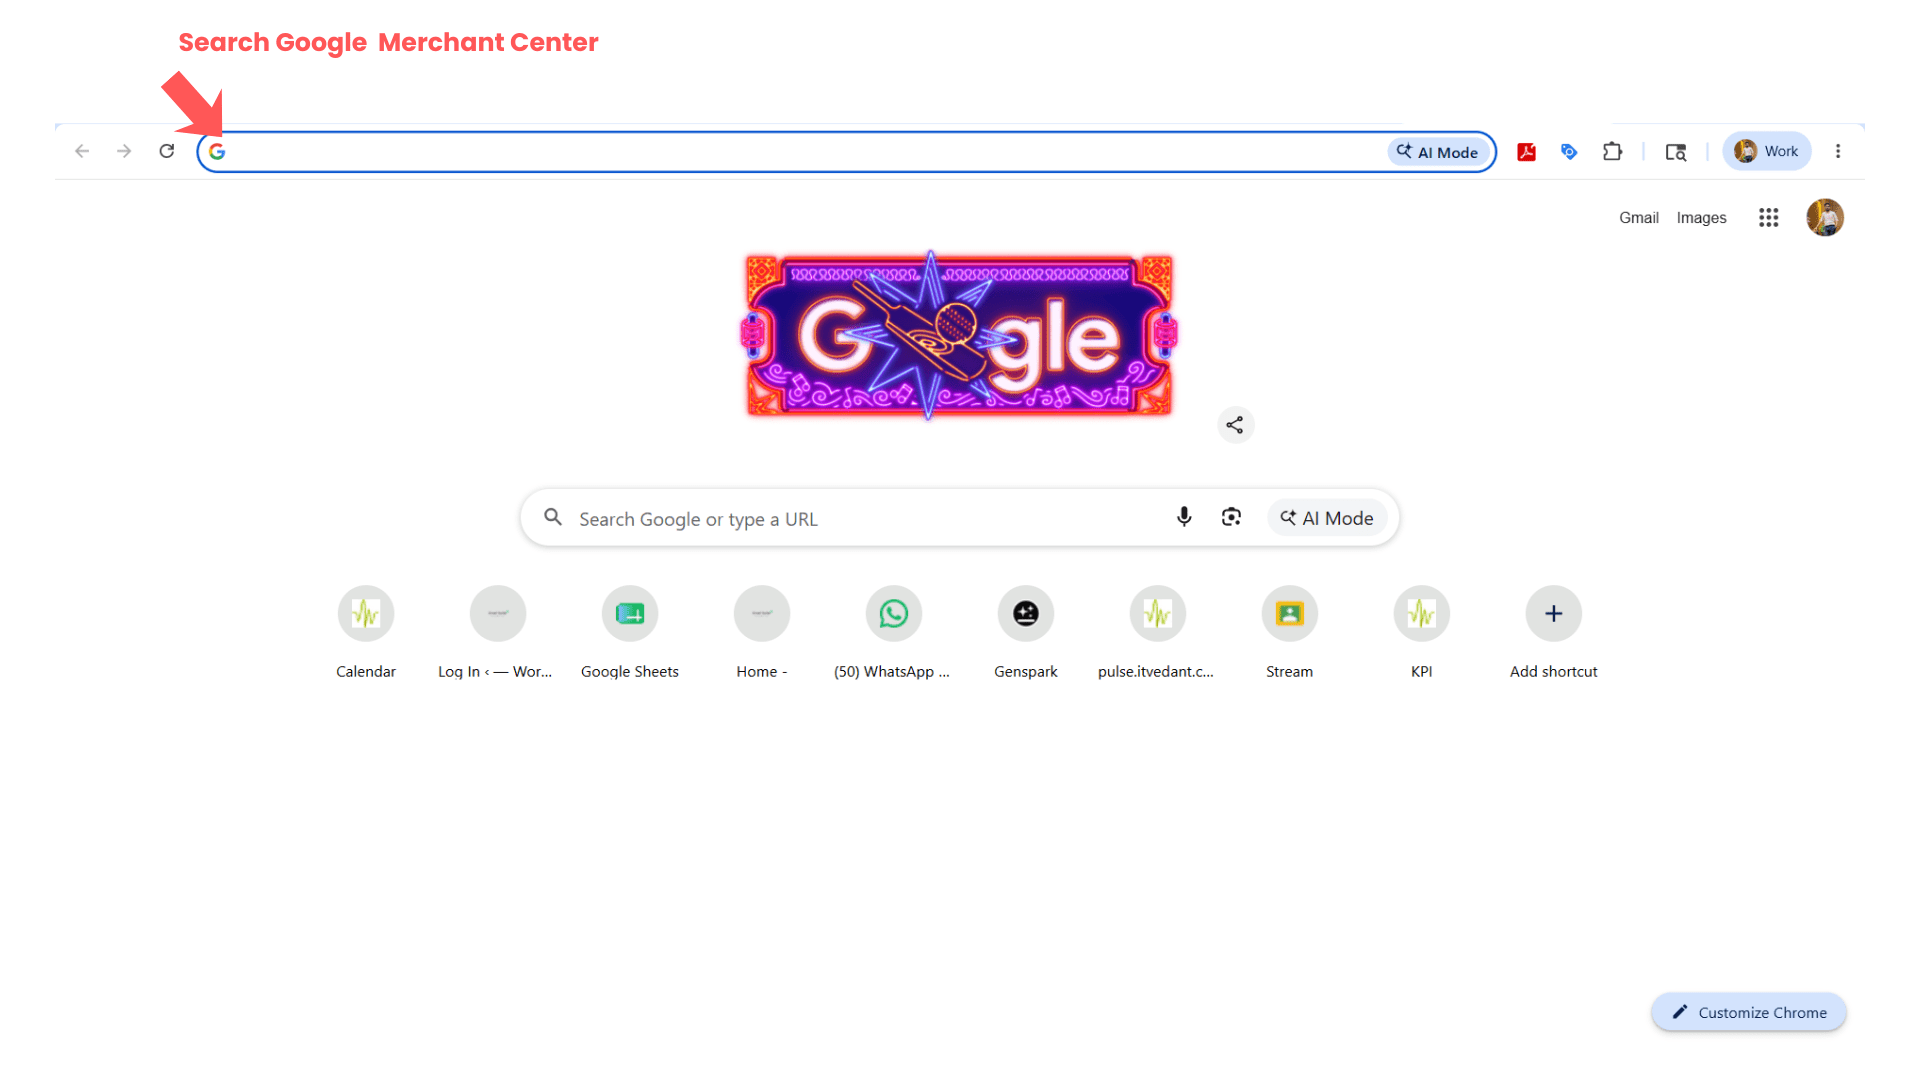
Search Google Merchant Center
2
-
Search:
Google Merchant Center -
Open official Merchant Center website.
Setup of Google Merchant center
3
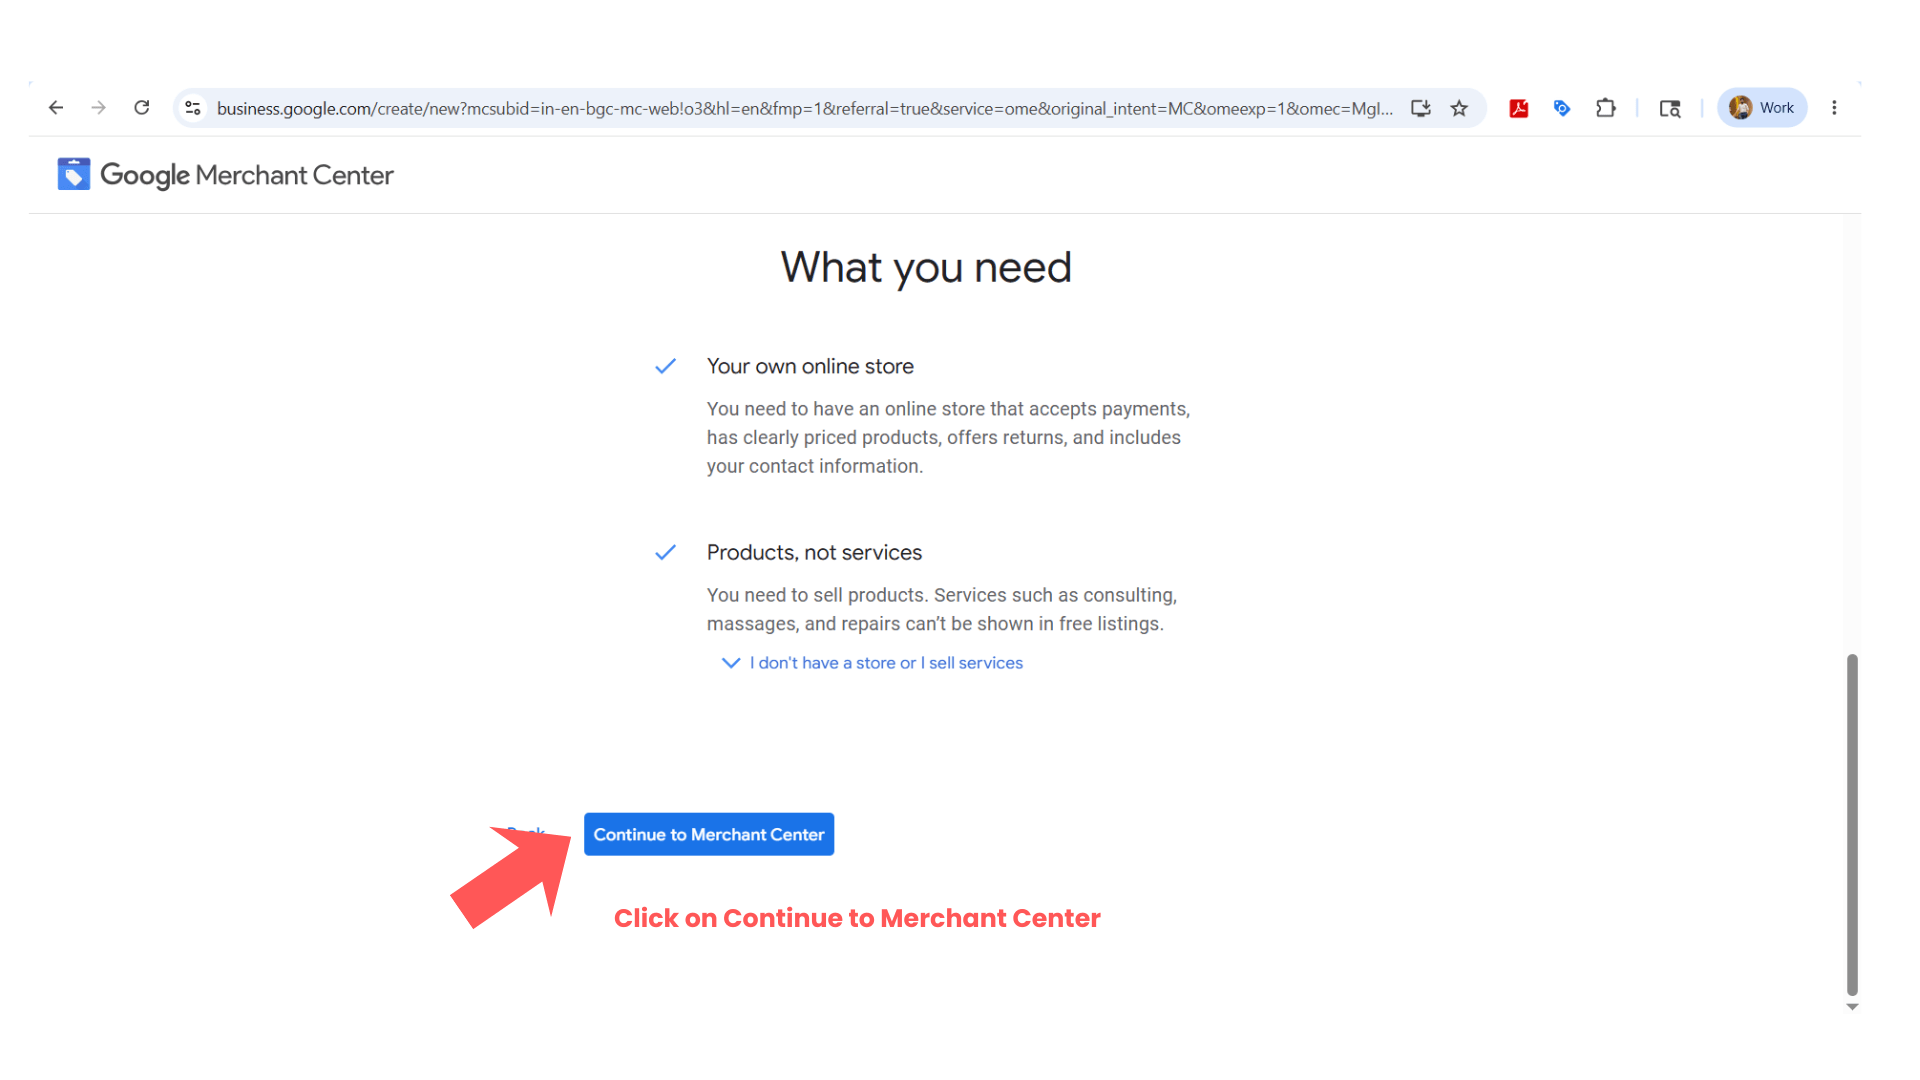
- Click Continue To Merchant Center
Task 2: Setup Merchant Center Account
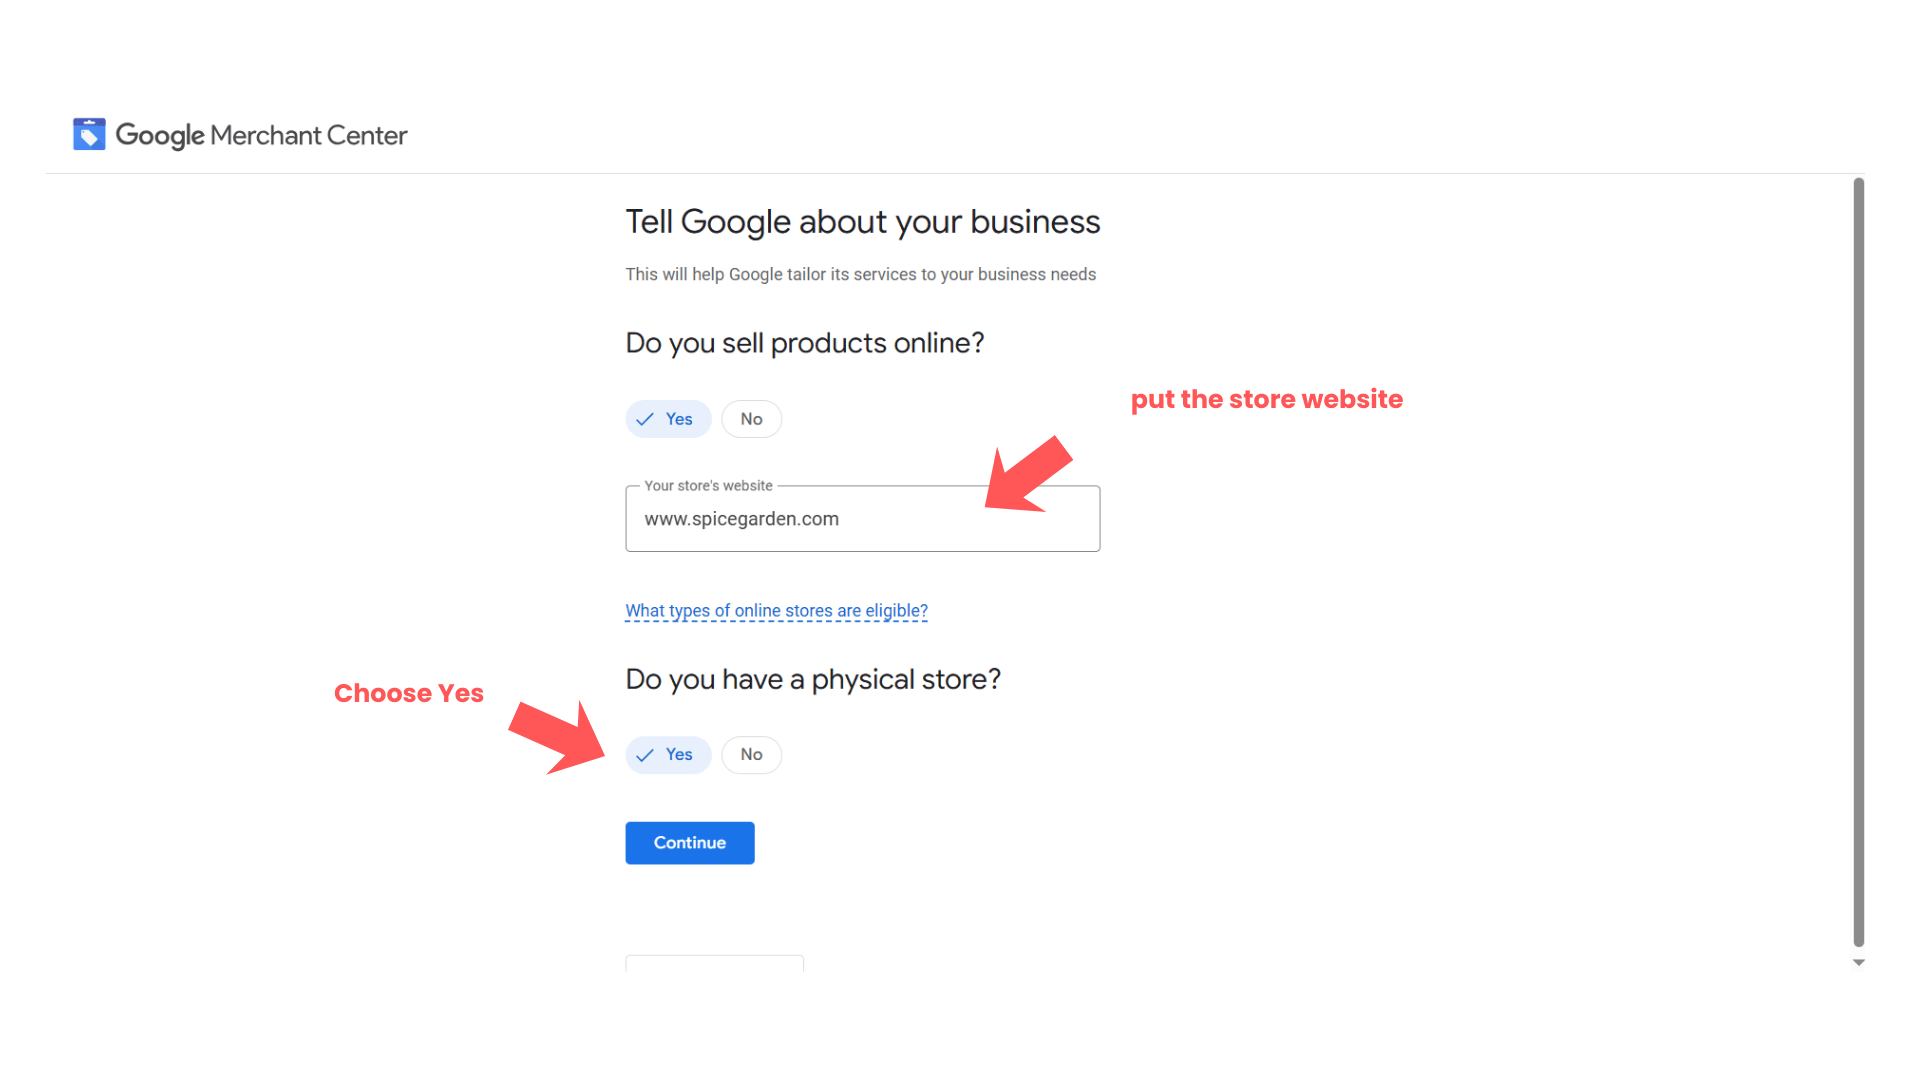
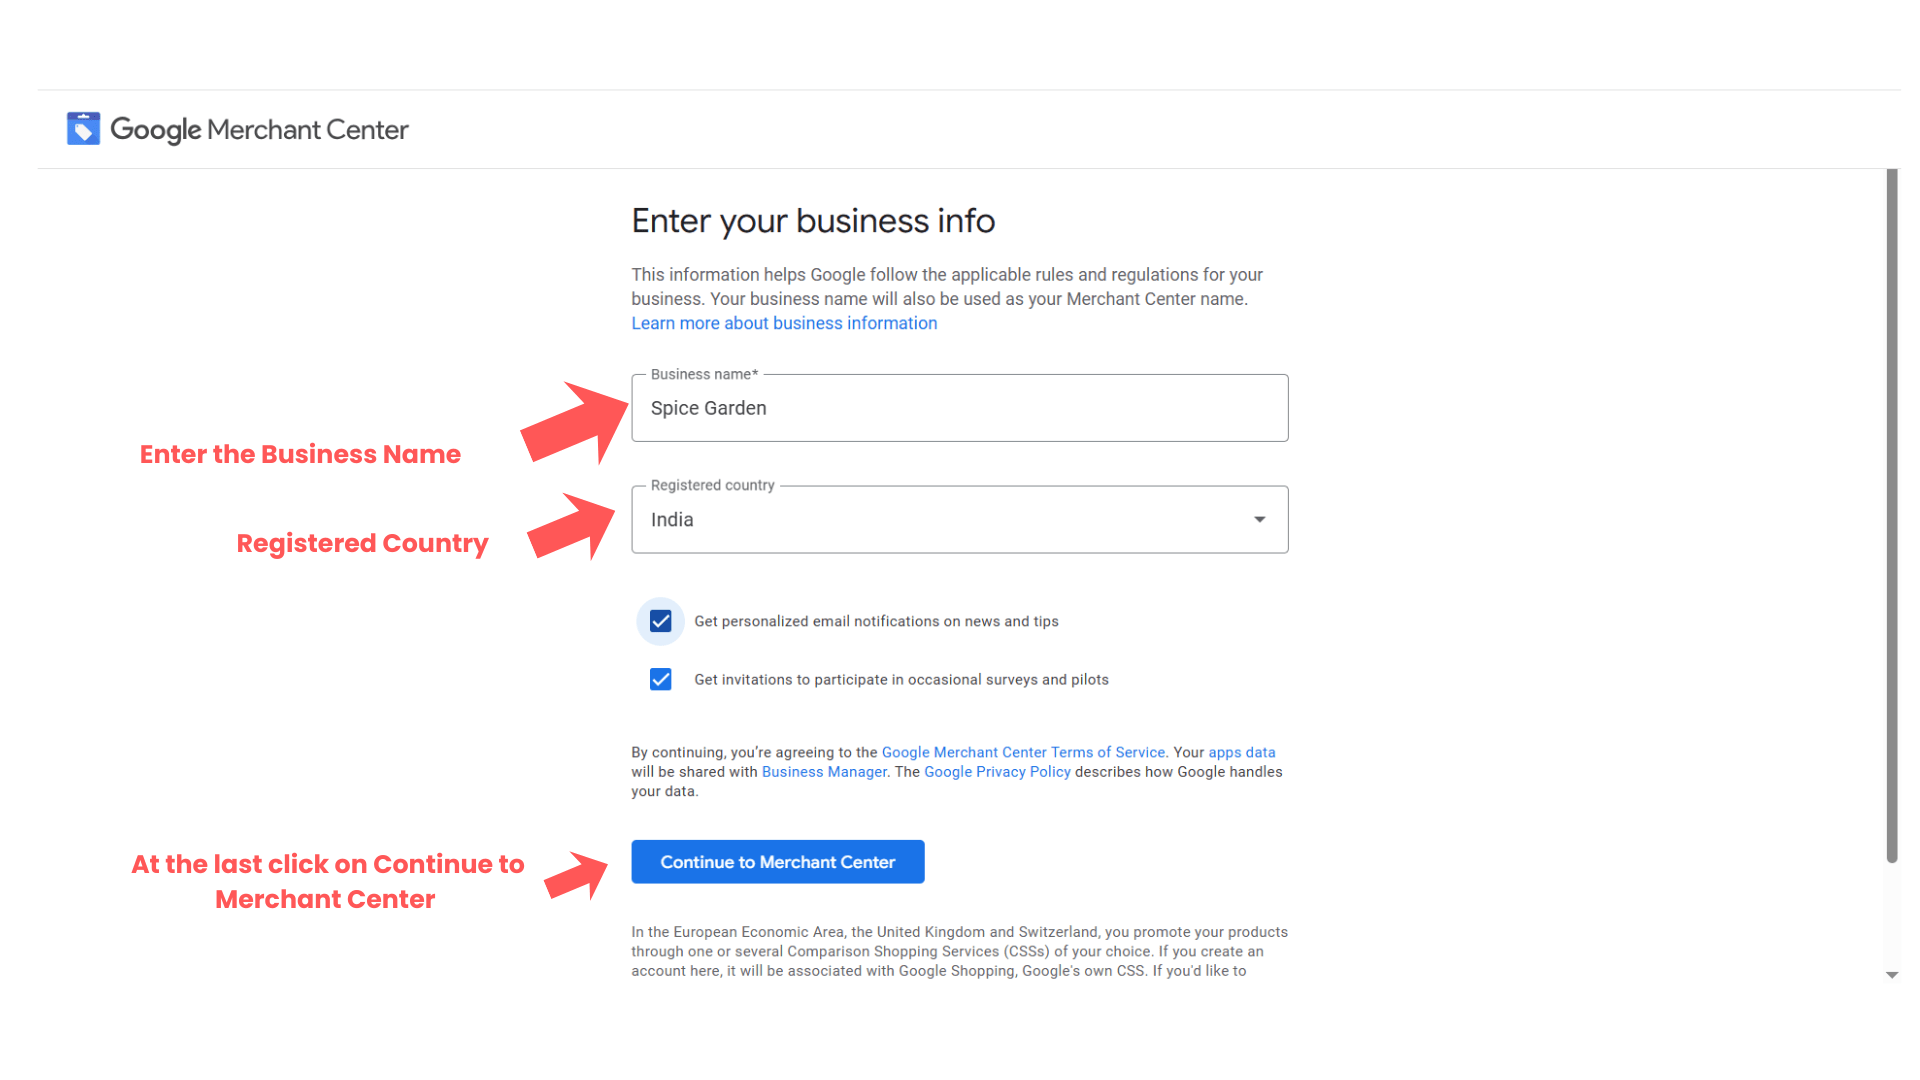
Enter Business Information
1
Fill business details such as:
| Field | Sample Value |
|---|---|
| Business Name | Spice Garden |
| Country | India |
| Time Zone | India Standard Time |
Then click:
“Continue”
Add Business Address
2
Enter restaurant address details.
Example:
Spice Garden Restaurant,
Pune, Maharashtra, India
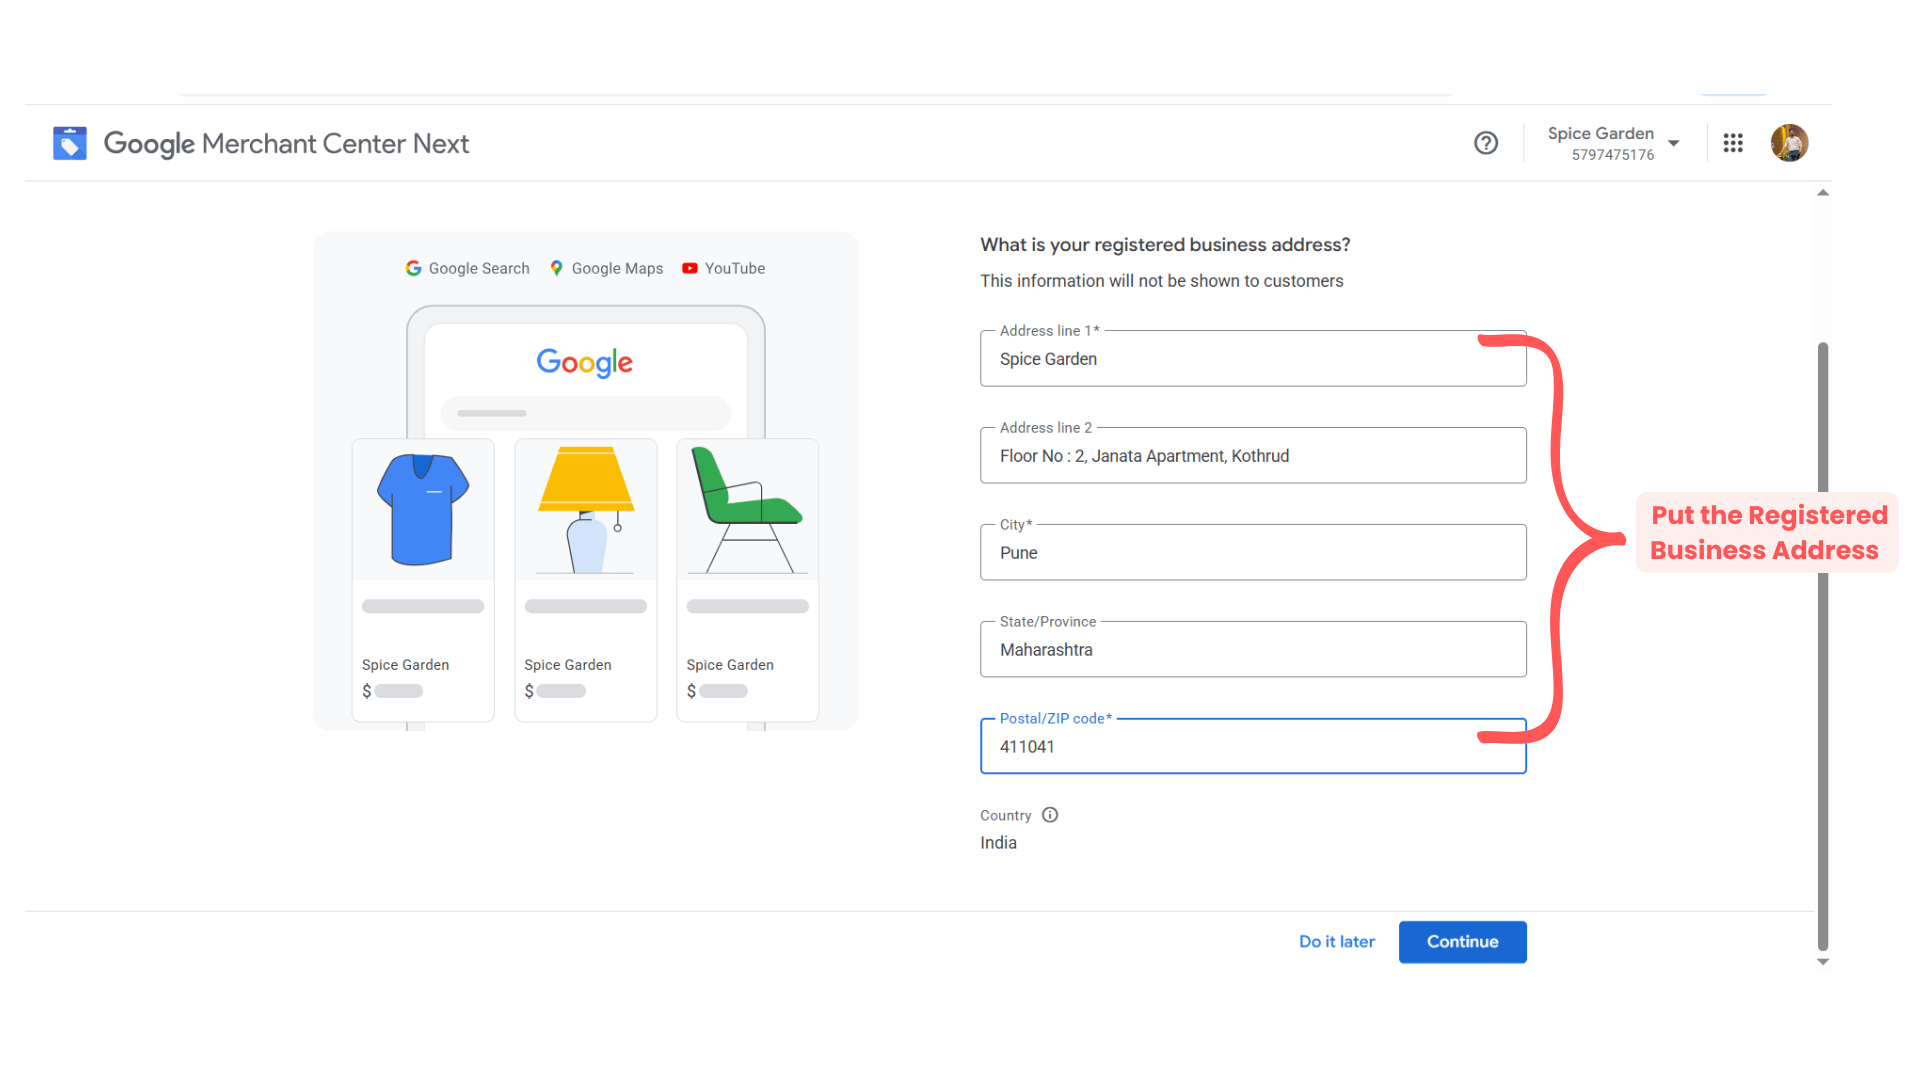
- Then click on Continue button
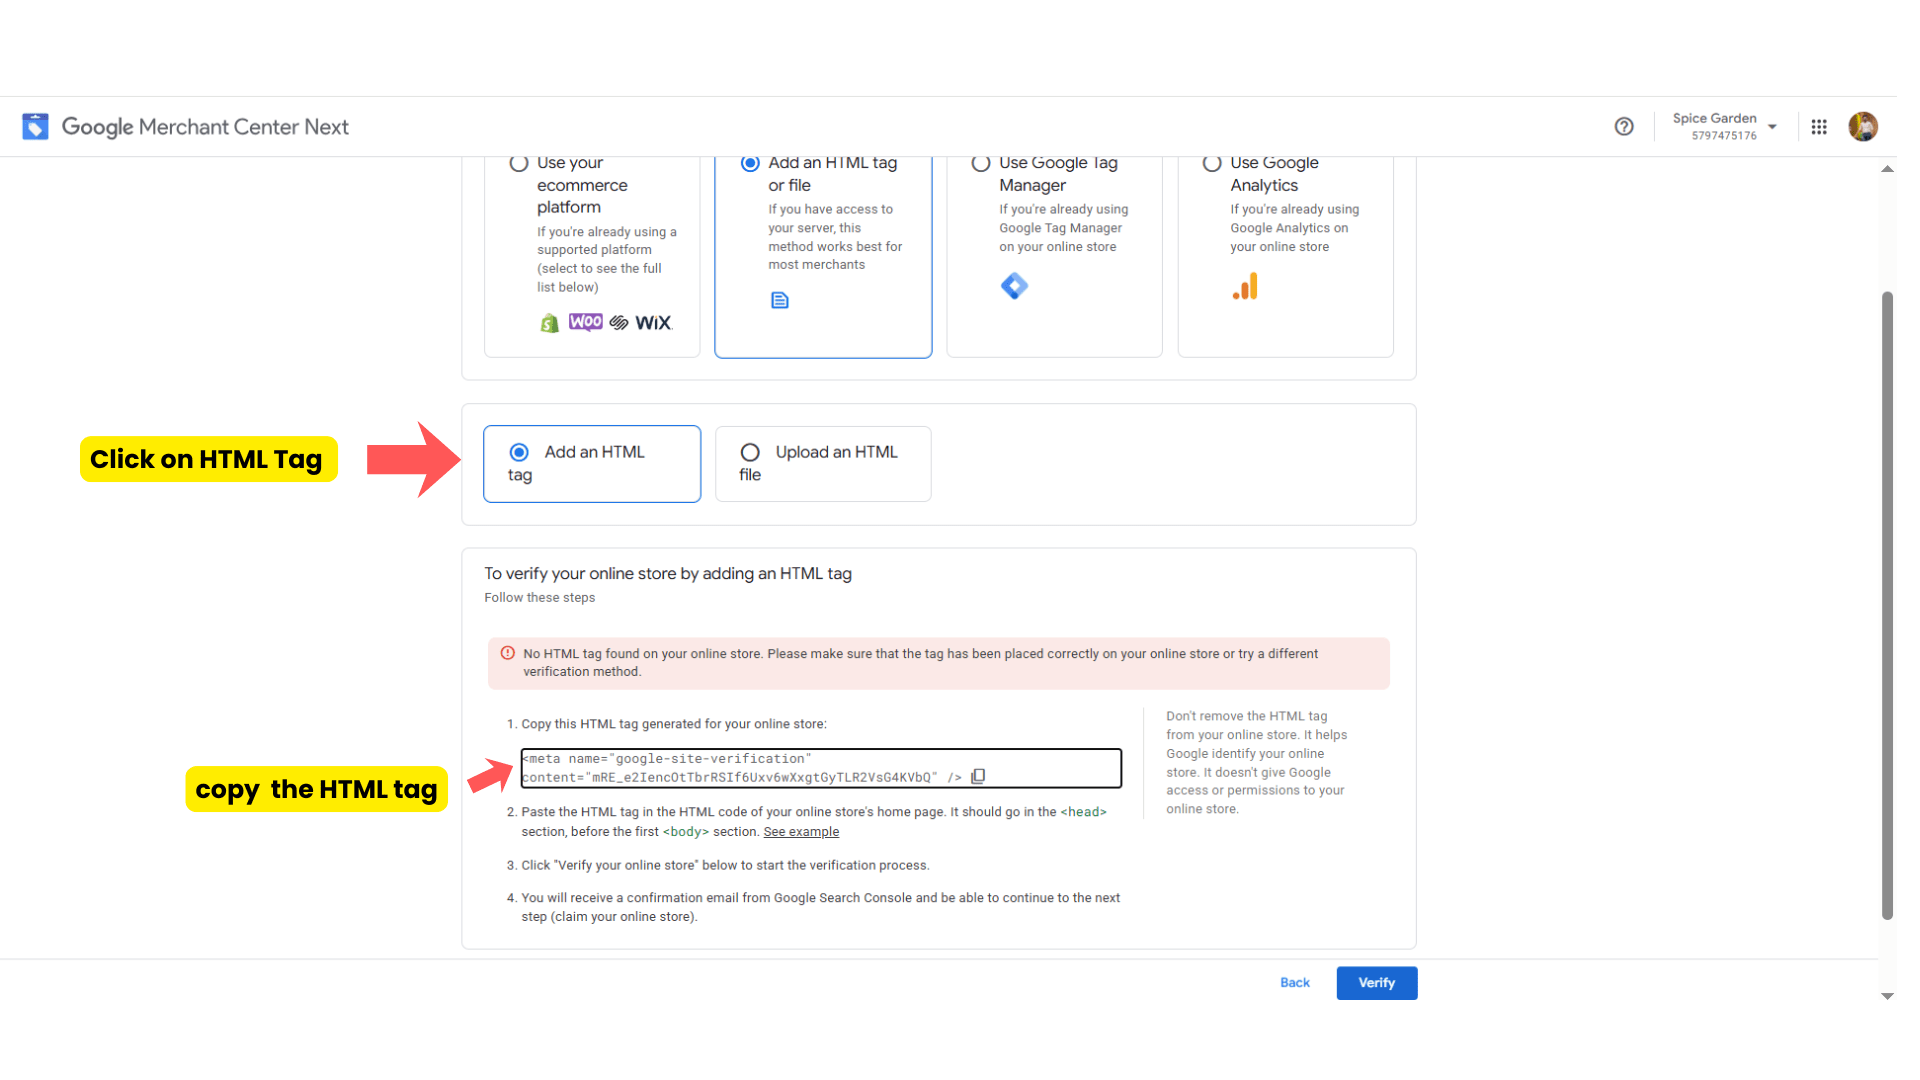
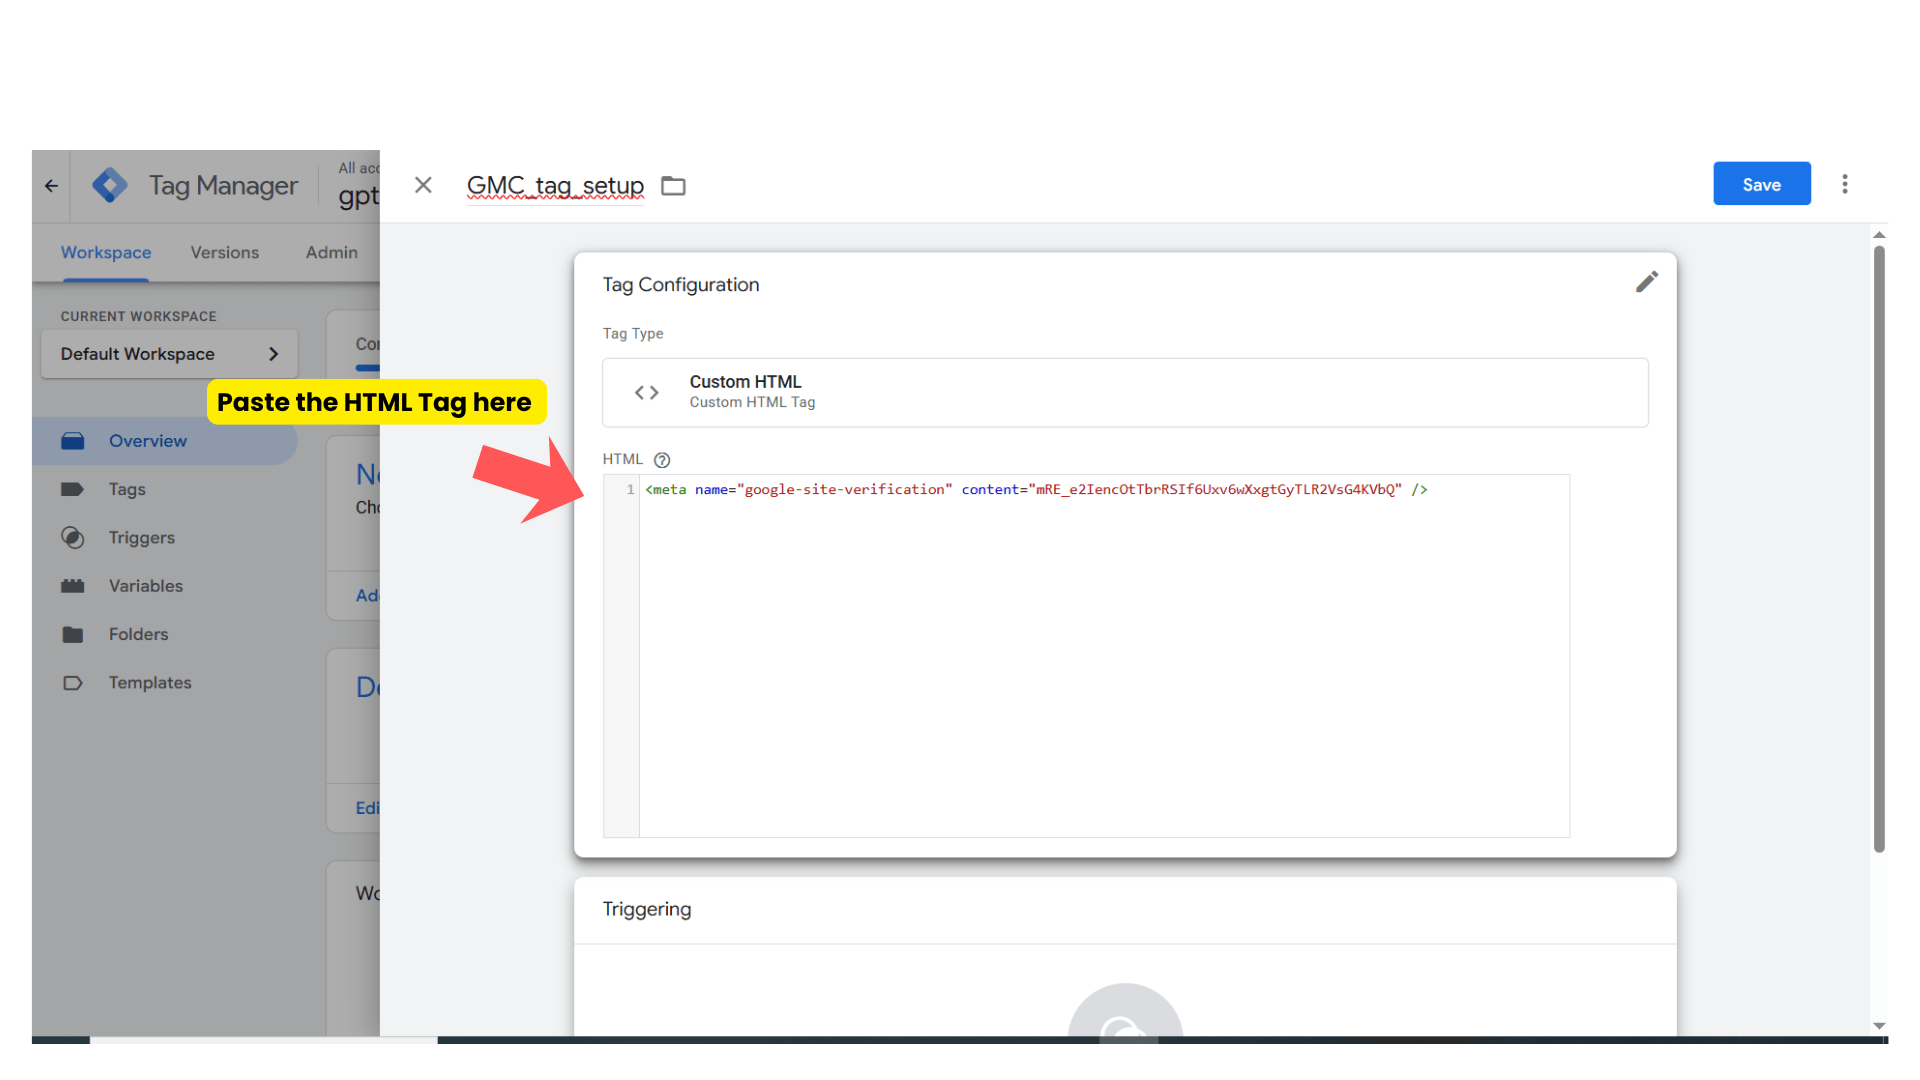
Then click on Add an HTML tag on file for the verification purpose.
Copy the tag and go to google tag manager.
Click on New Tag
3
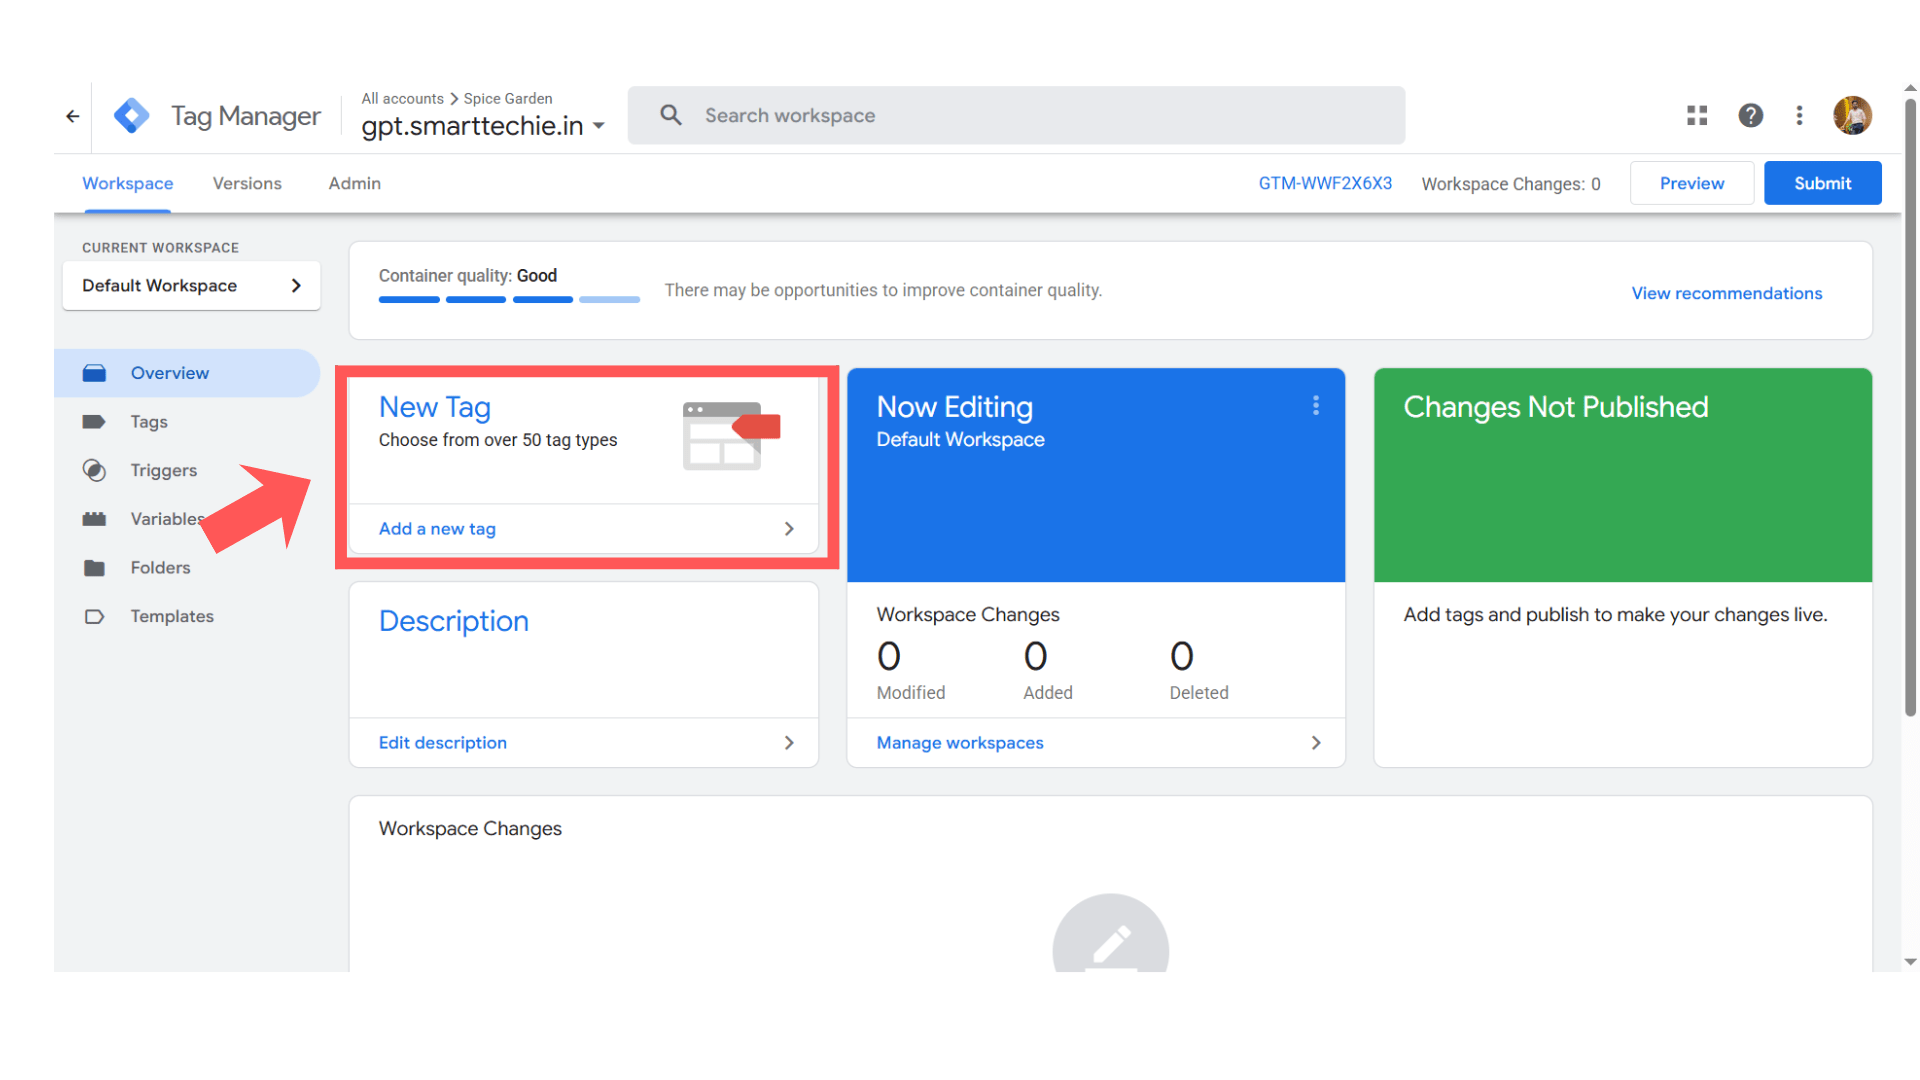
- Give Name to the tag - GMC_tag_setup

Click on Tag Configuration
Custom → Choose custom HTML
-
Paste the copied tag there.
Then click on Triggering
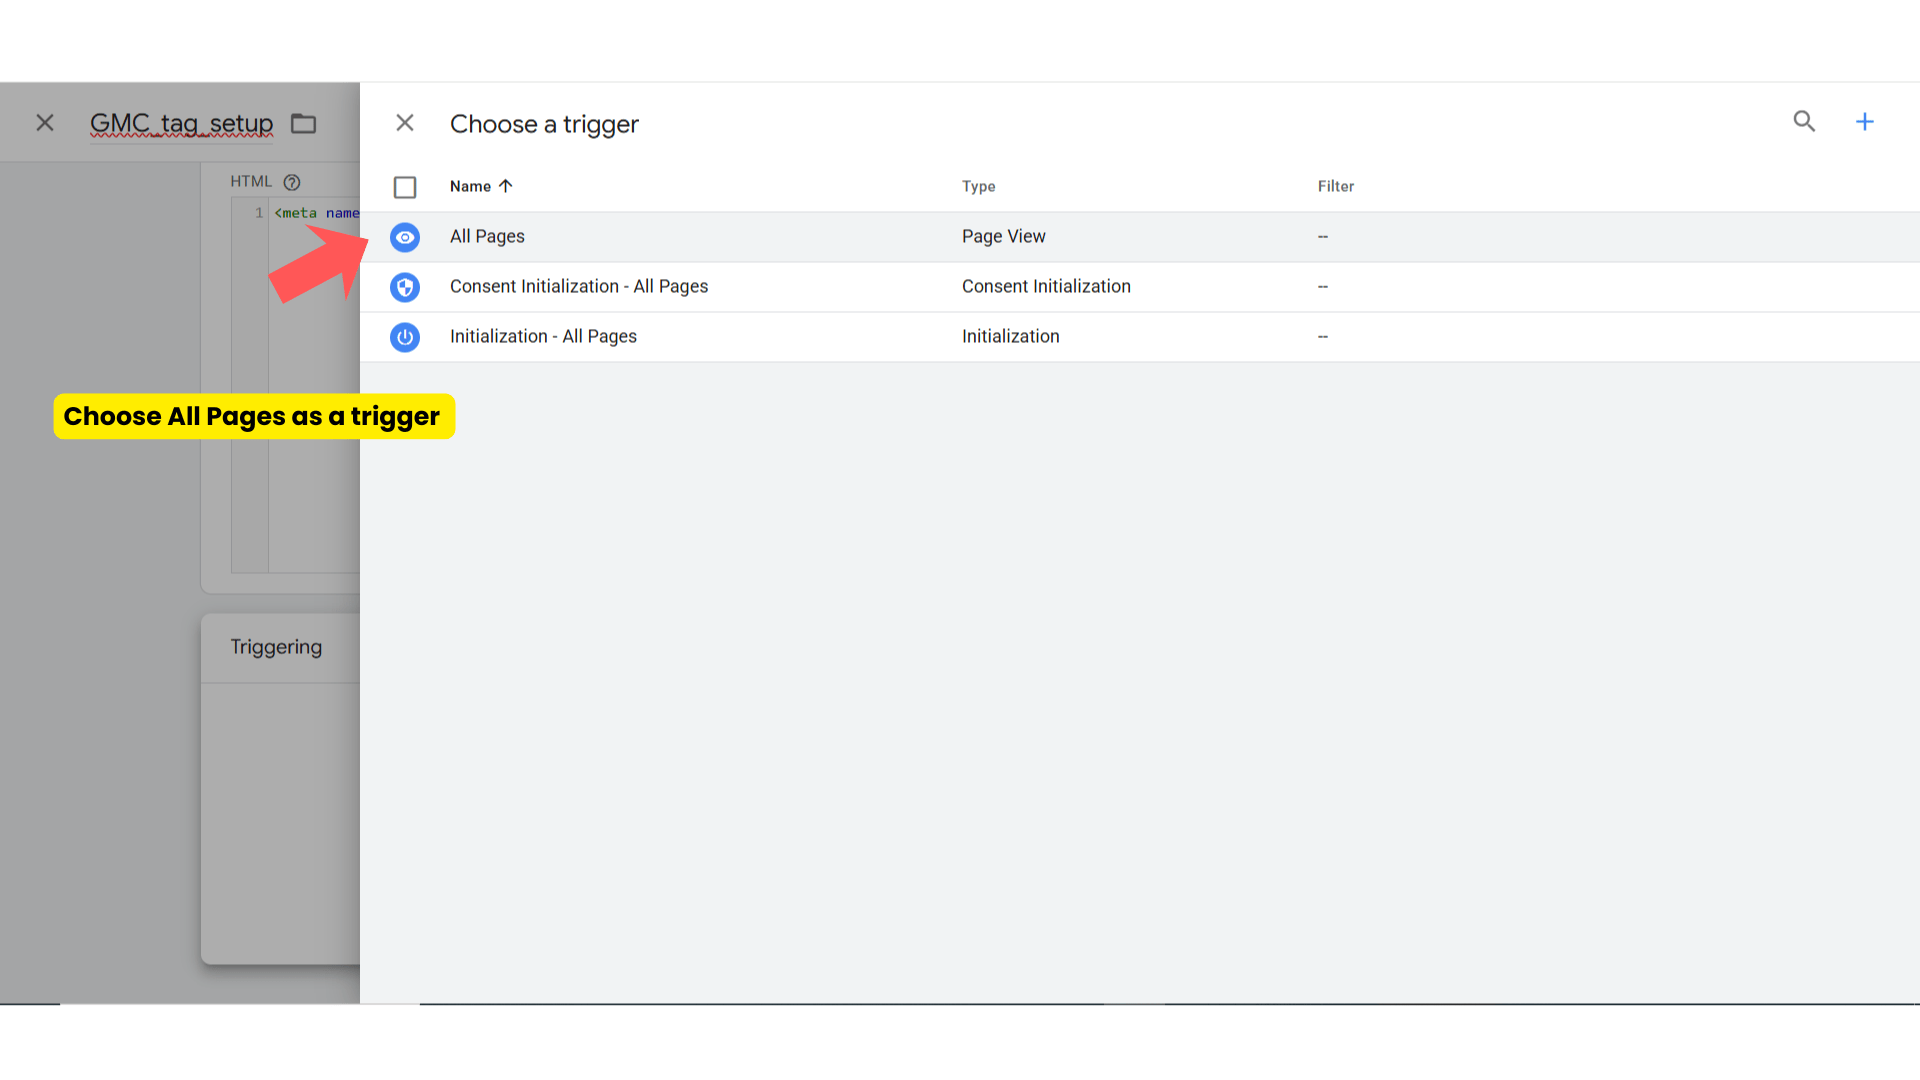
-
Choose Triggering type → All Pages
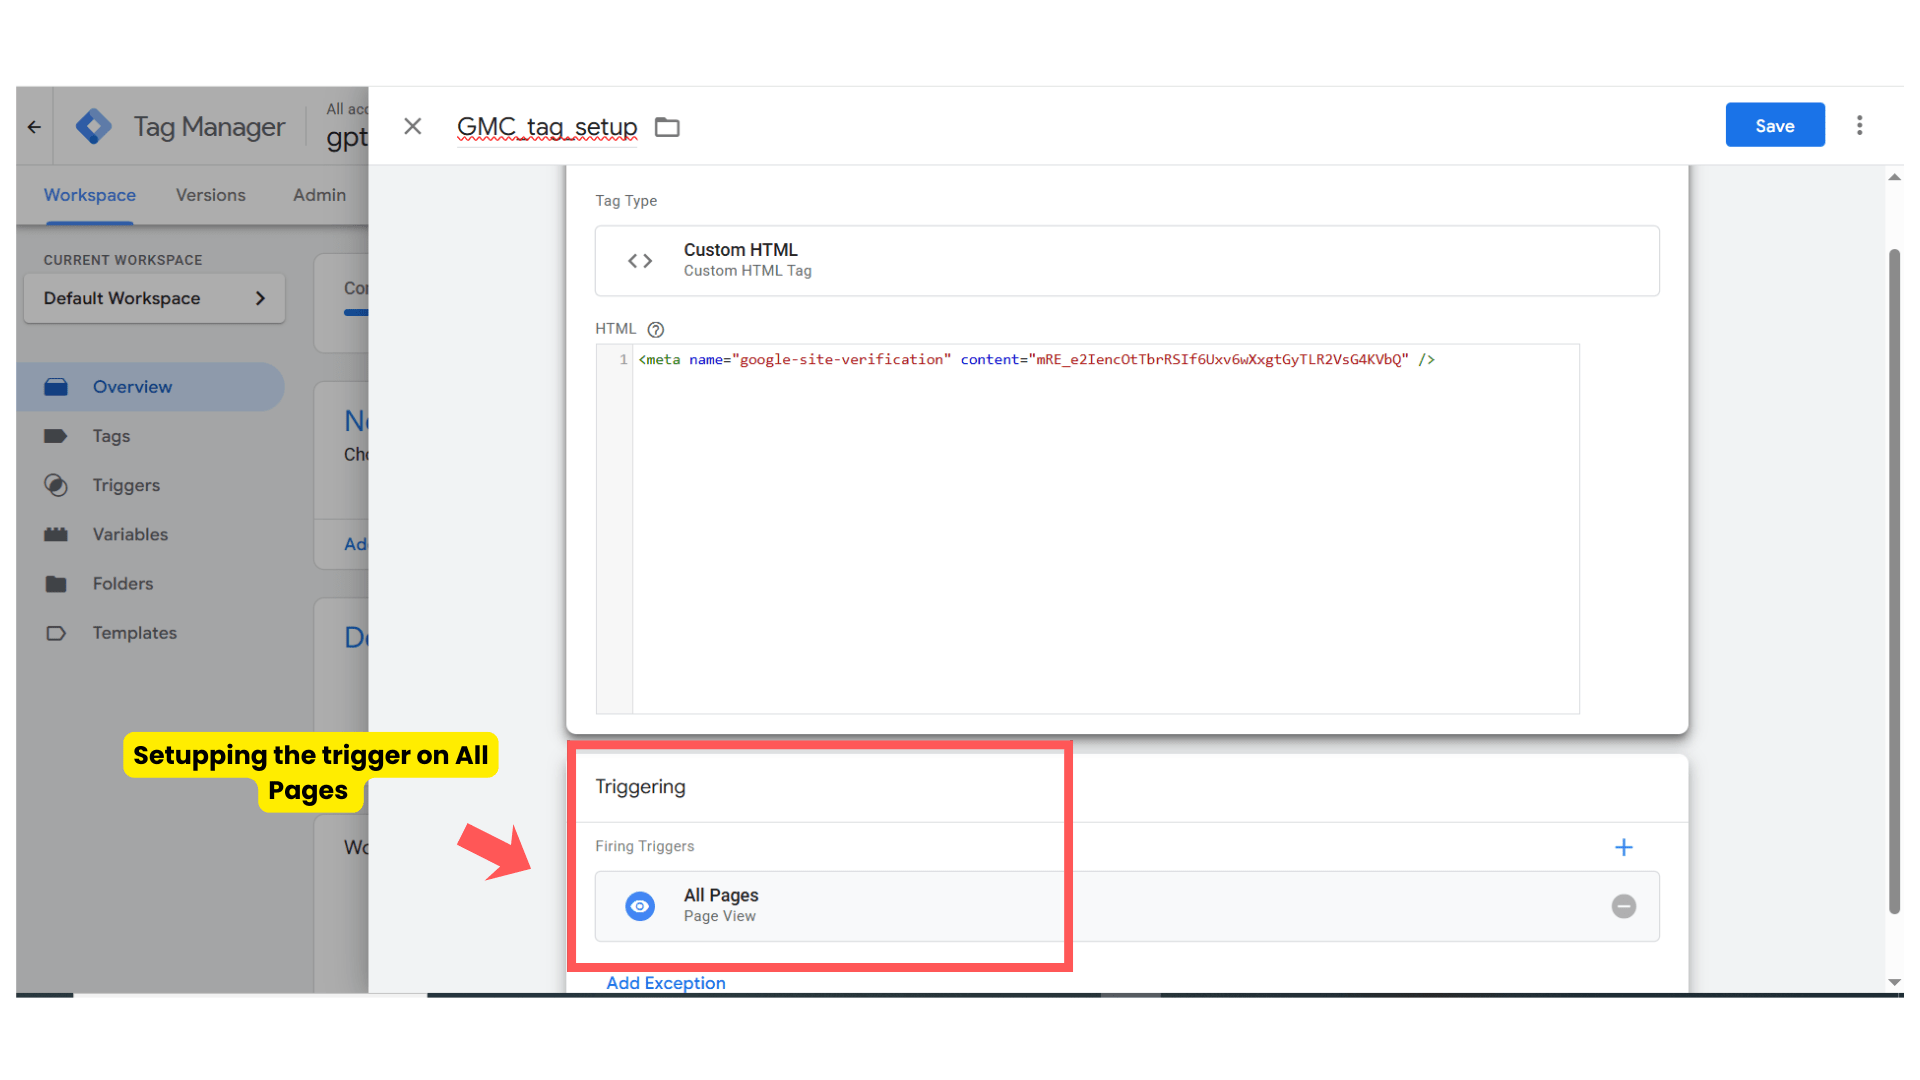
-
Then click on save.
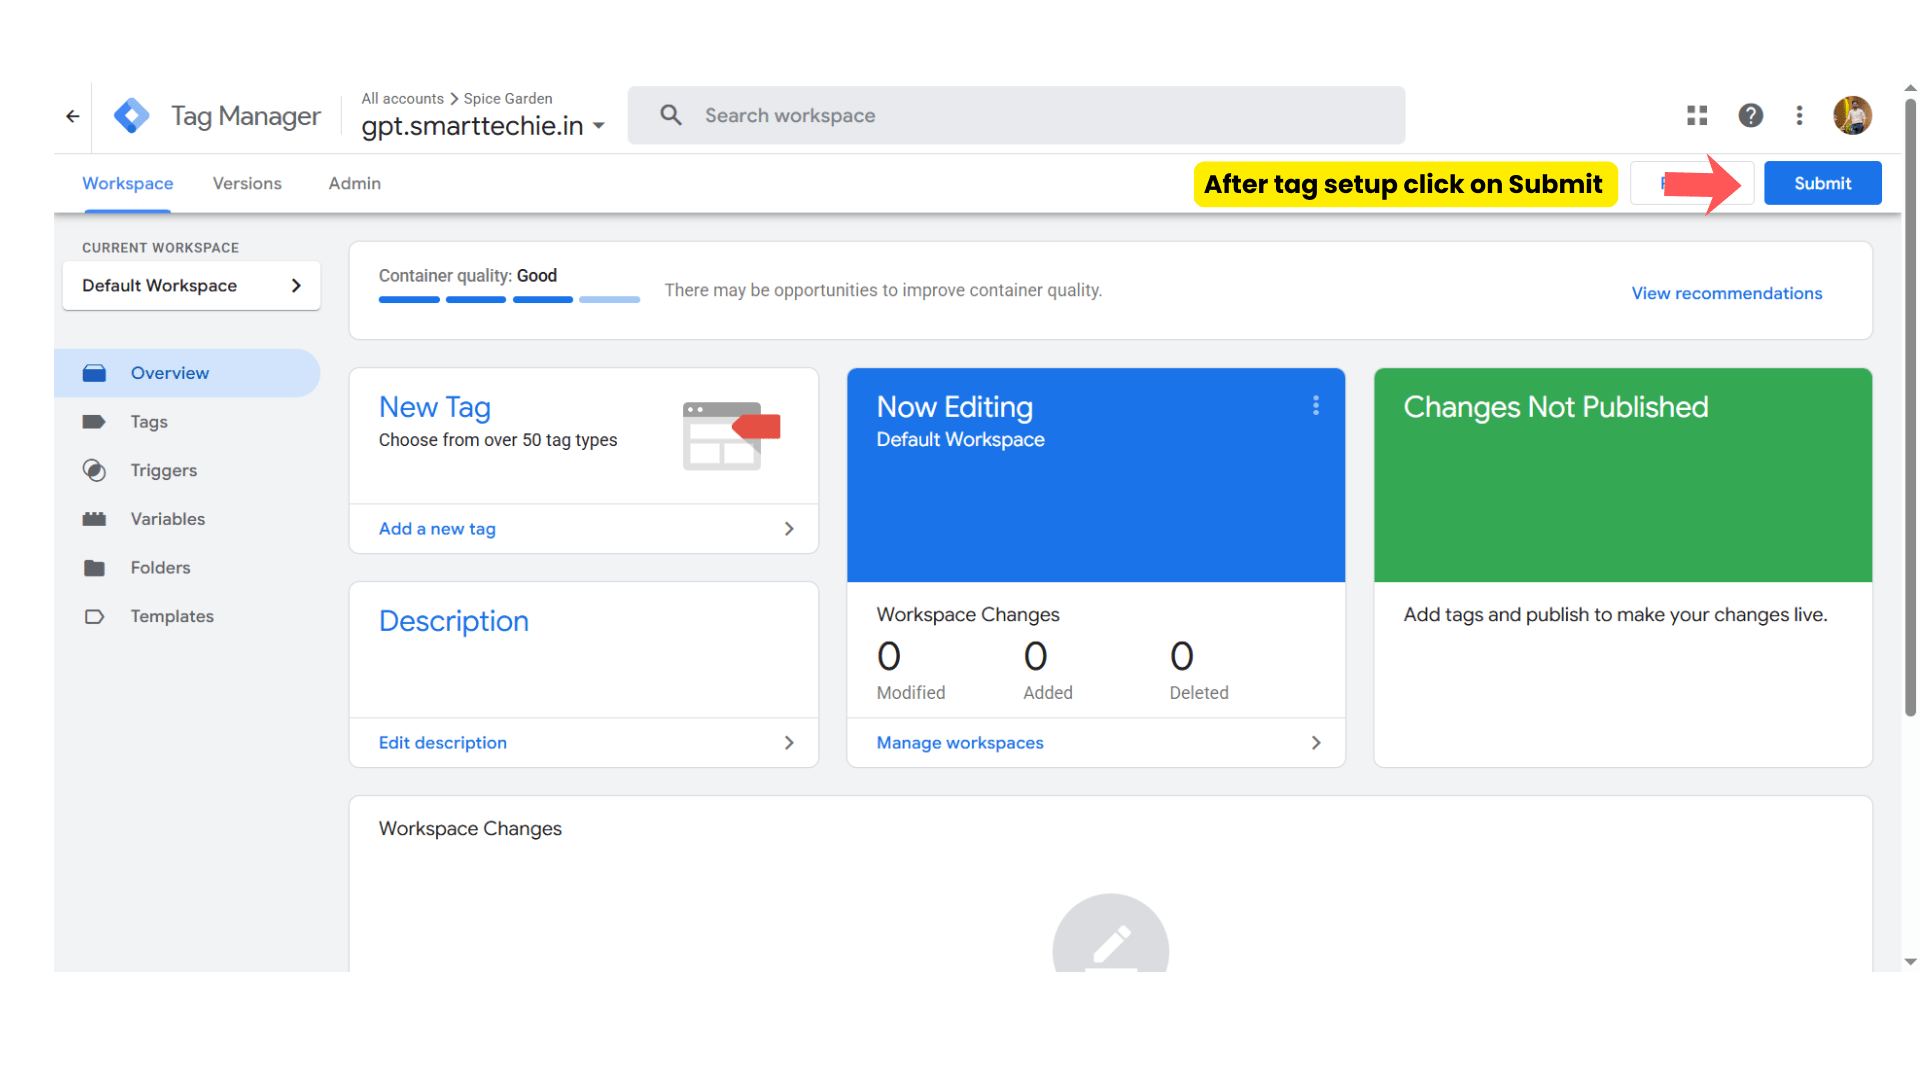
-
Click on Submit
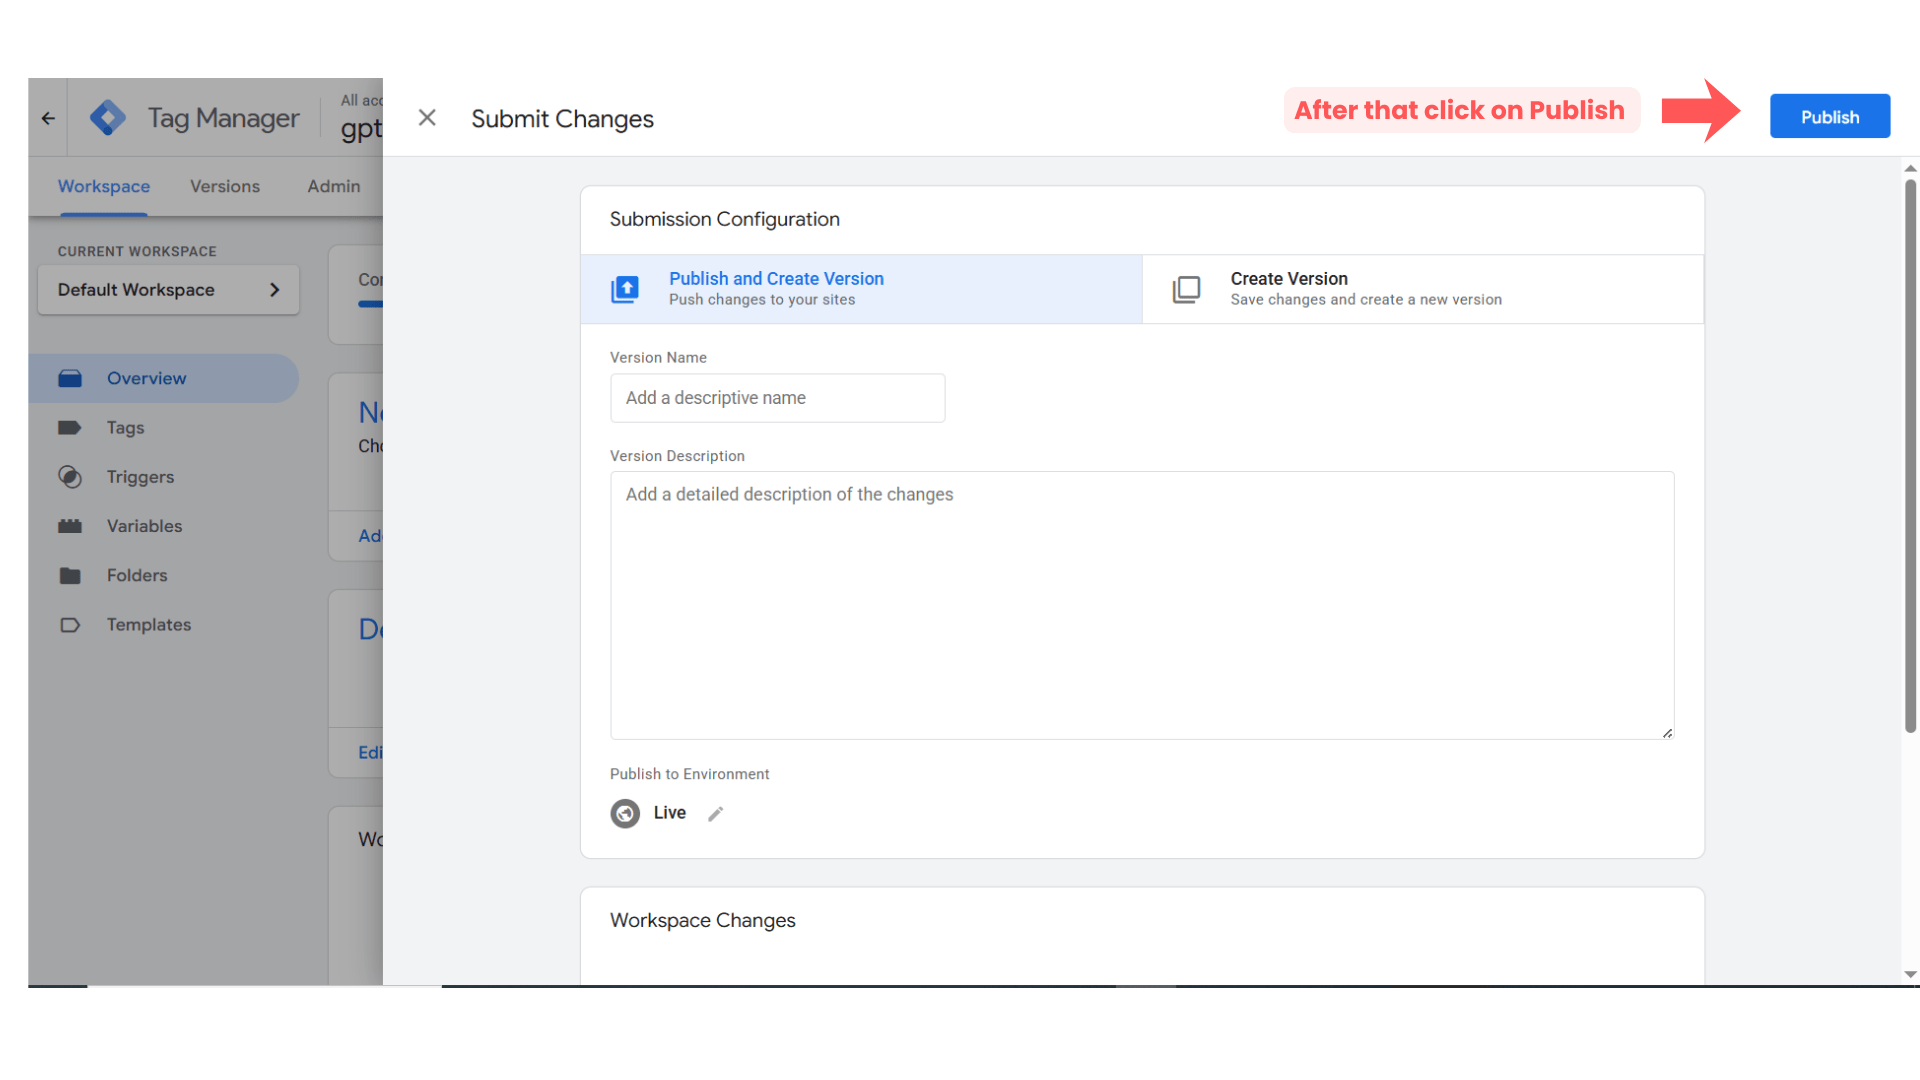
- After that click on Publish
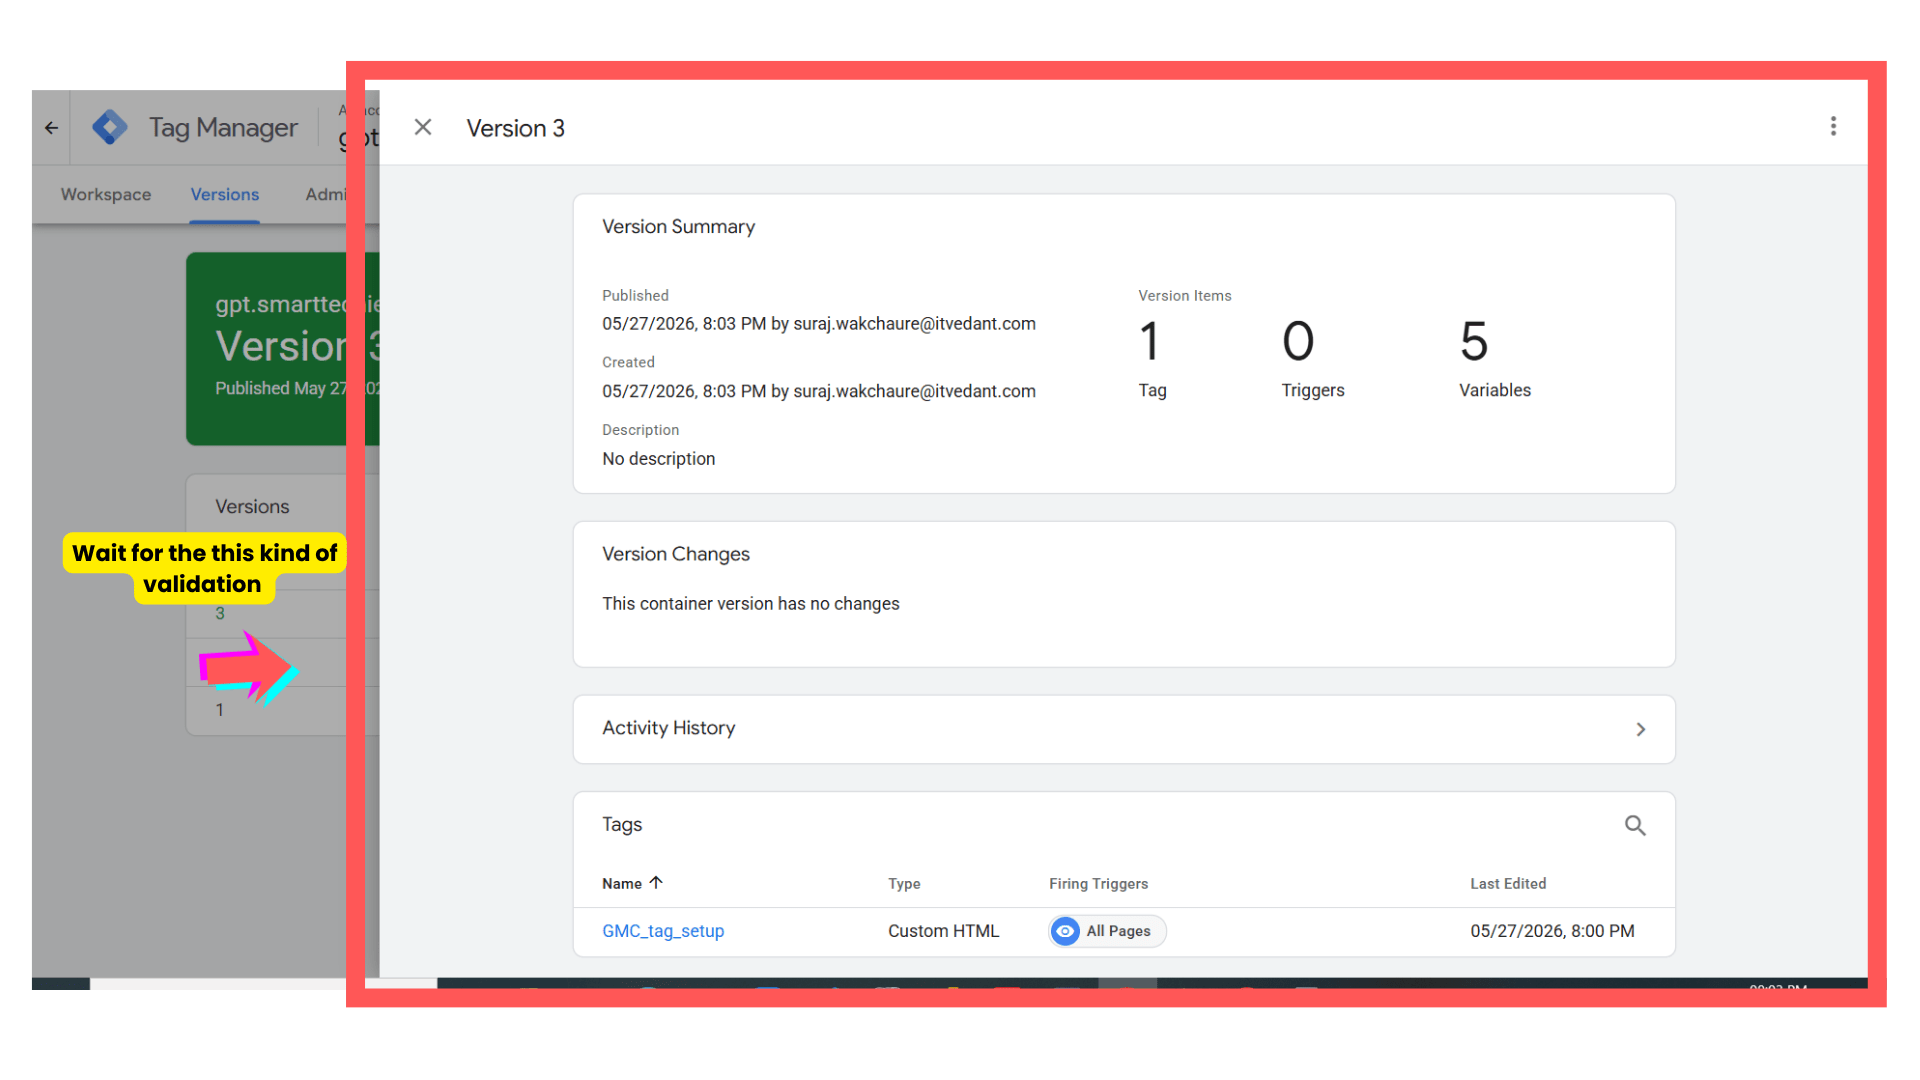
- Wait for above kind of validation then come back to GMC Dashboard.
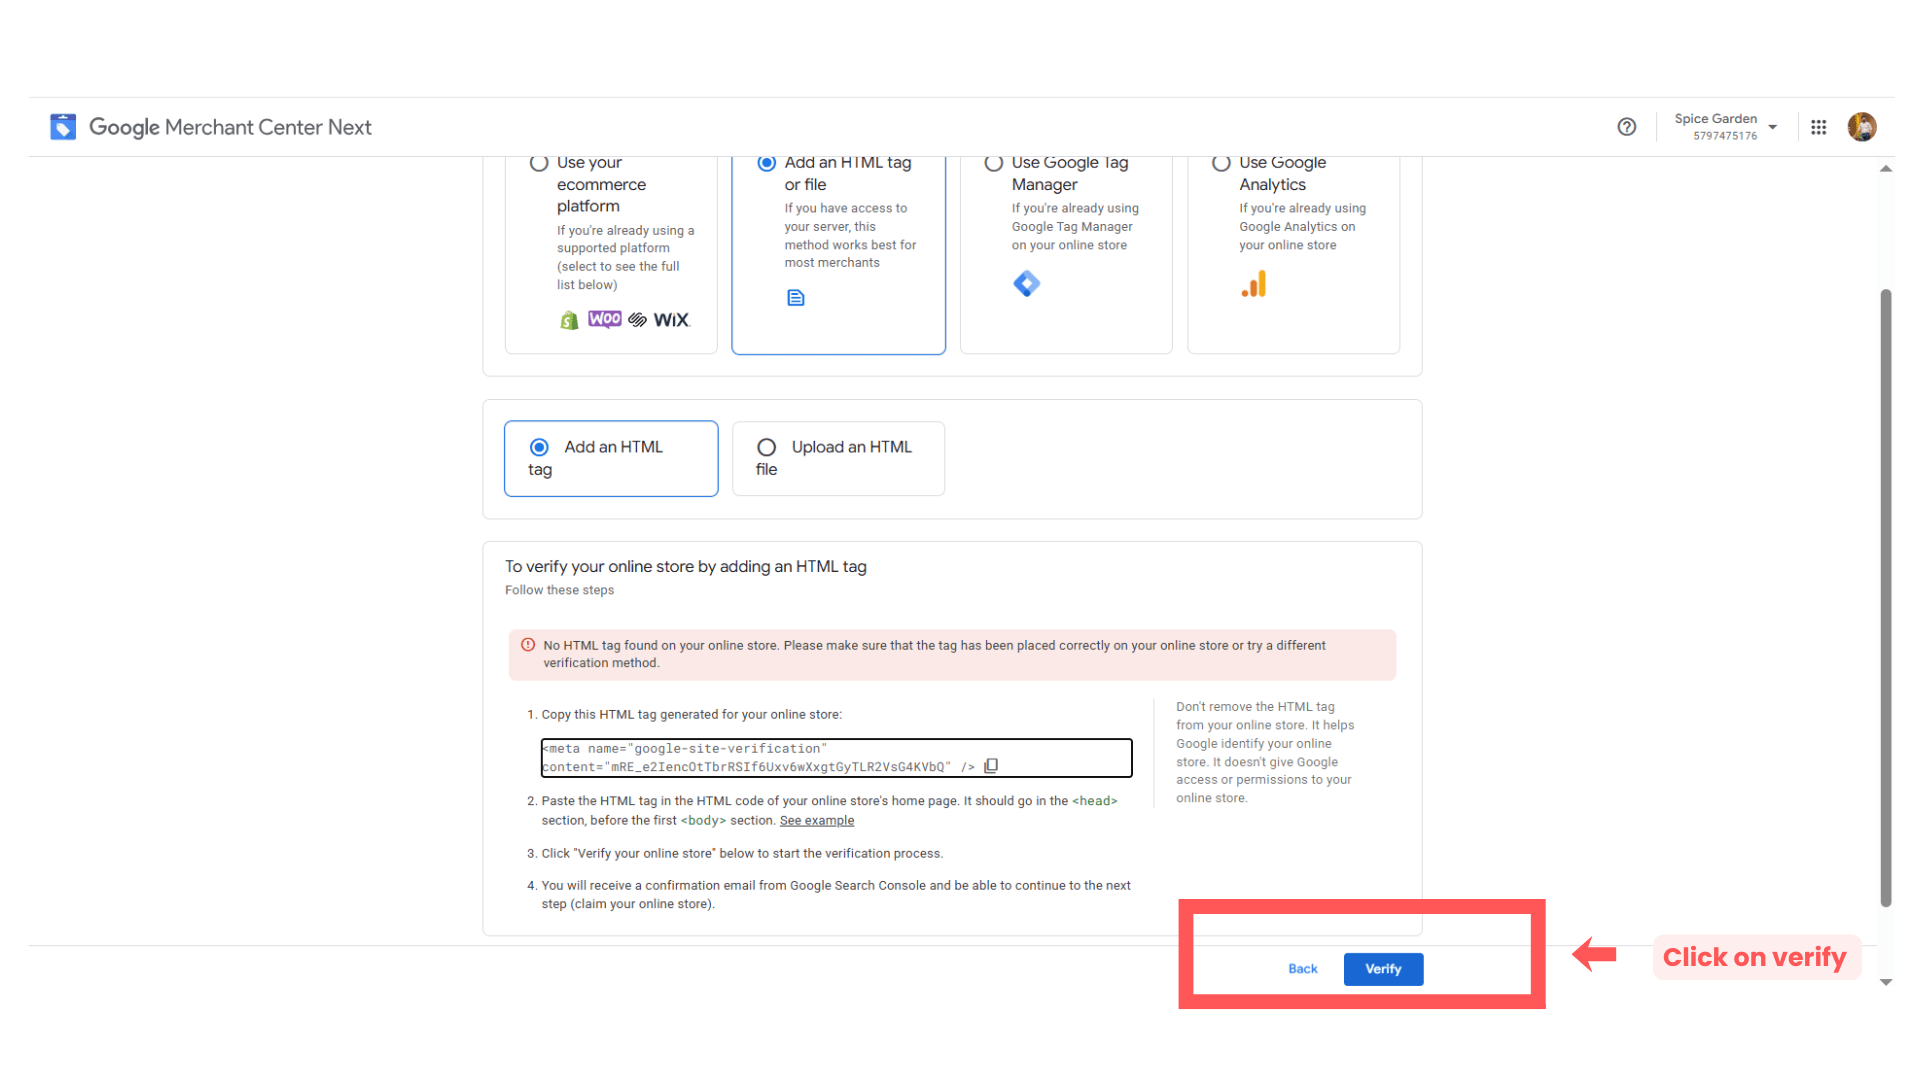
- Then click on verify
- After that successfully will get opened.
Task 3: Create Product Feed
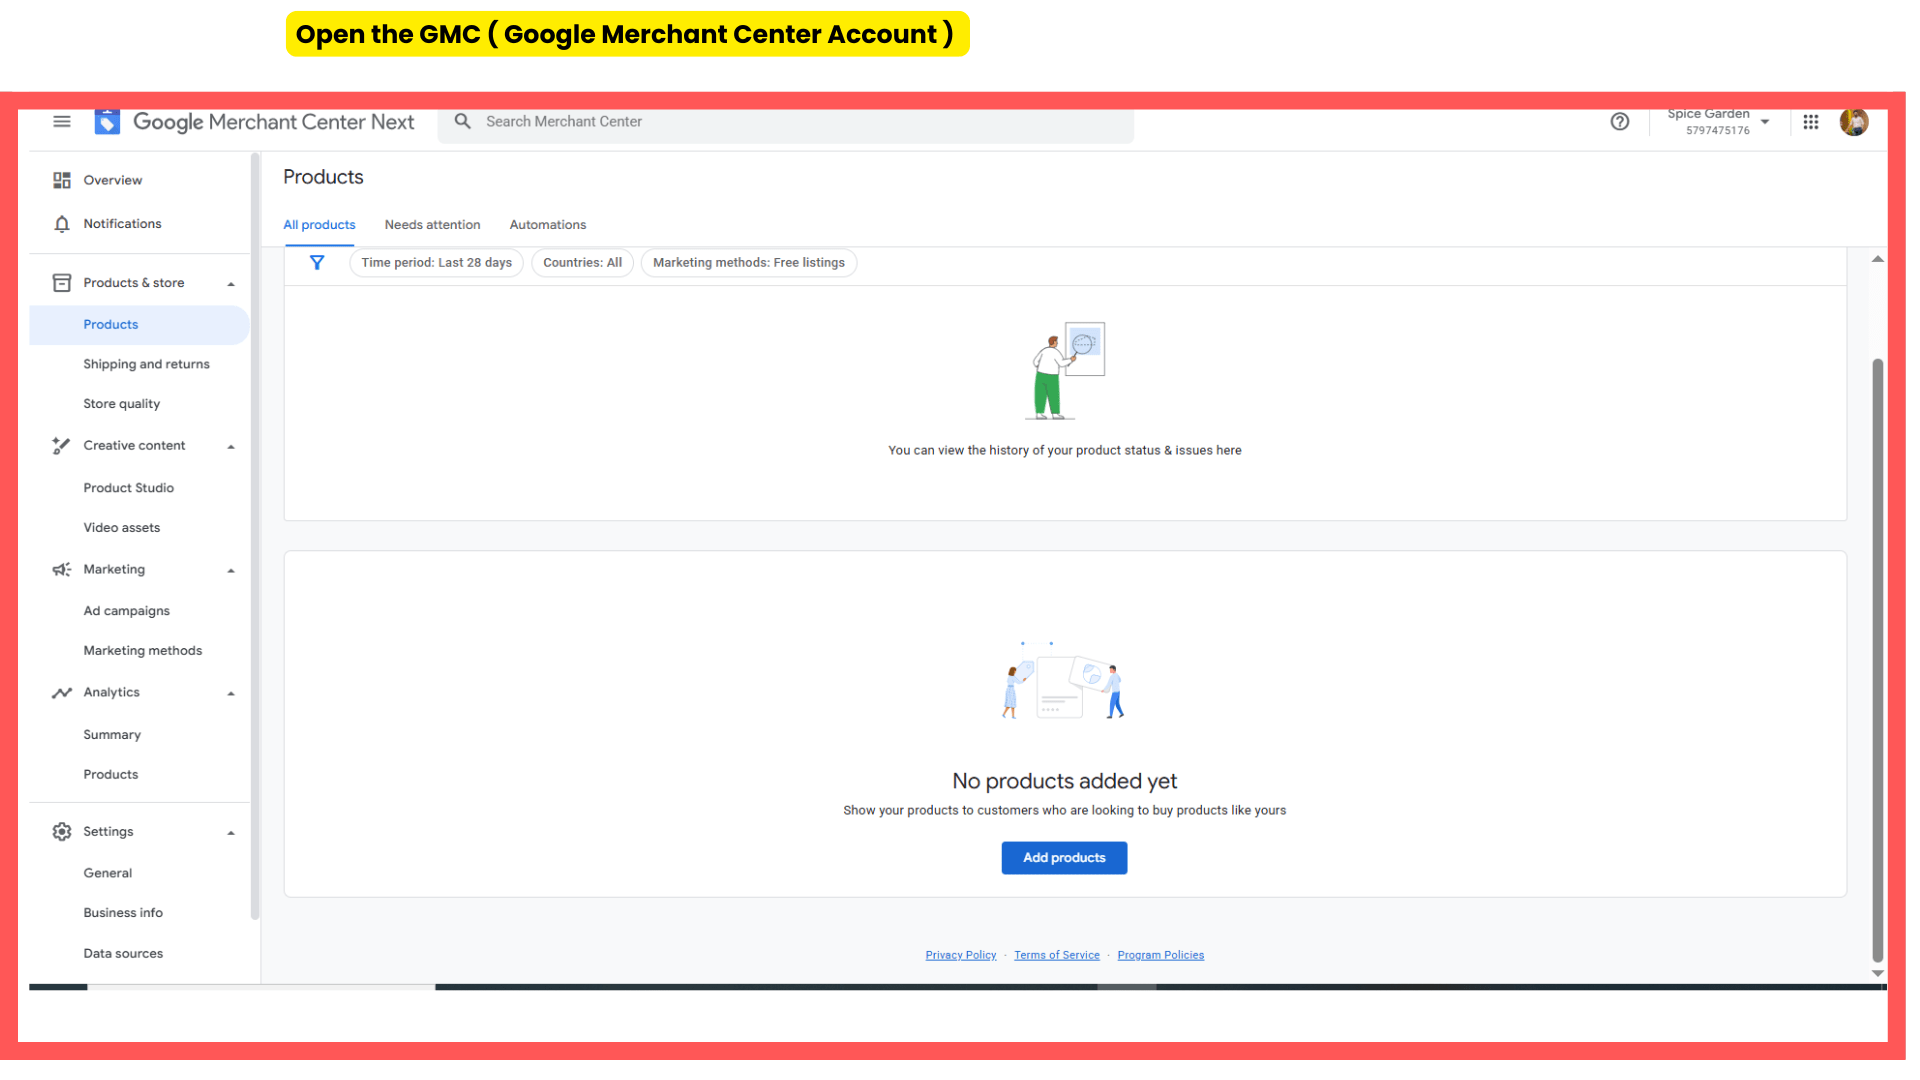
Navigate to Products Section
1
-
From left-side menu, click:
“Products”
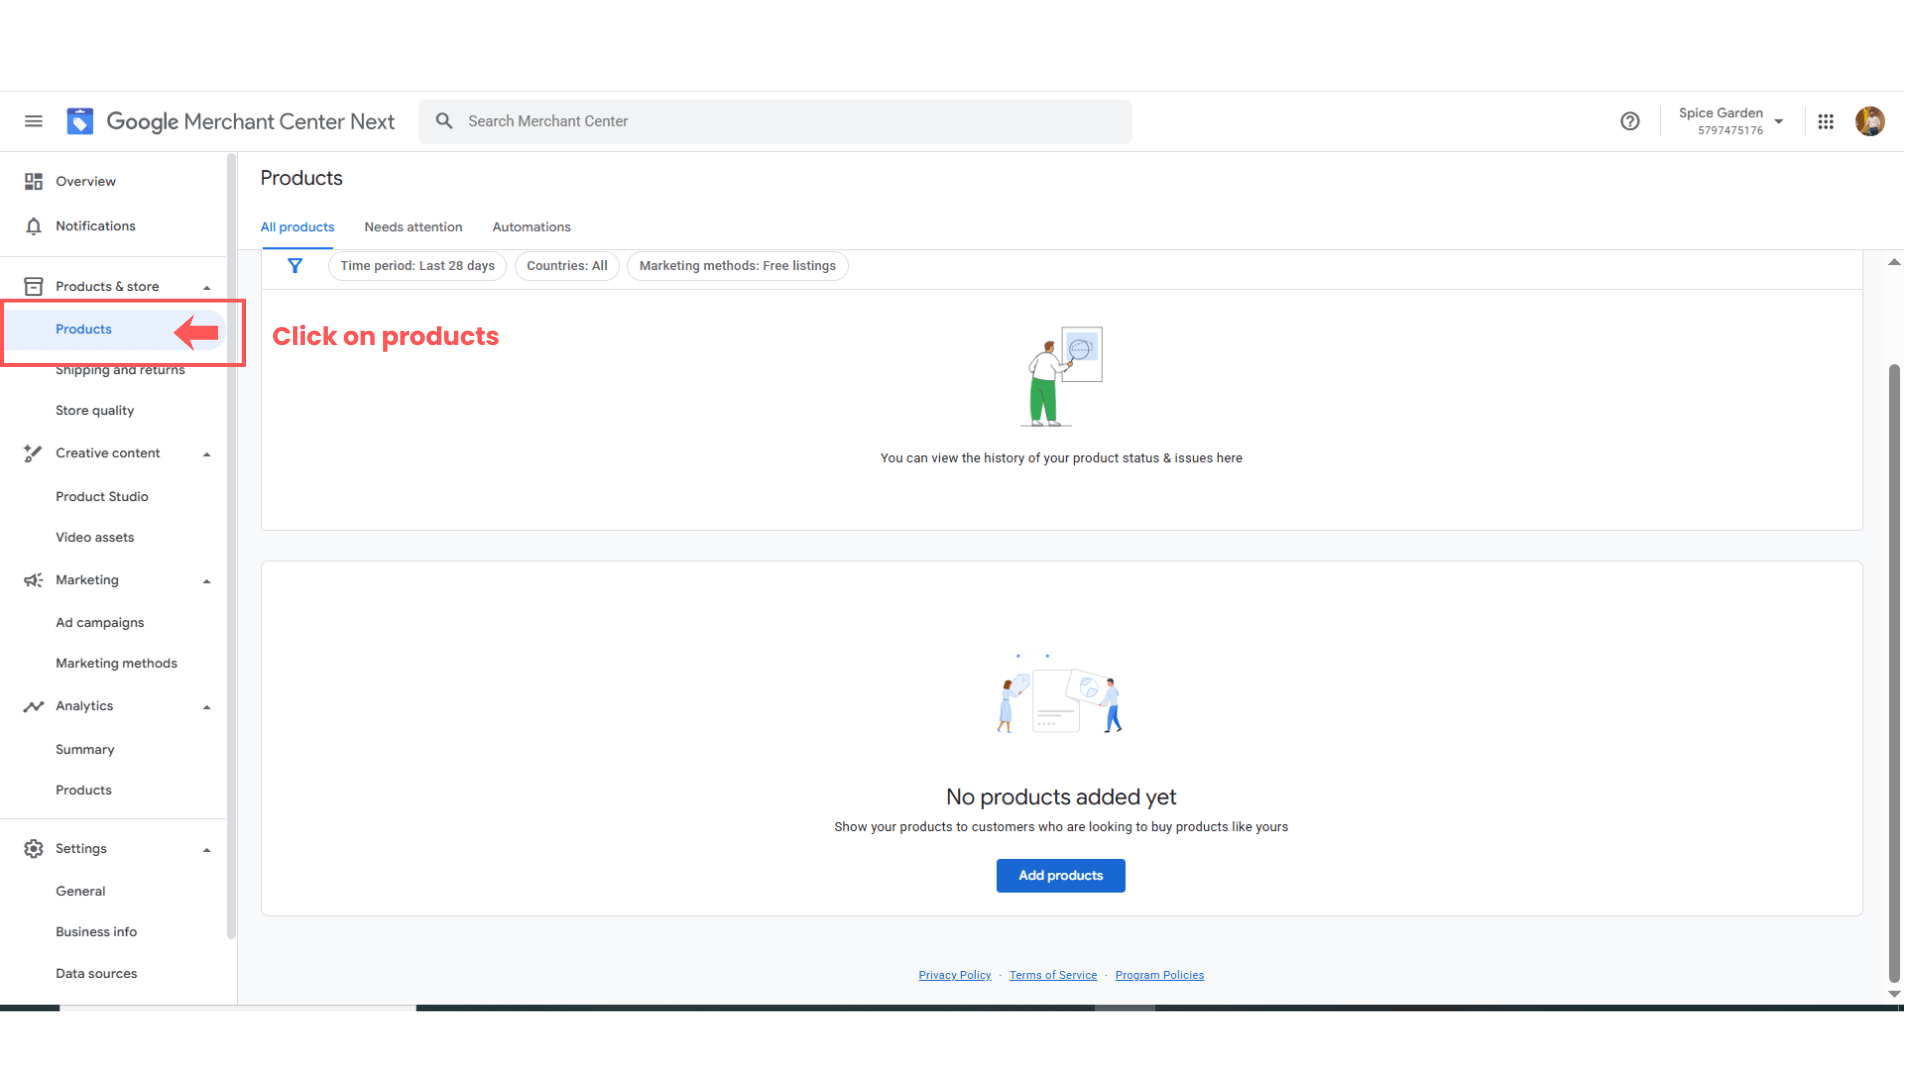
Add New Product Feed
2
-
Click:
“Add Products”

Select Feed Method
3
Choose:
-
Google Sheets
OR -
Manual Upload
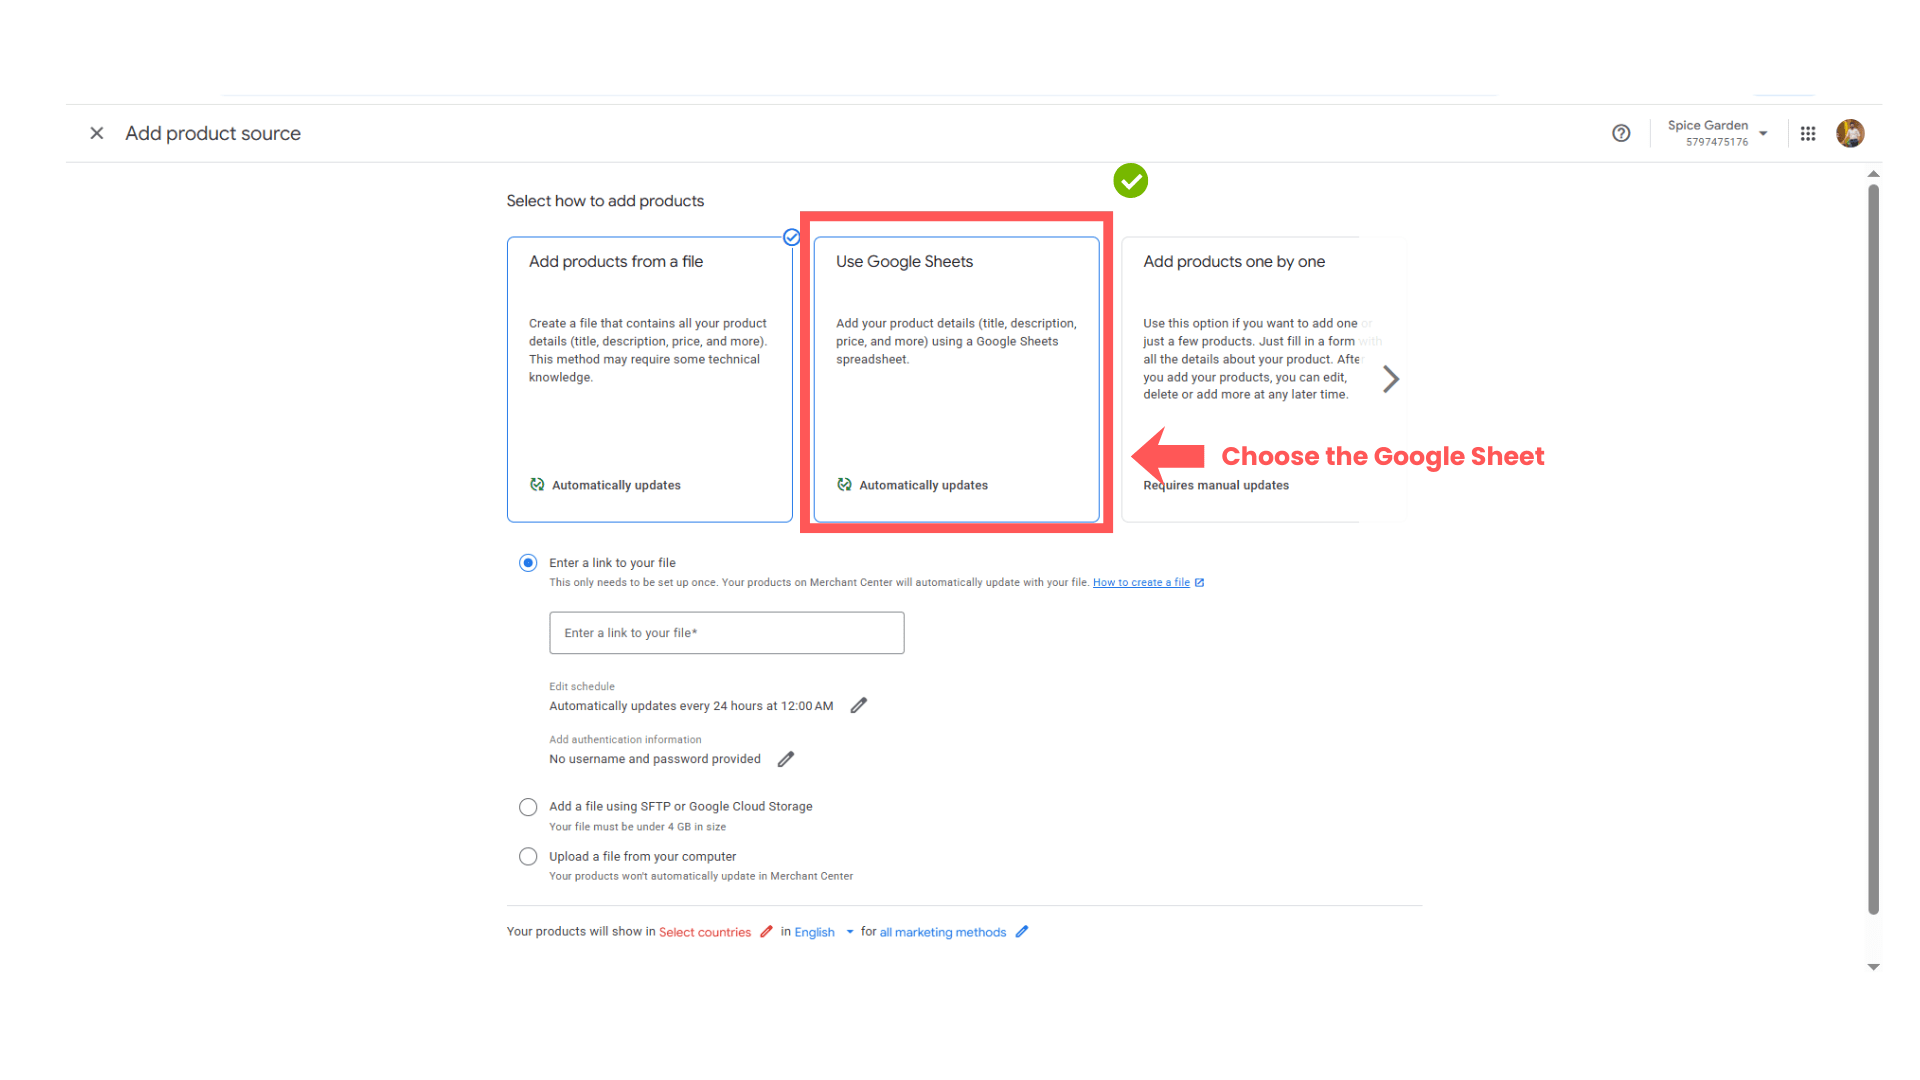
Choose Google sheet option from the list and upload the sheet.
4
Upload Spice Garden Products
5
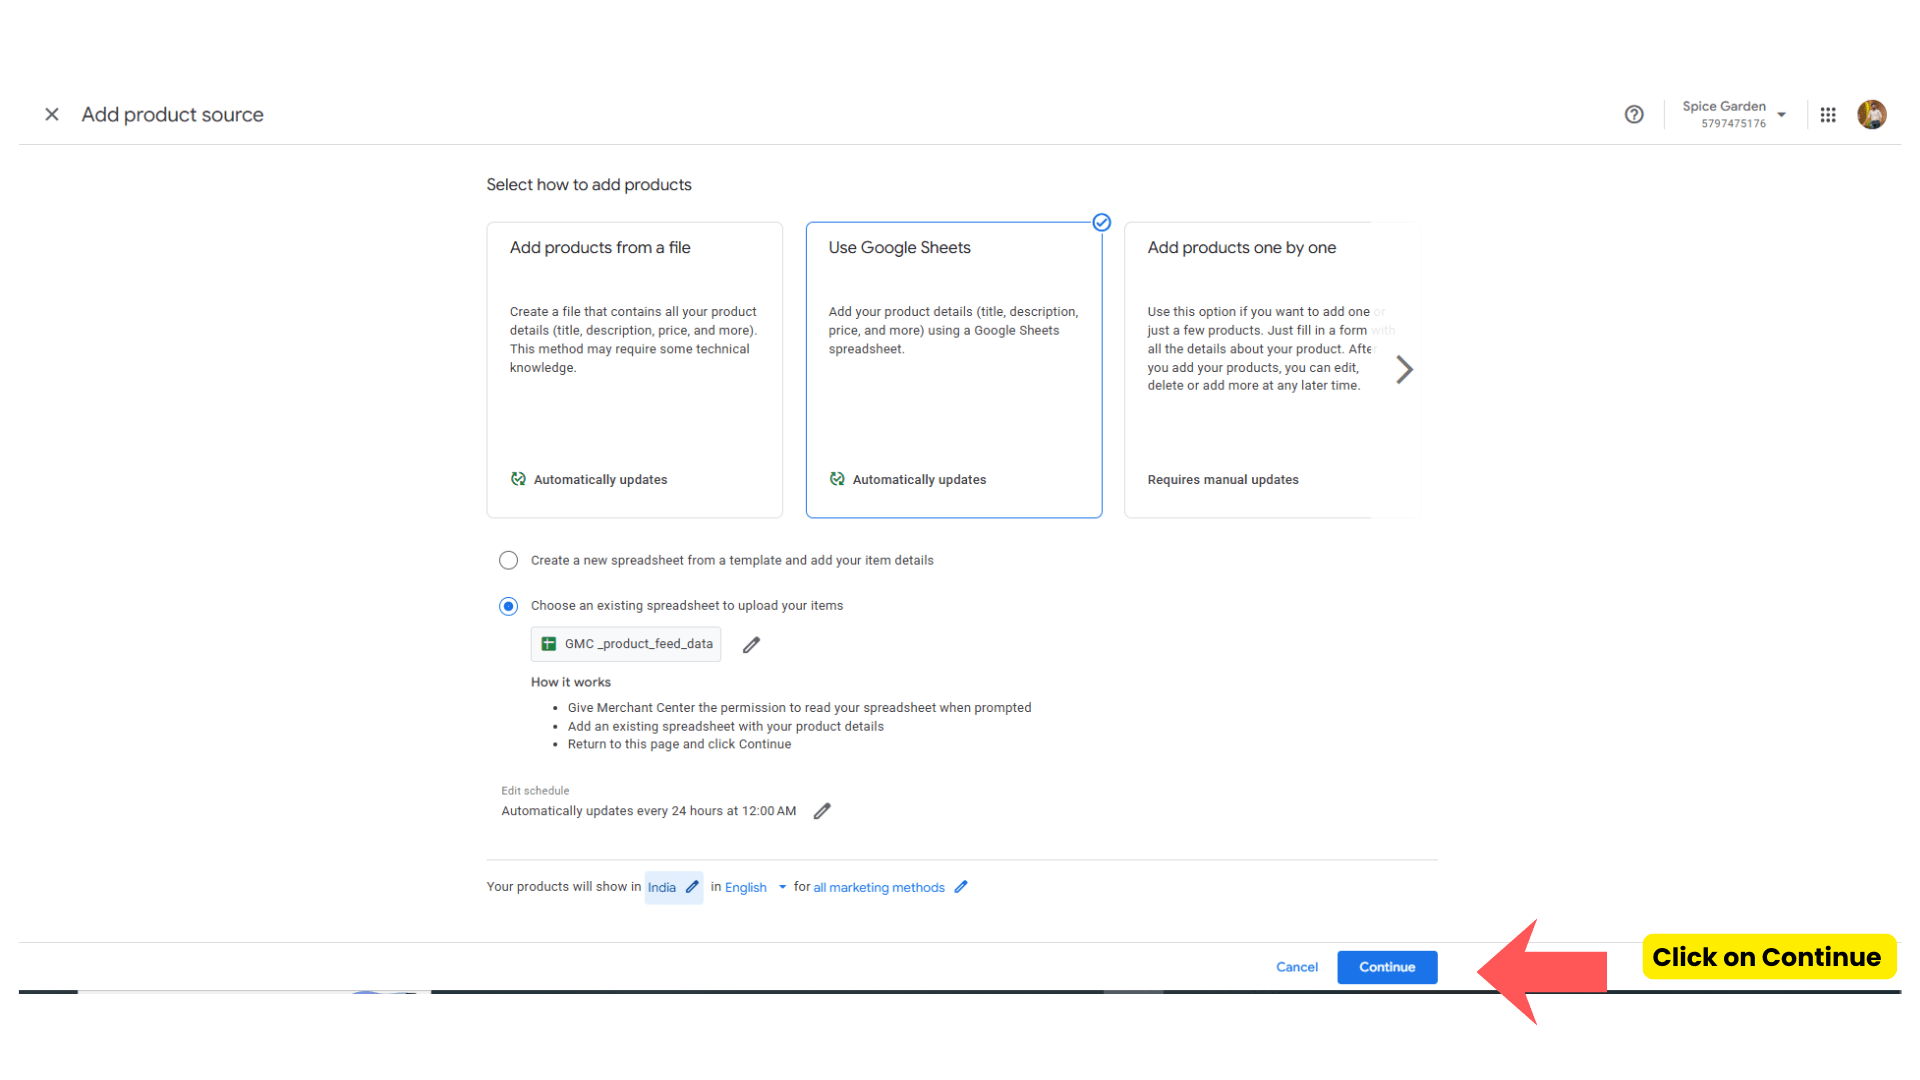
- After uploading the products sheet click on Continue
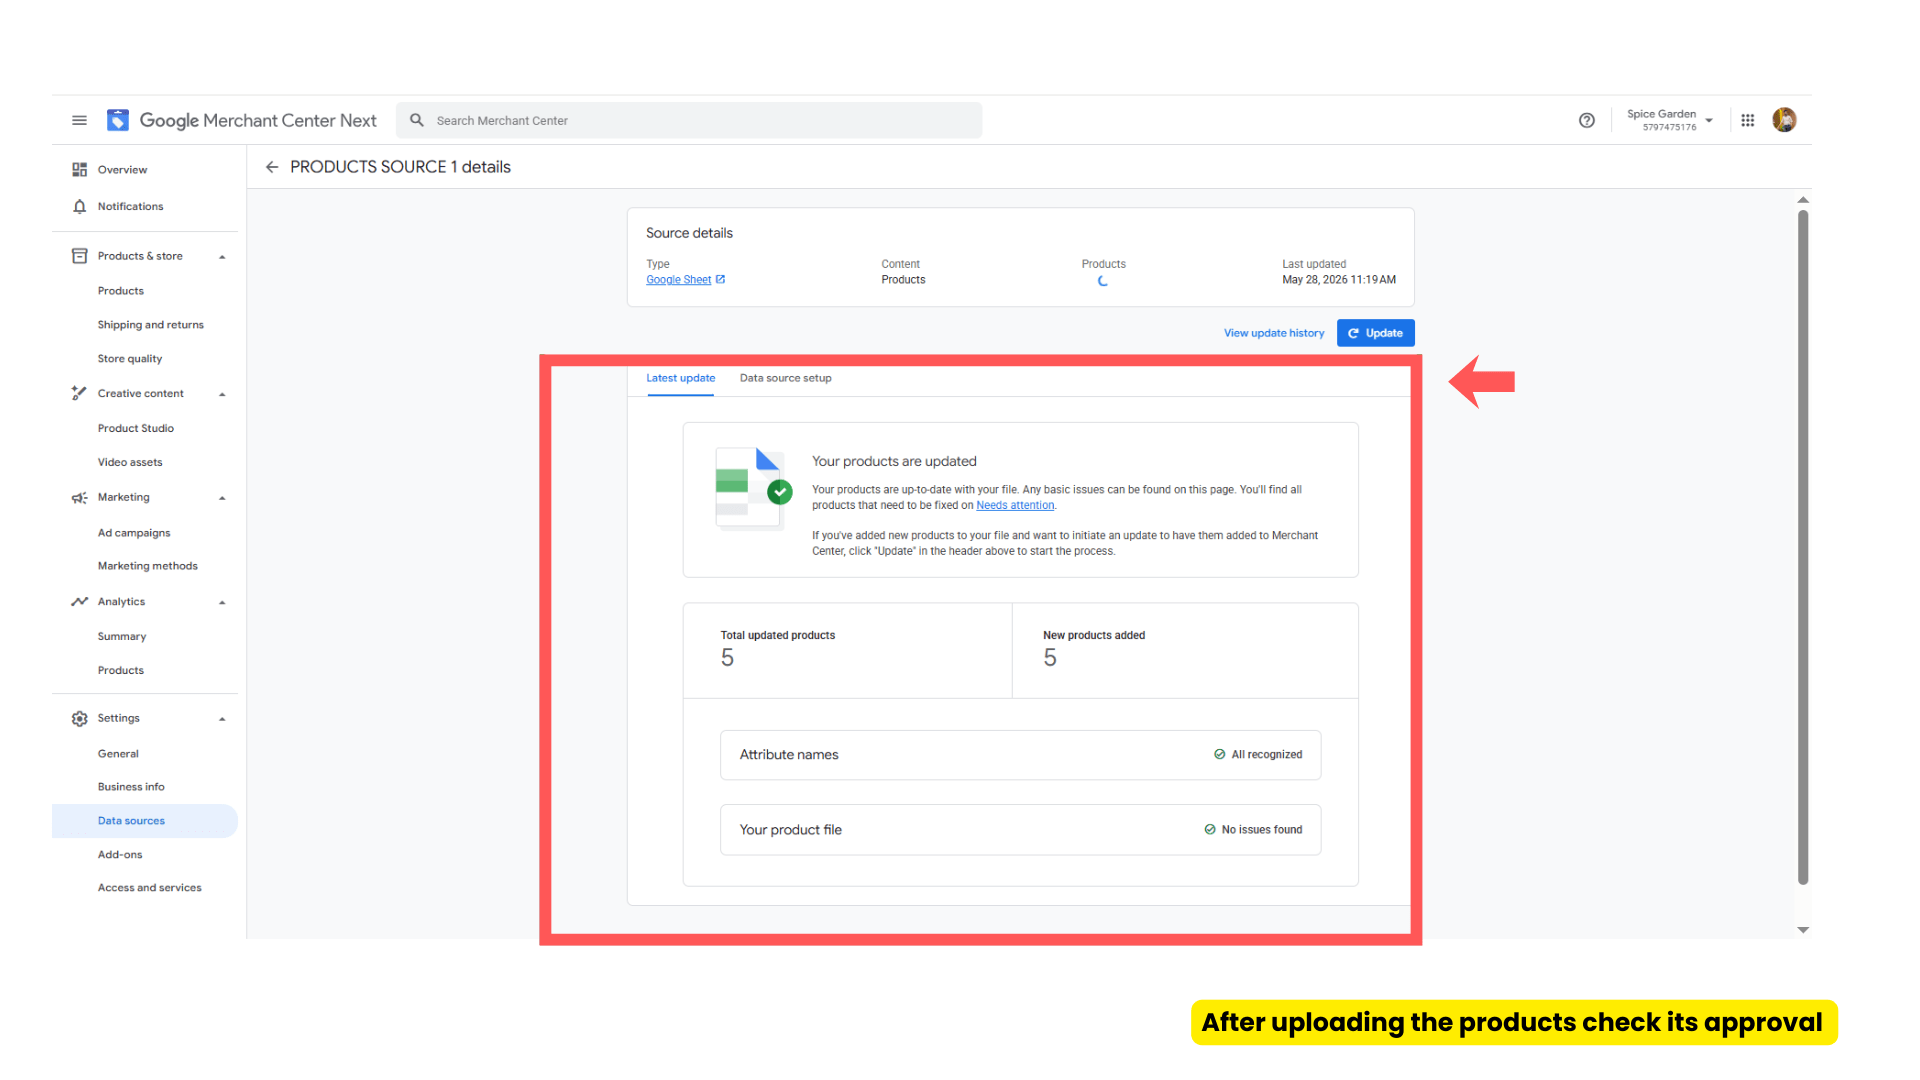
- After uploading the products will get the above kind of dashboard after that check the product approval status.
Task 4: Link GMC with Google Ads
Open Linked Accounts in Google Ads
1
Navigate to:
Tool → Data Manager →
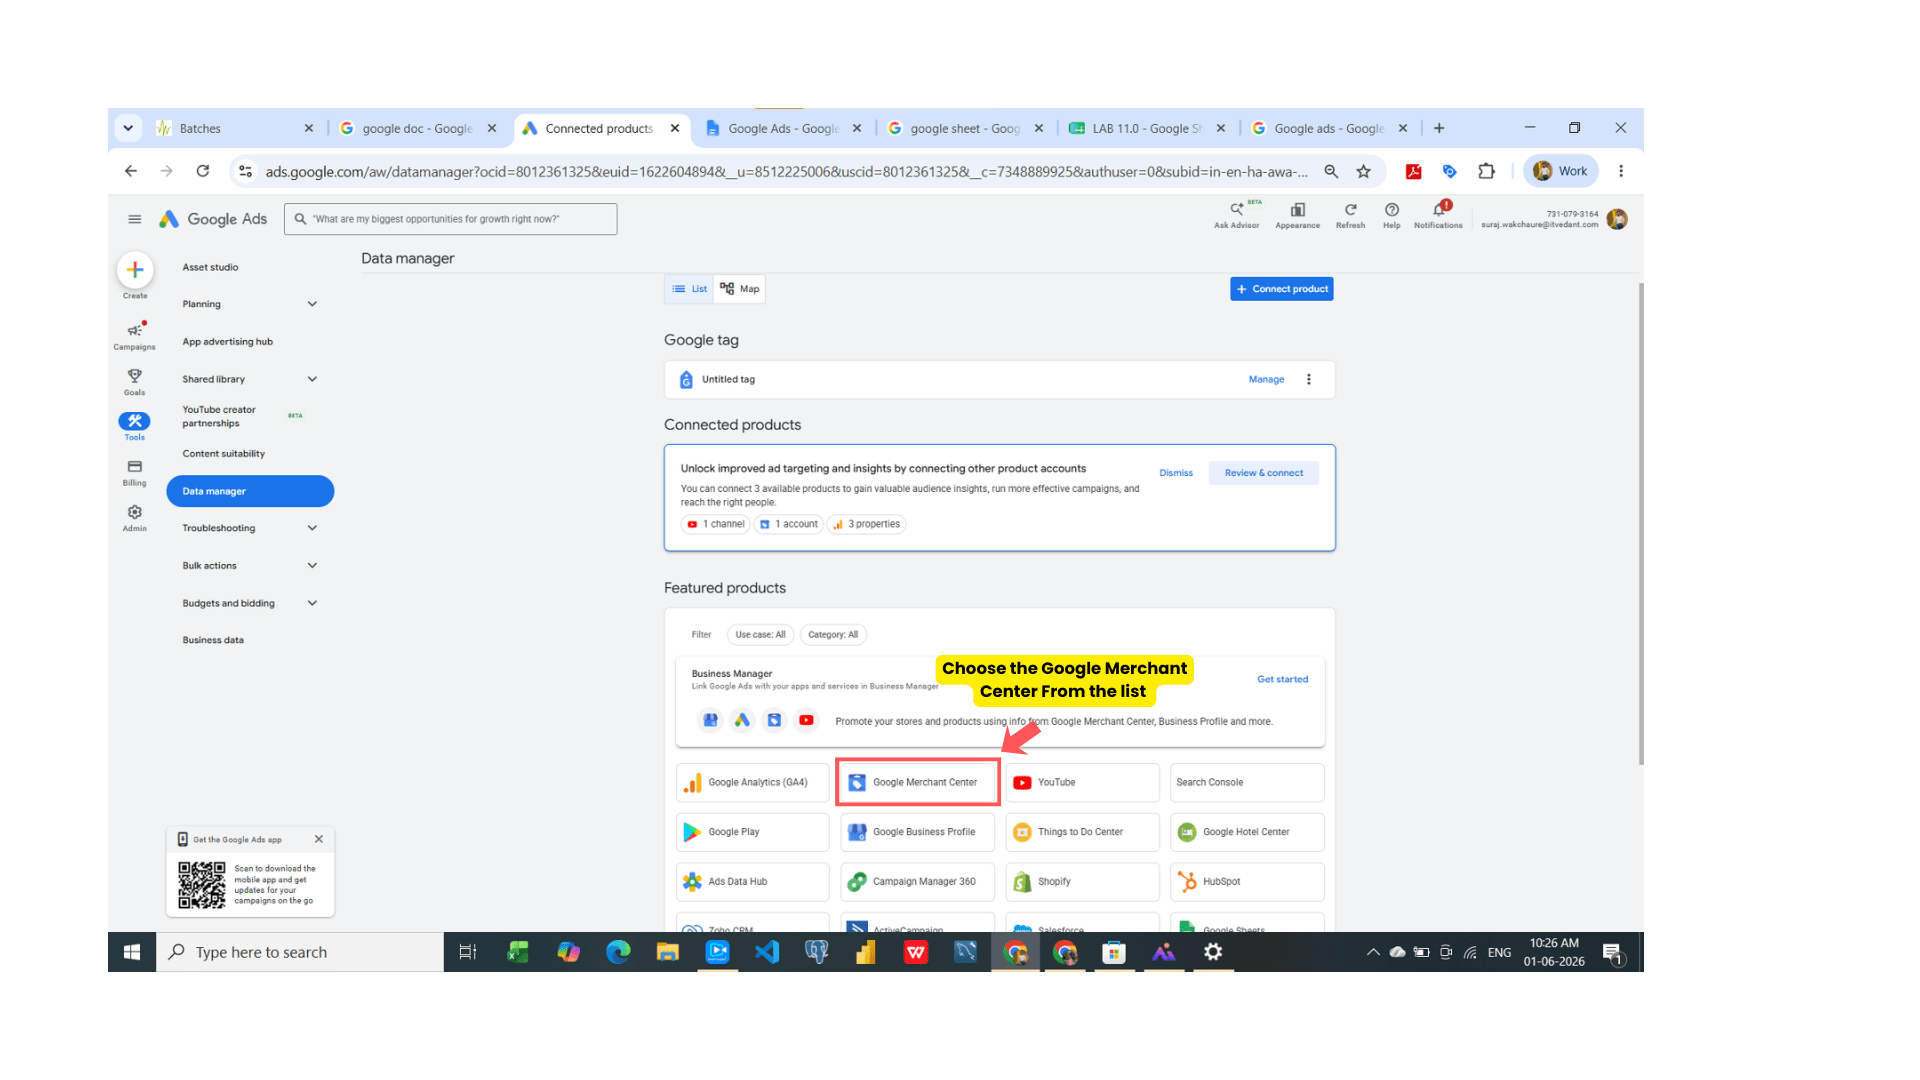
- Choose Google Merchant Center from the list
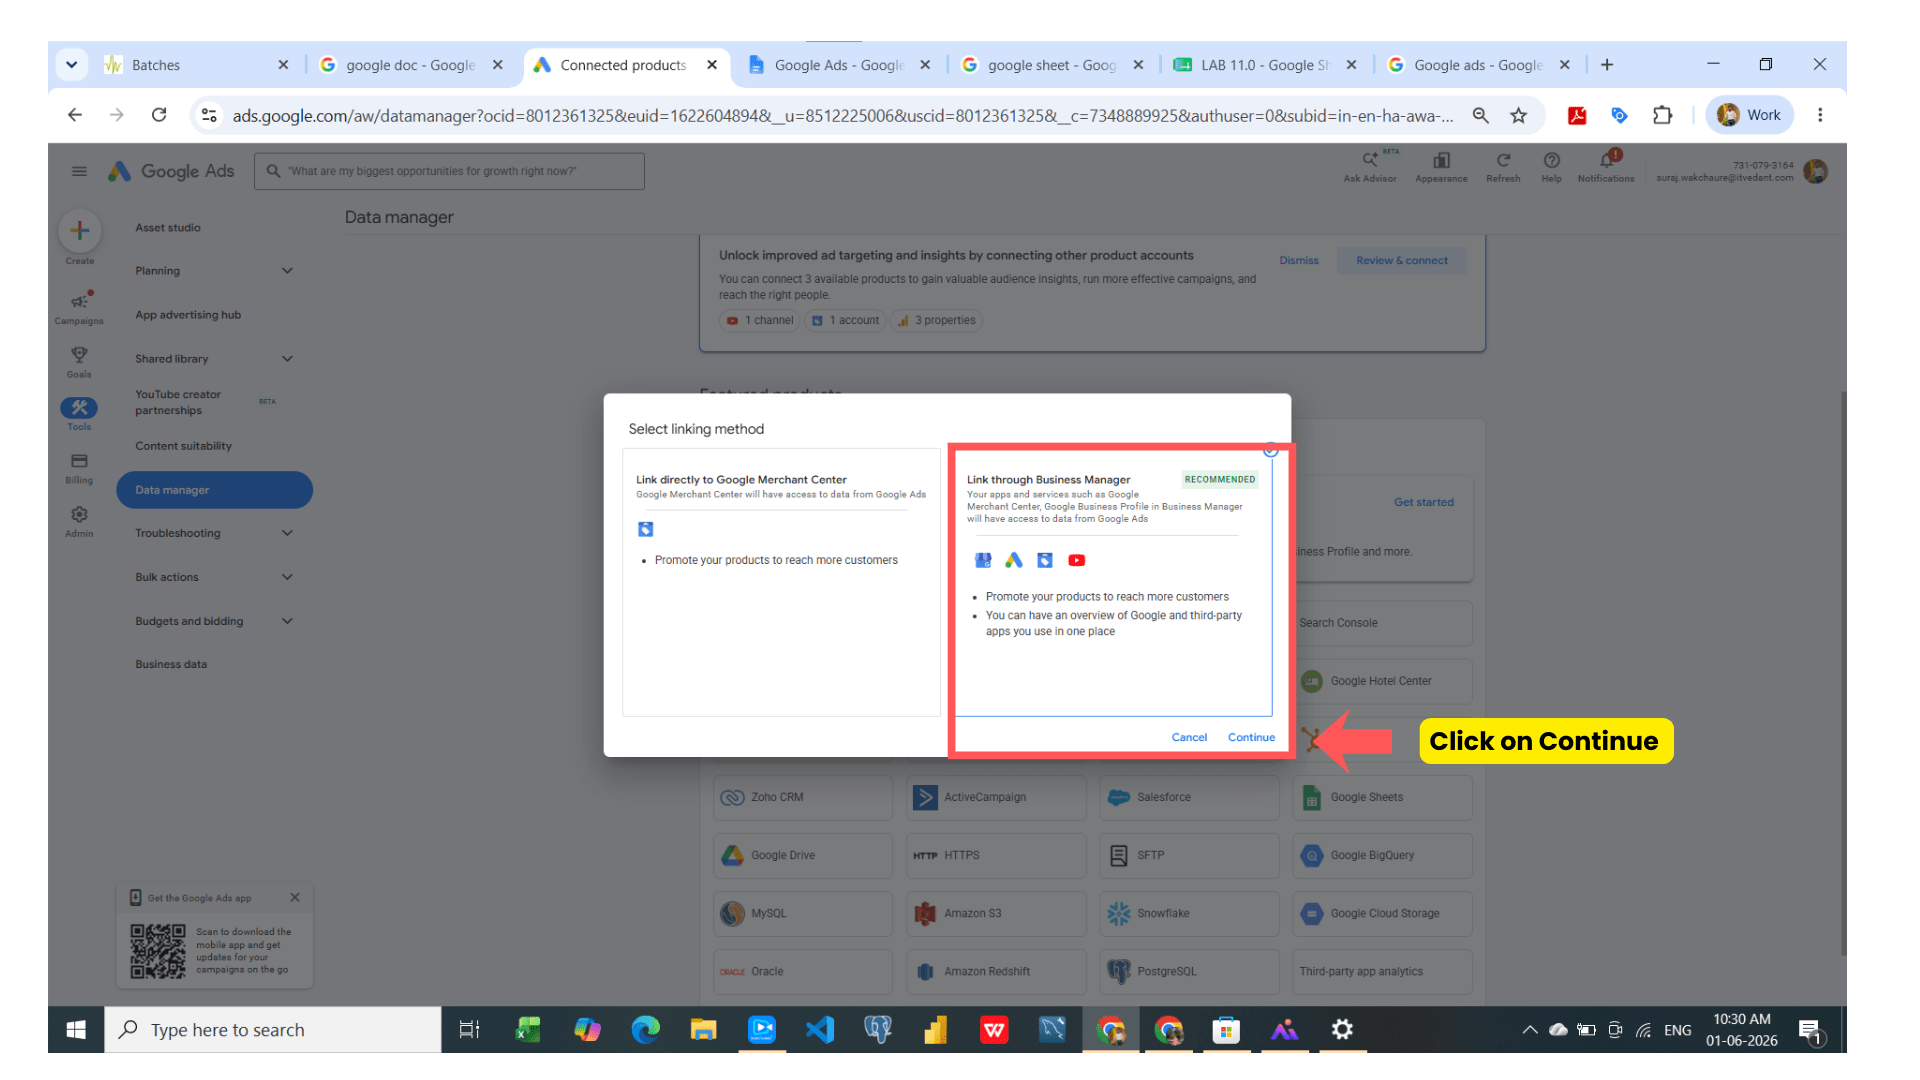
- Choose 2nd option - Link through business Manager and click on continue
-
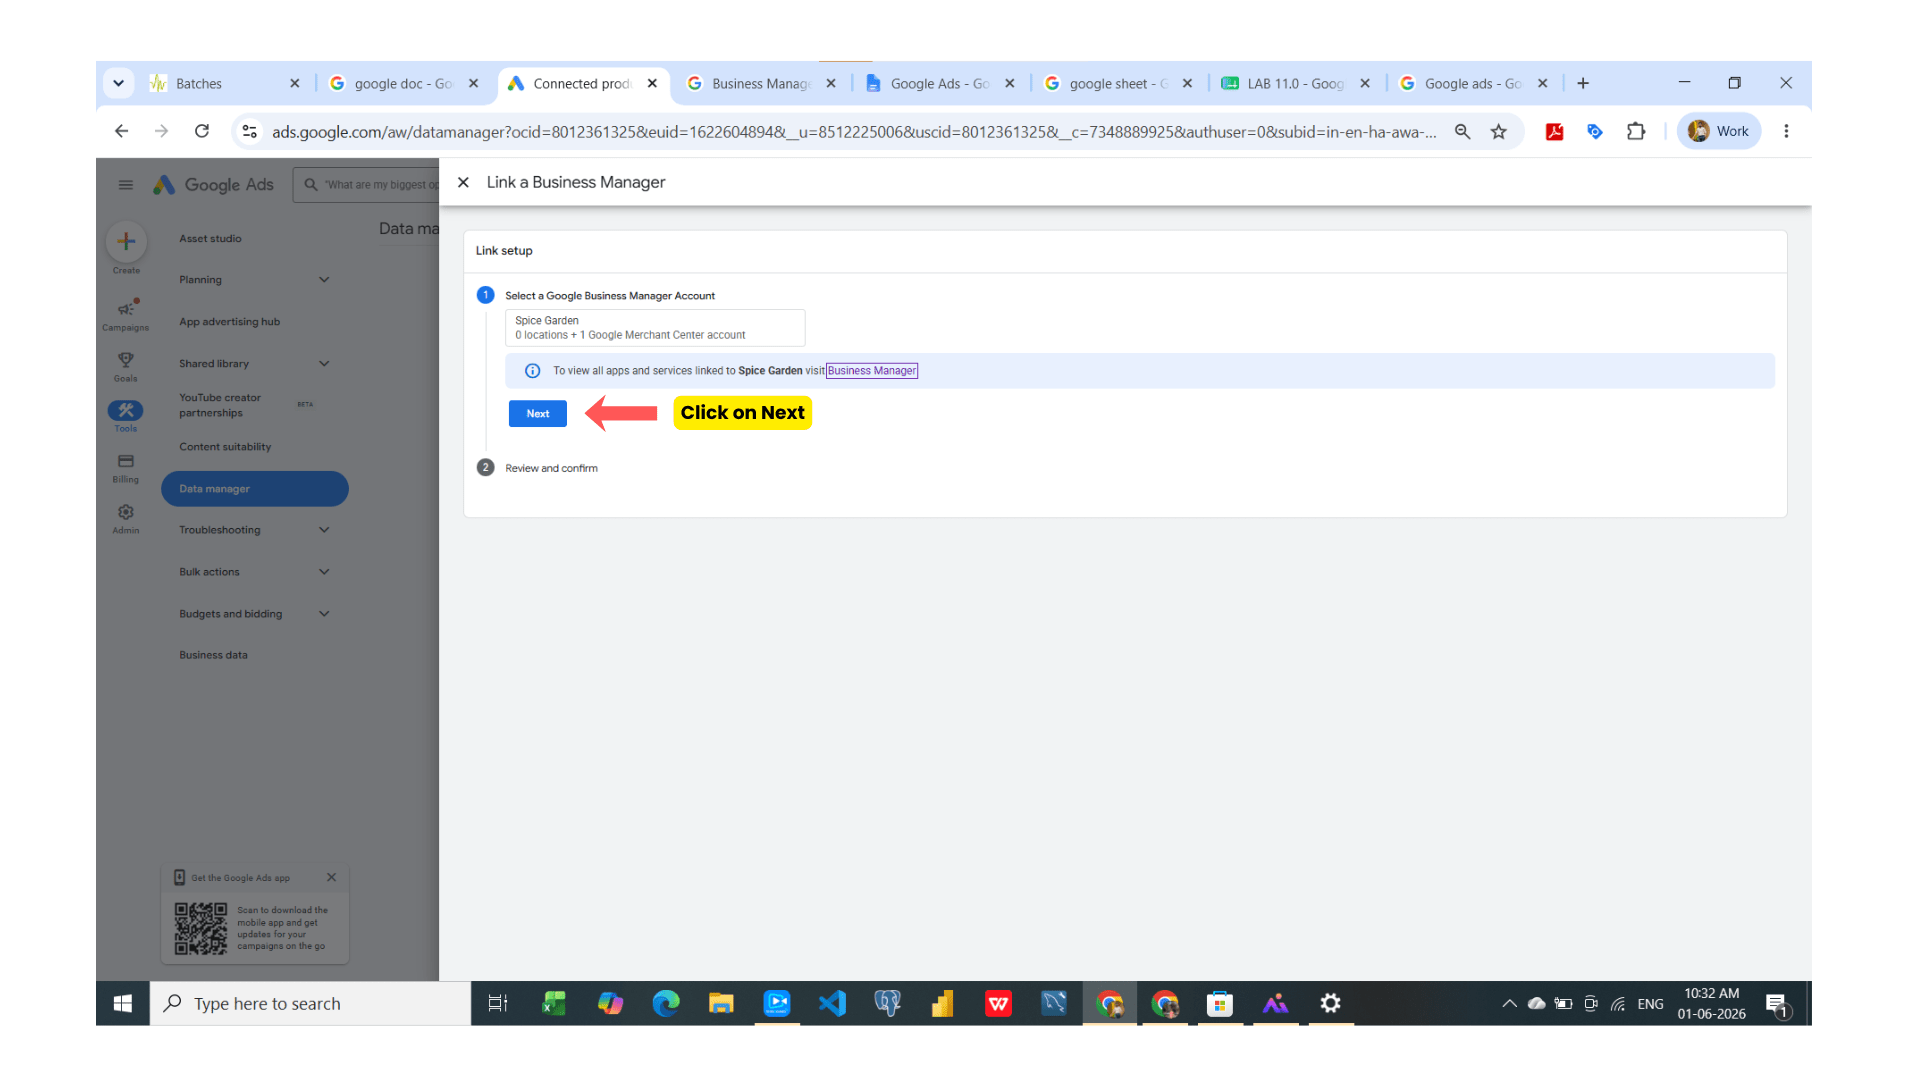
Click on Next
( Imp note - Create all accounts of all google products through same mail so it will be better to fetch all the other google products. As you can see the google merchant had created through same mail so after choosing the ‘Link through Business Manager’ we are getting 1 merchant center account in the list of Business Manager )
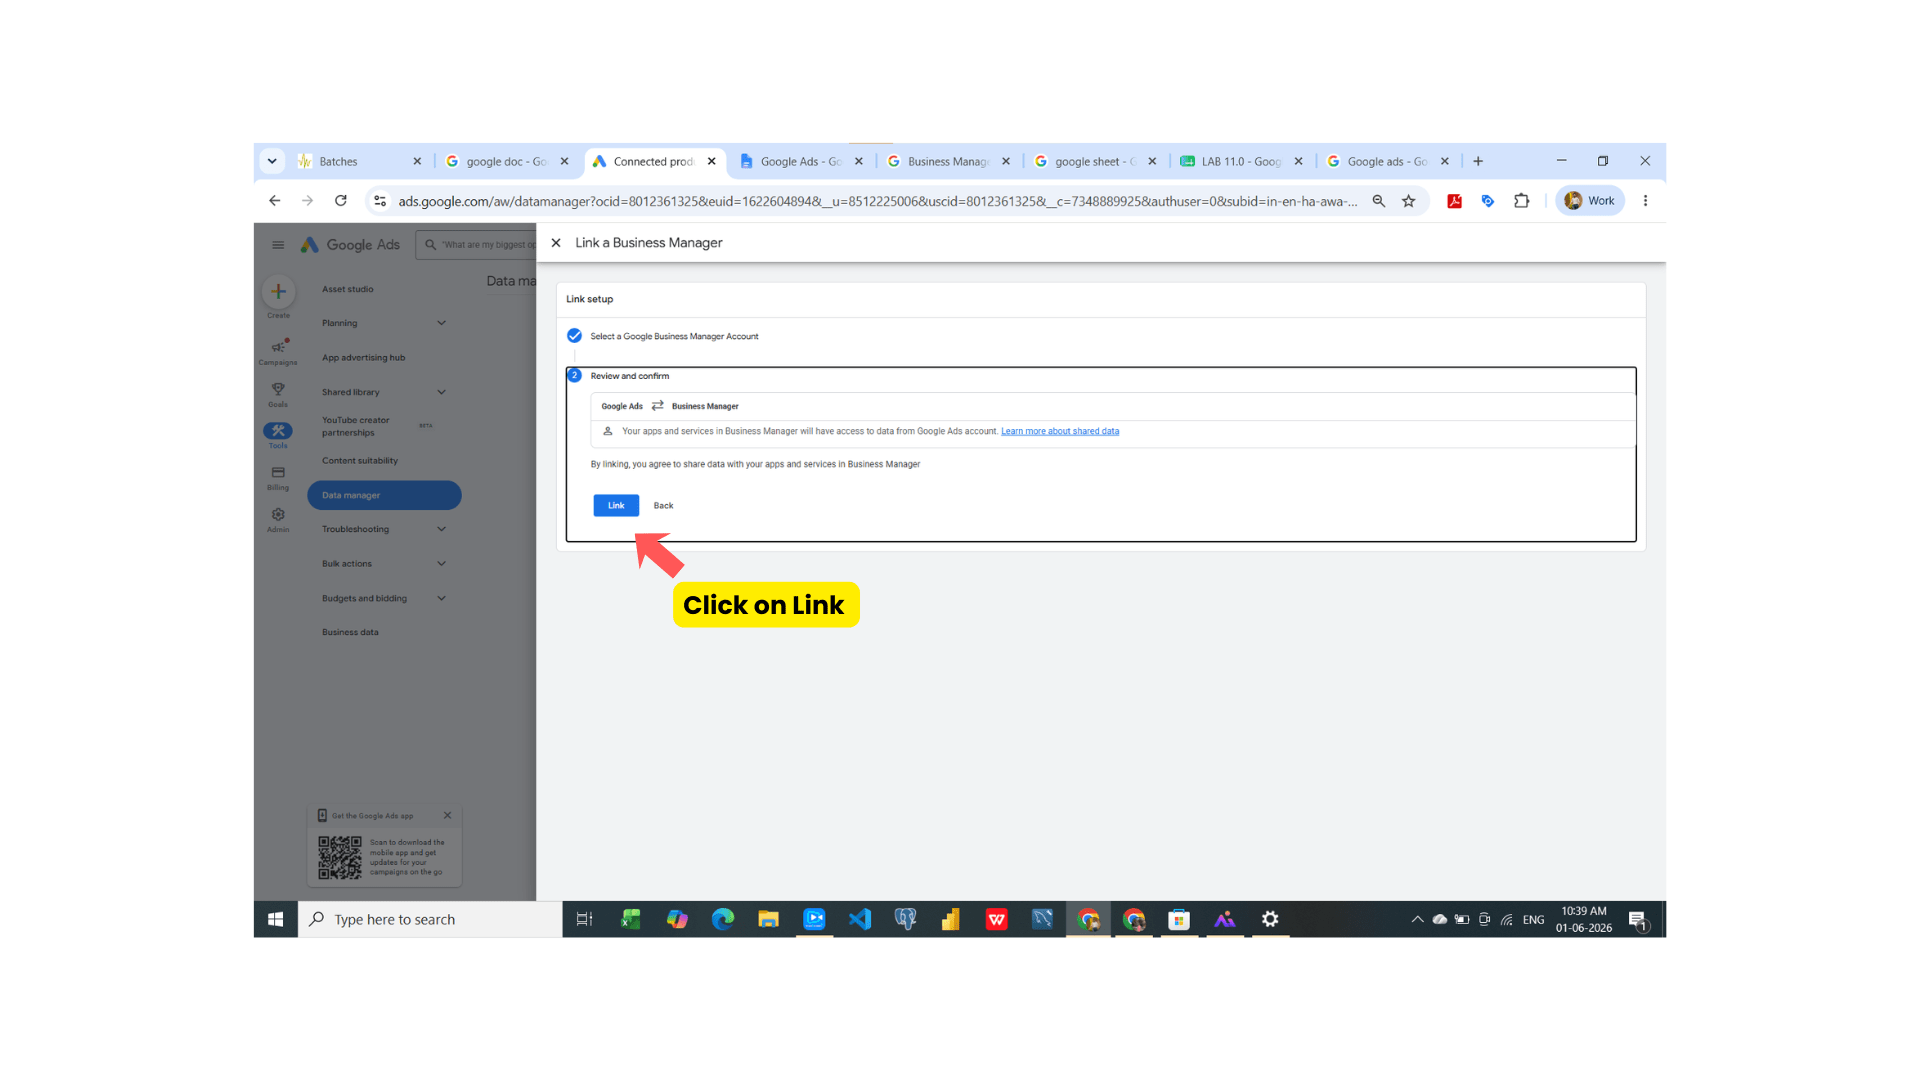
- After that click on click

- Now successfully account has been connected
Setup the shopping campaign
2
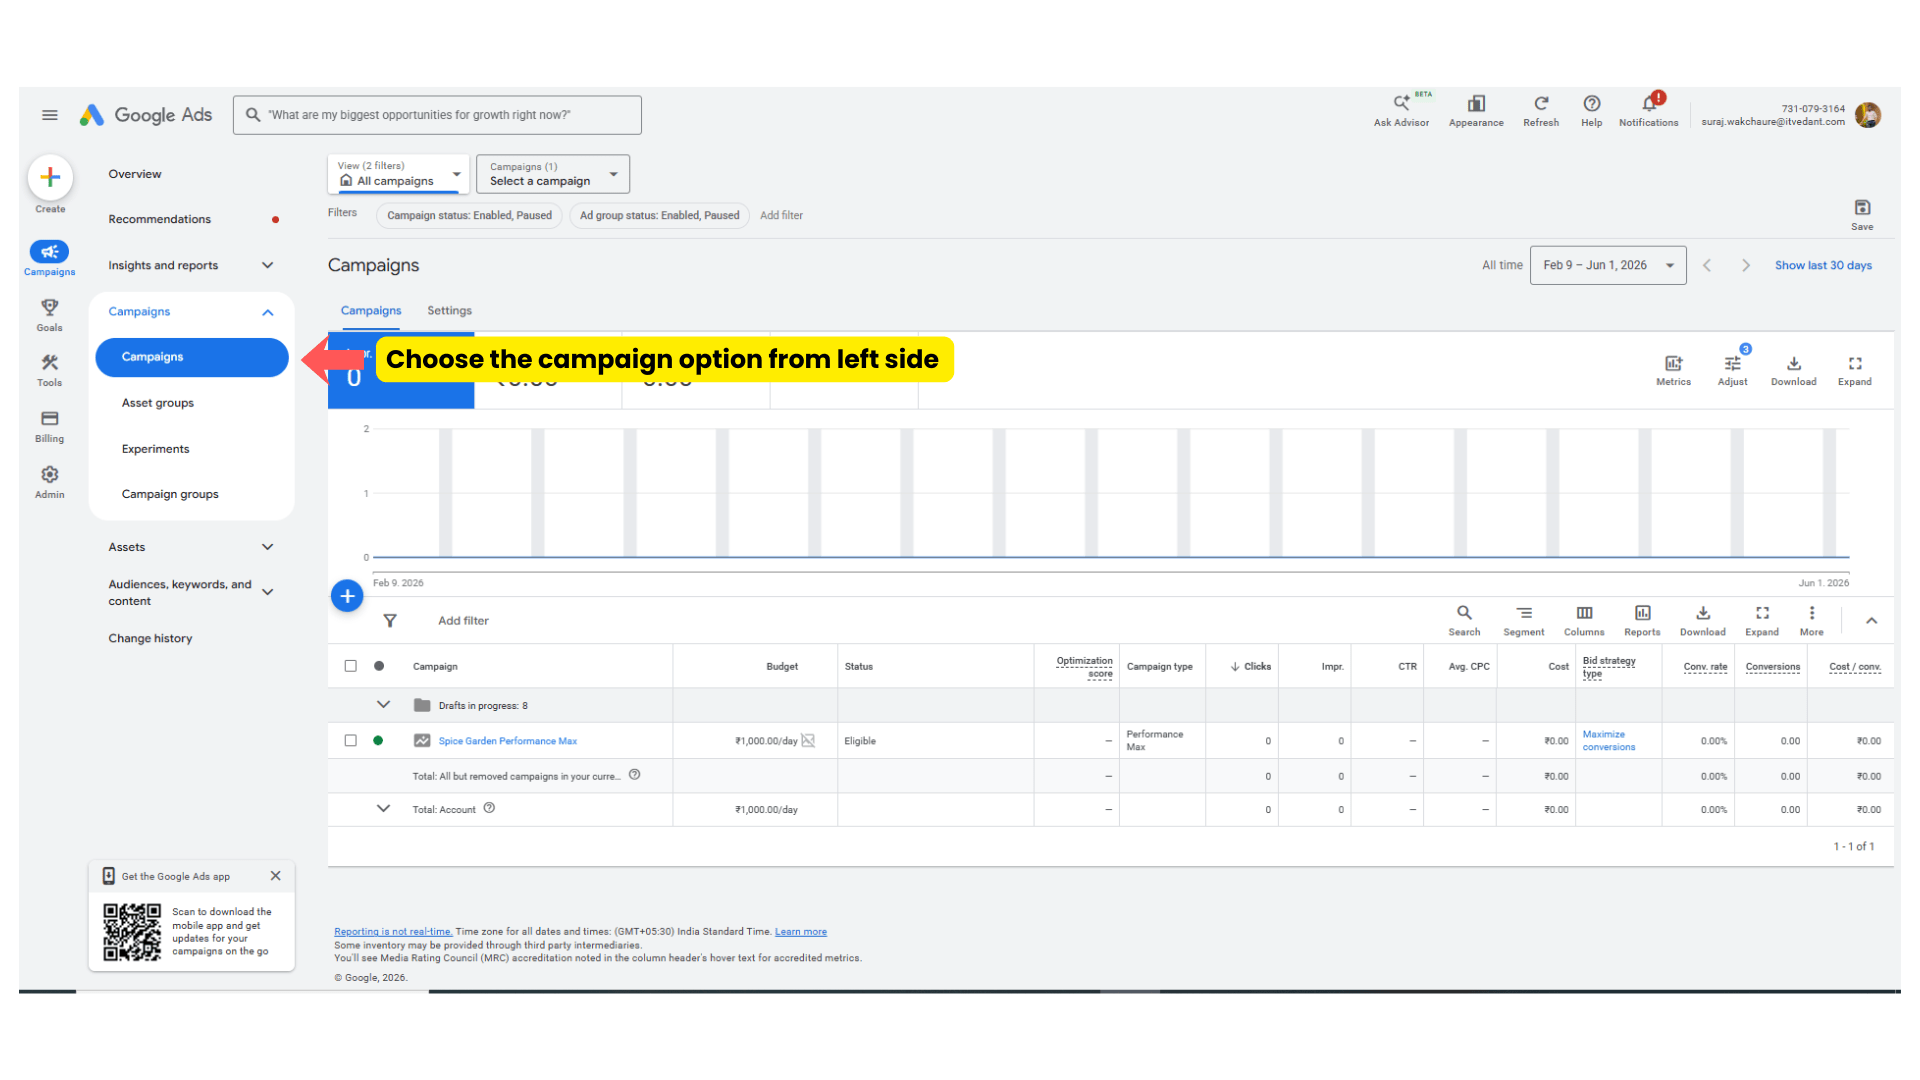
Then click on cross mark and come to campaign dashboard by choosing campaign option from the left menu.
- Click on + icon → New campaign
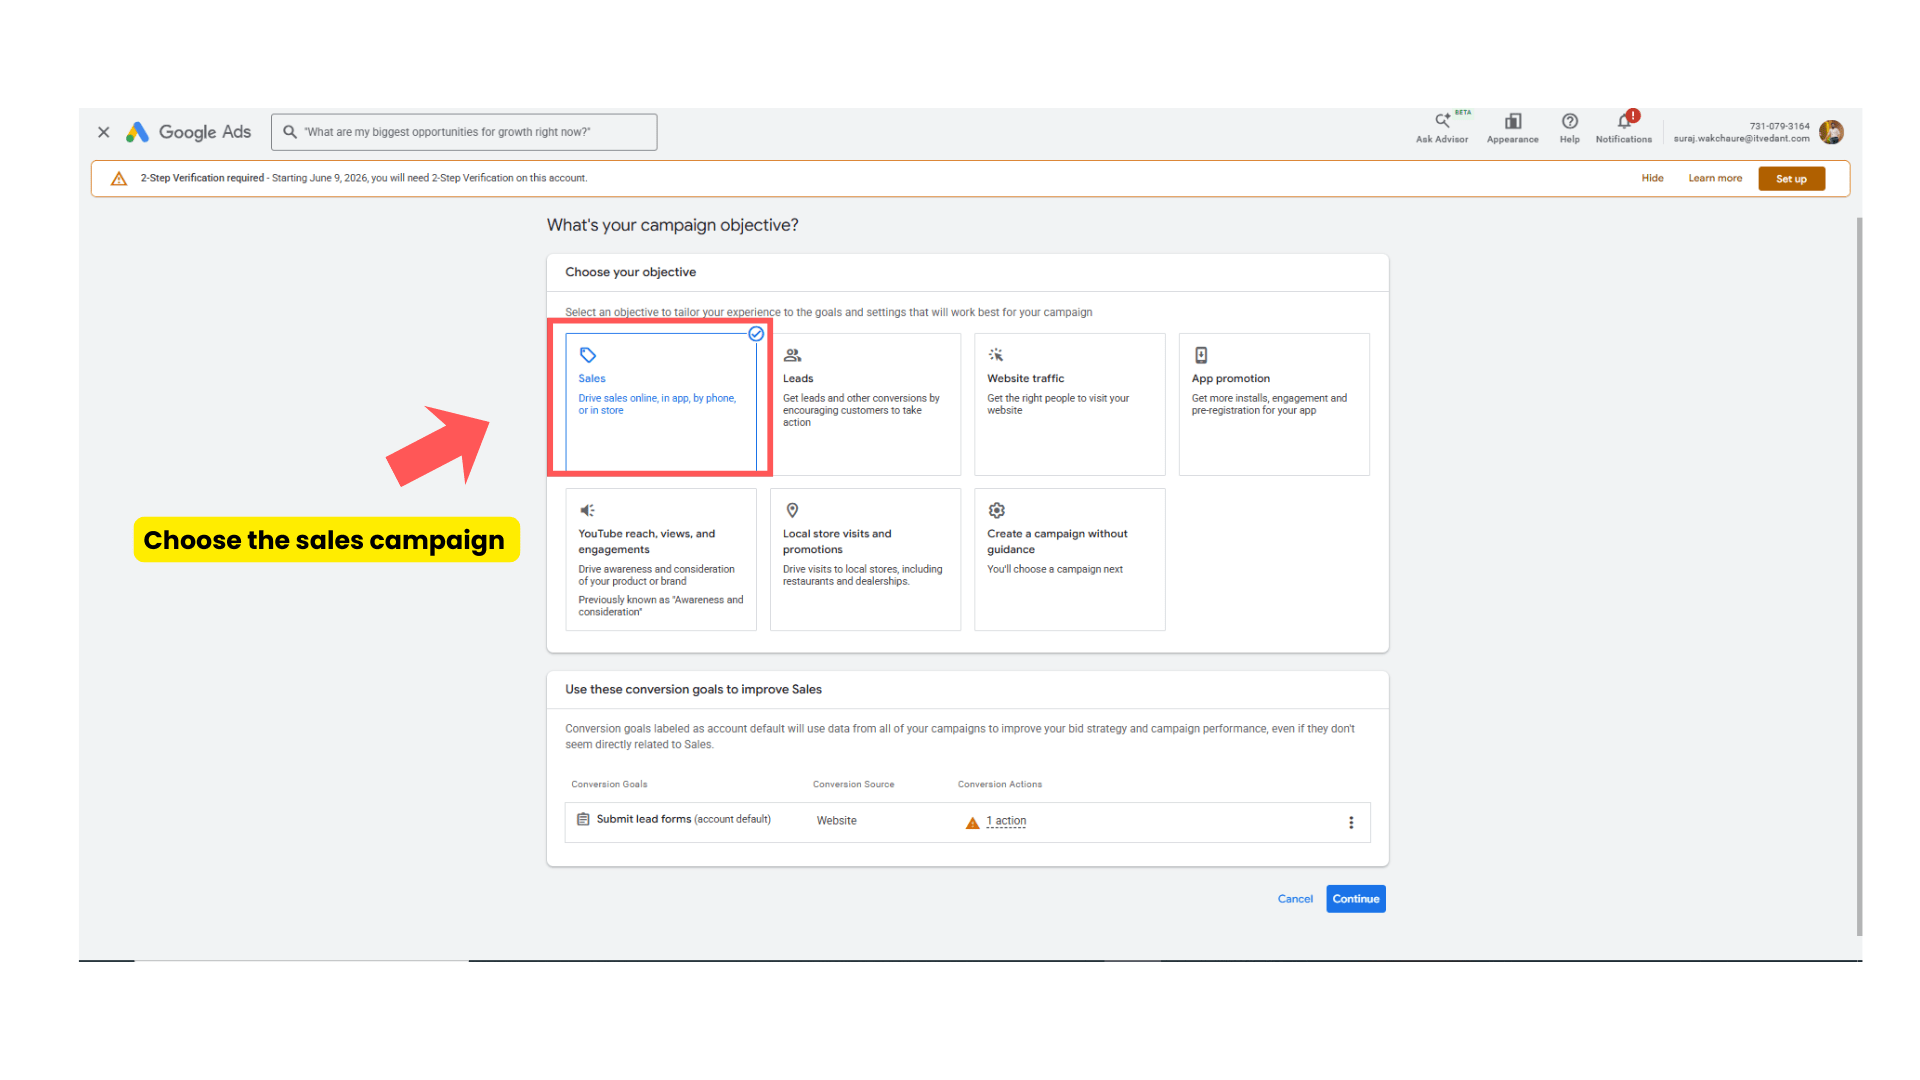
- Choose Sales Campaign and click on continue.
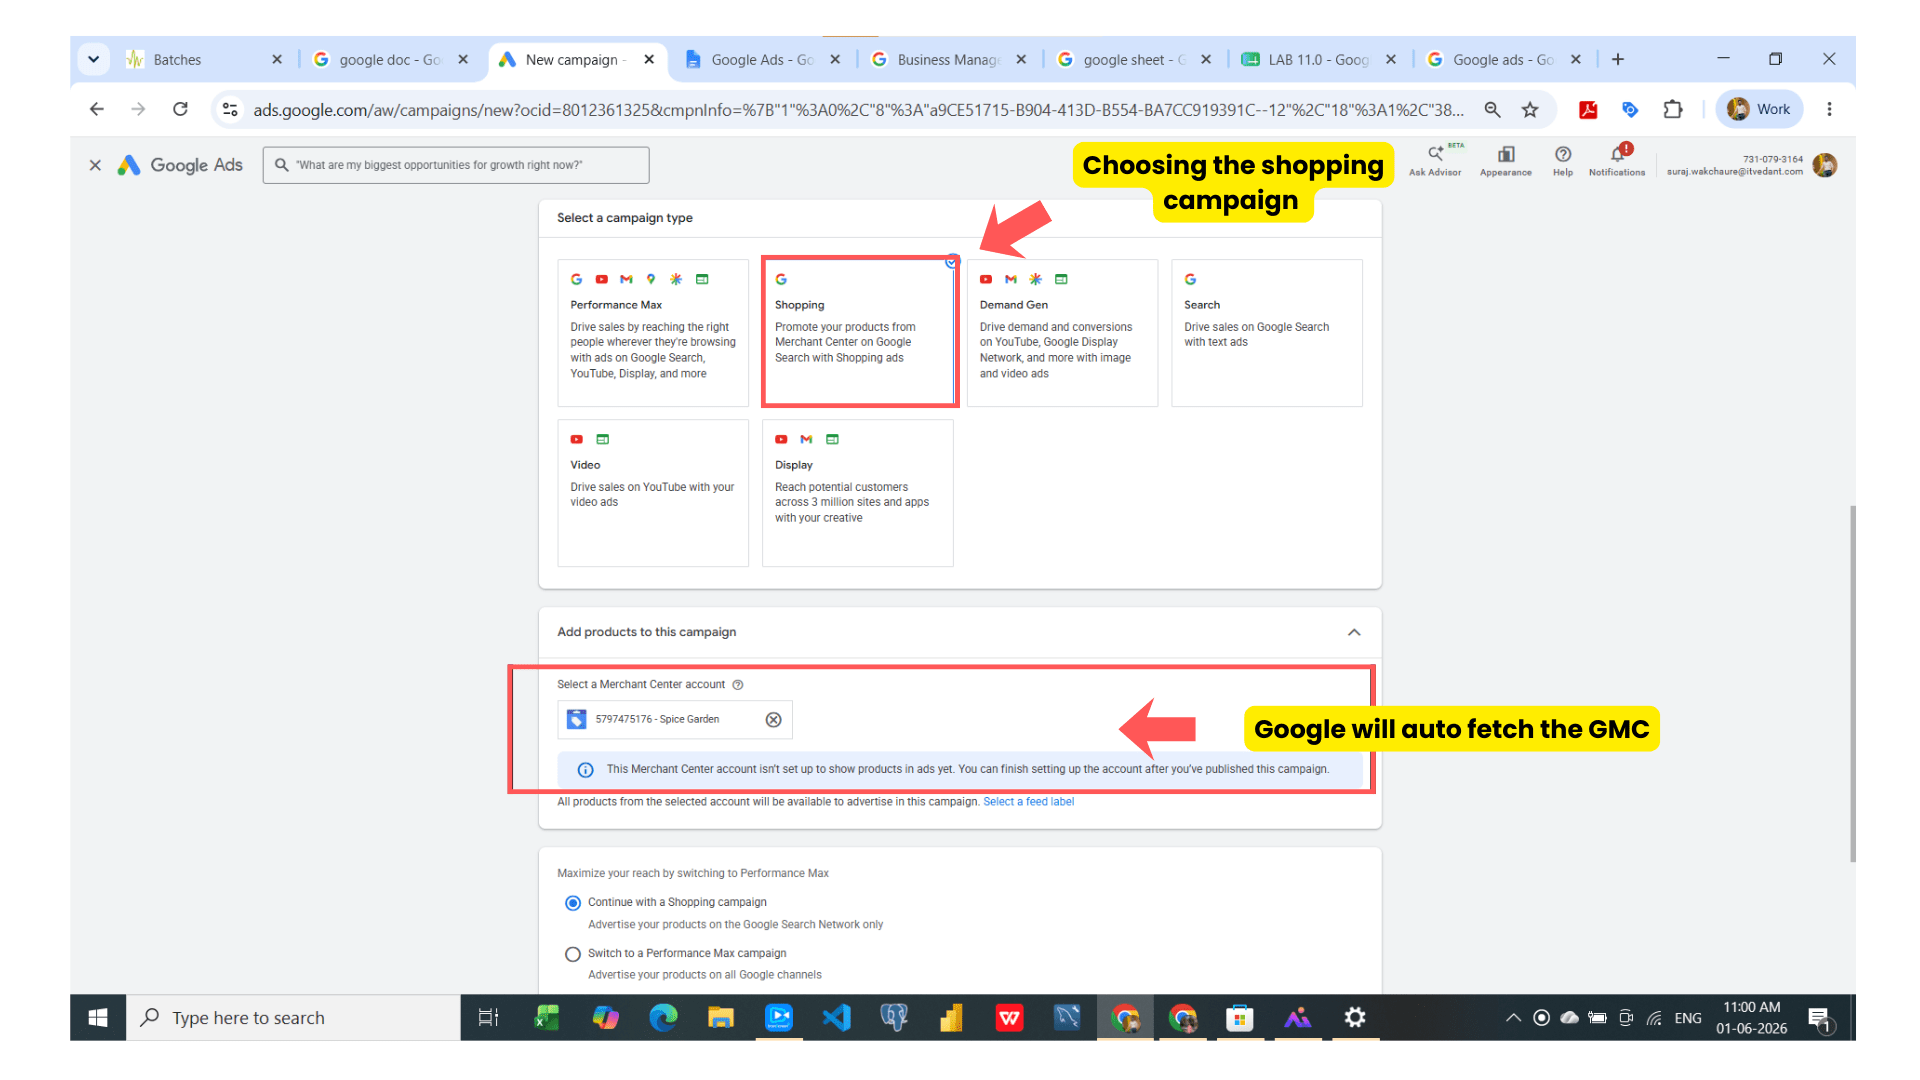
- Click on shopping campaign then google autofetch the google merchant center account.
After that
- Maximize your reach by switching to Performance Max → Choose ‘Continue with a Shopping campaign’
Task 5: Campaign Optimization
- Campaign Name - Spice Garden Shopping Campaign
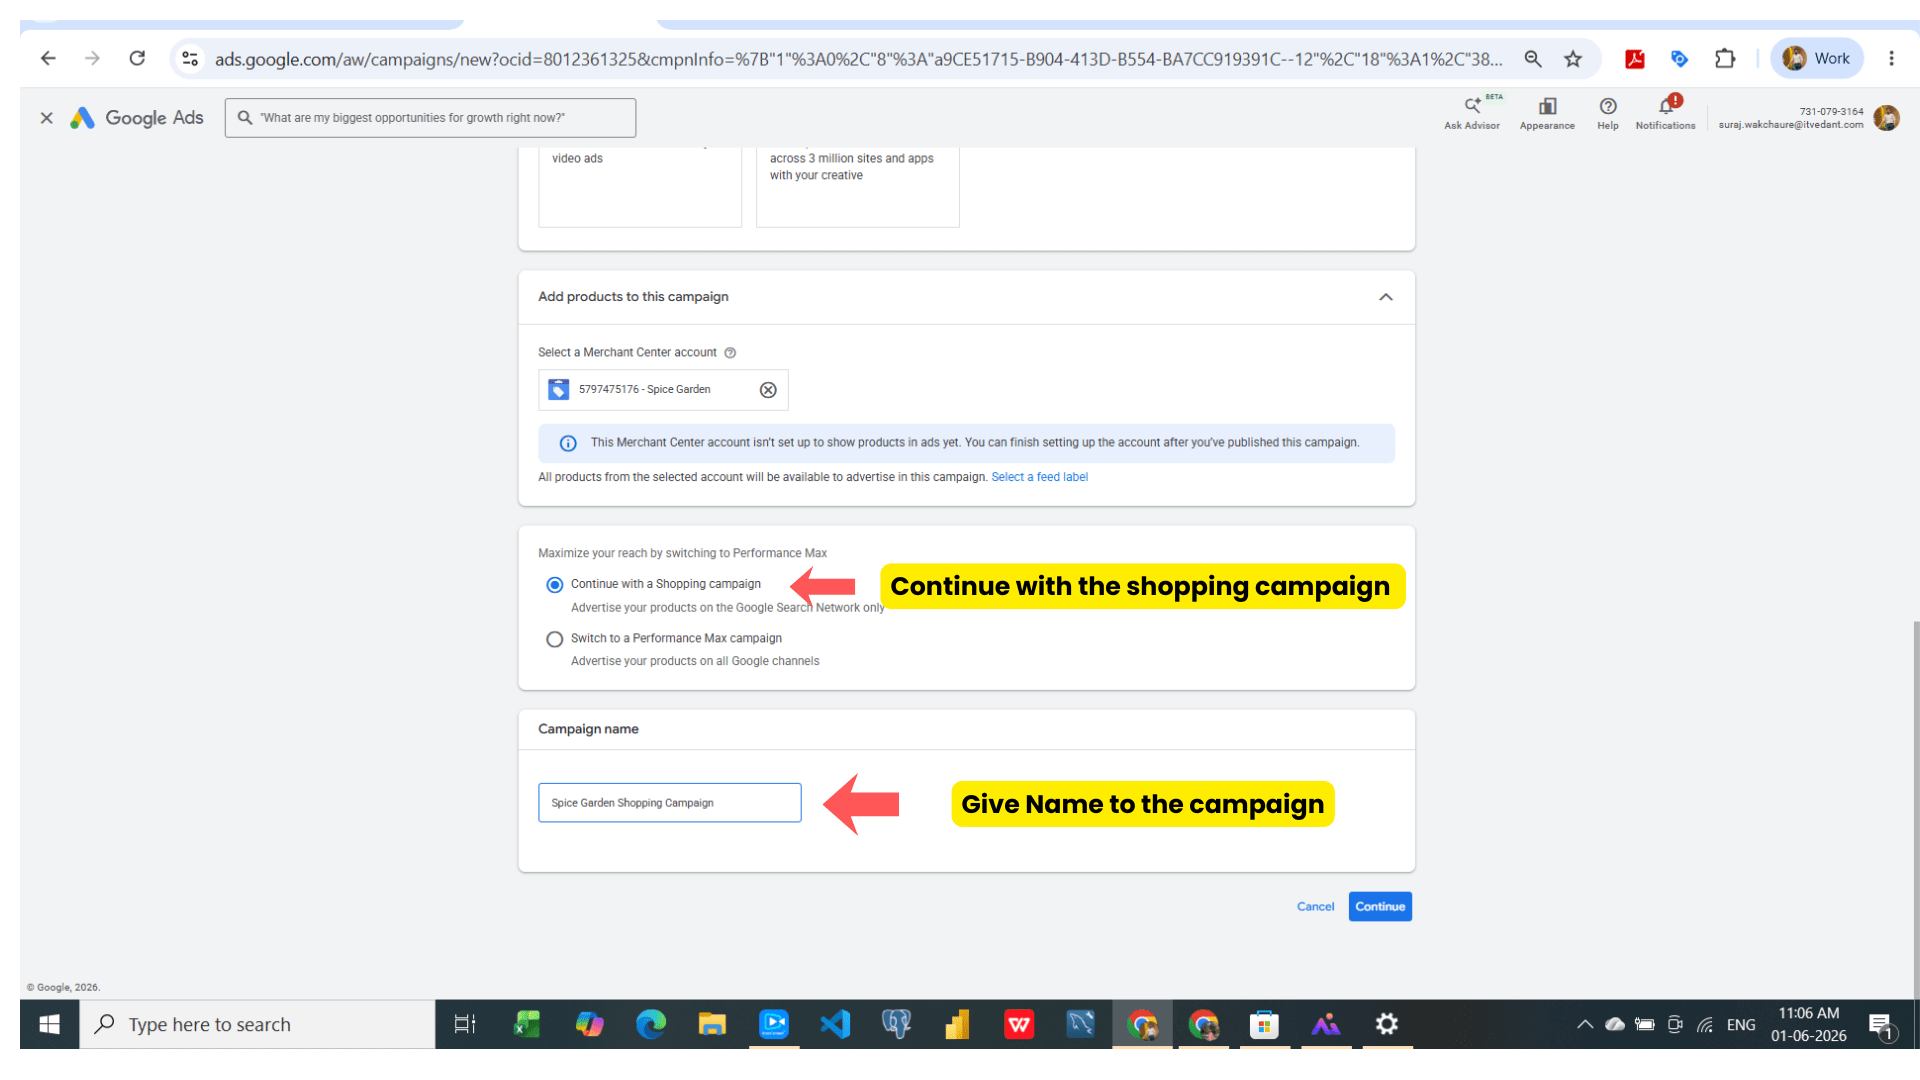
- After that click on continue
Task 6: Budget and Bidding Optimization
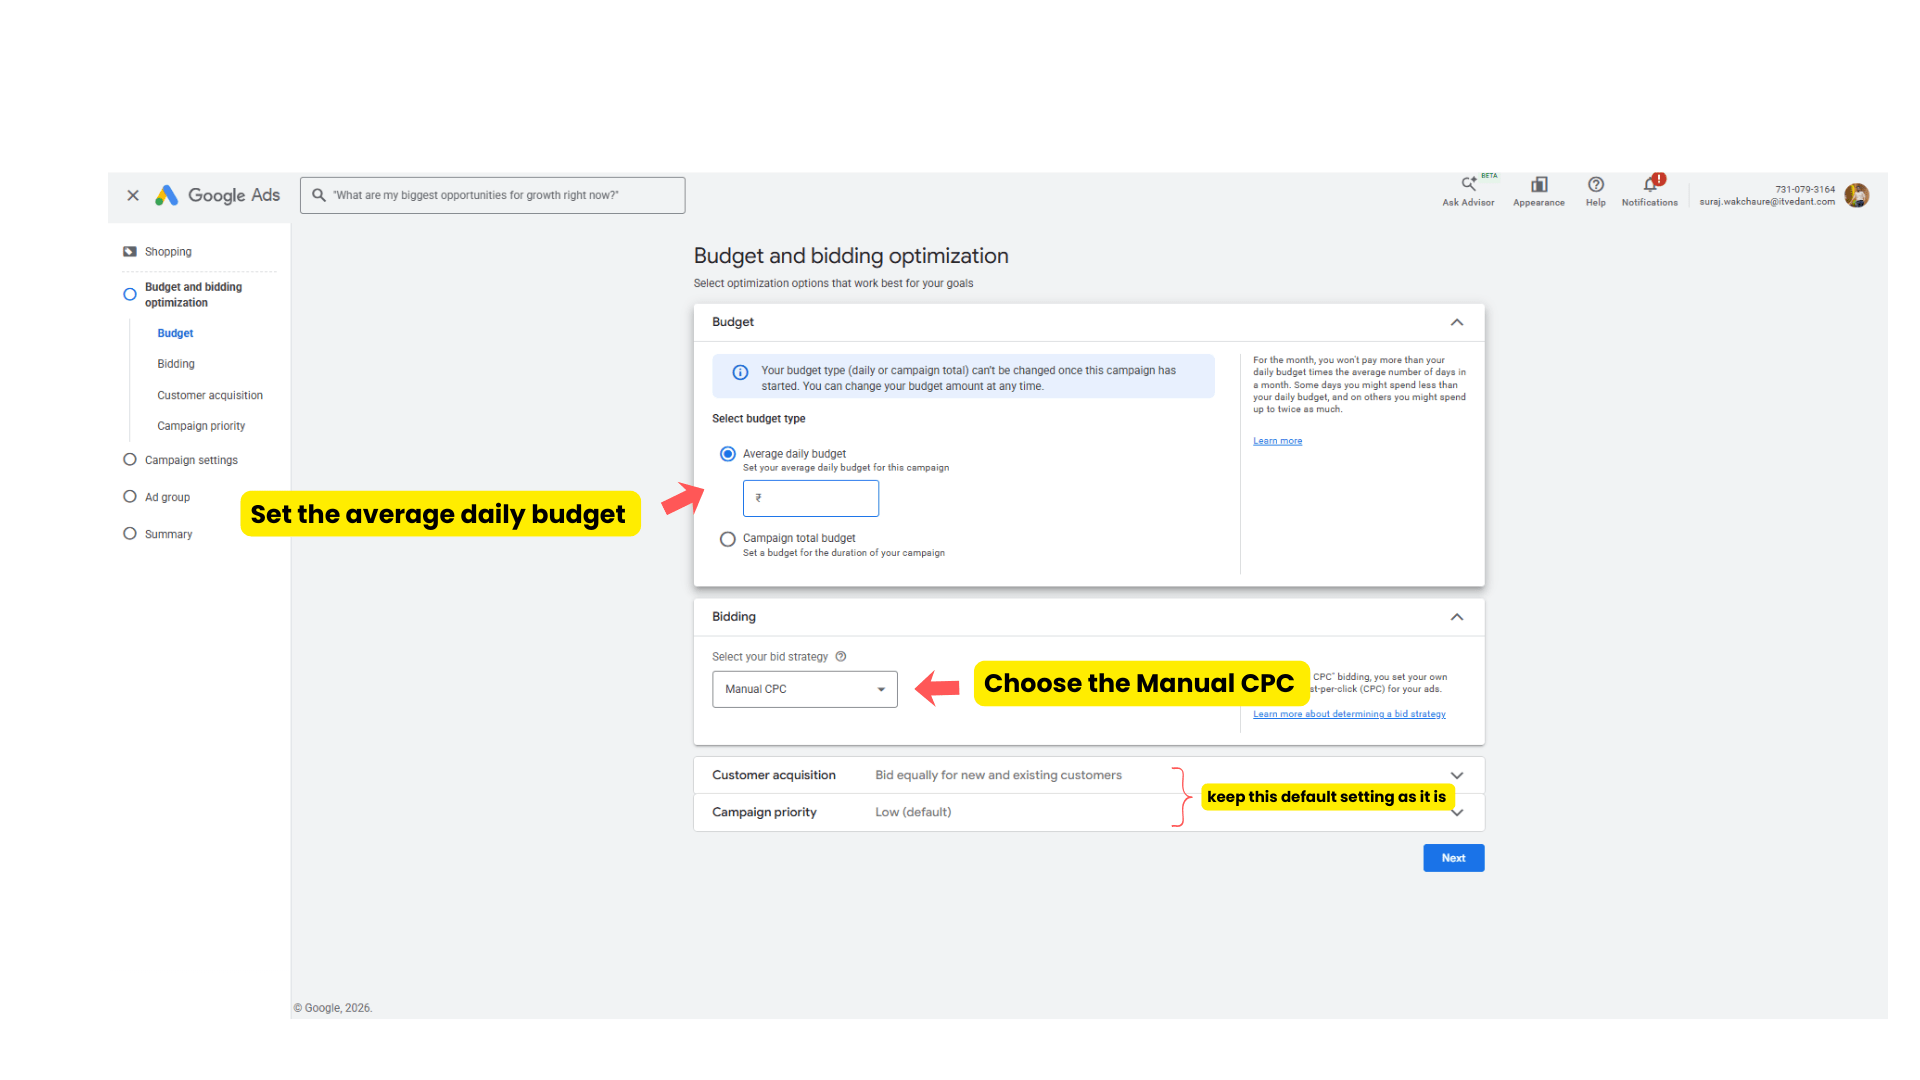
- Set demo average Daily Budget for the campaign - Rs 500
-
Bidding - Manual CPC
-
Customer acquisition - keep unchecked this
-
Campaign priority - Low
After setup above the setting click on Next.
Task 7: Location settings optimization
- Choose - Enter another location
- Locations as below - 1) Pimpri Chinchwad, wakad, hinjewadi
- Keep local products - Turned off
- EU political ads - No, this campaign doesn't have EU political ads
- Keep other setting as it is and click on Next.

Task 8: Ad Group optimization
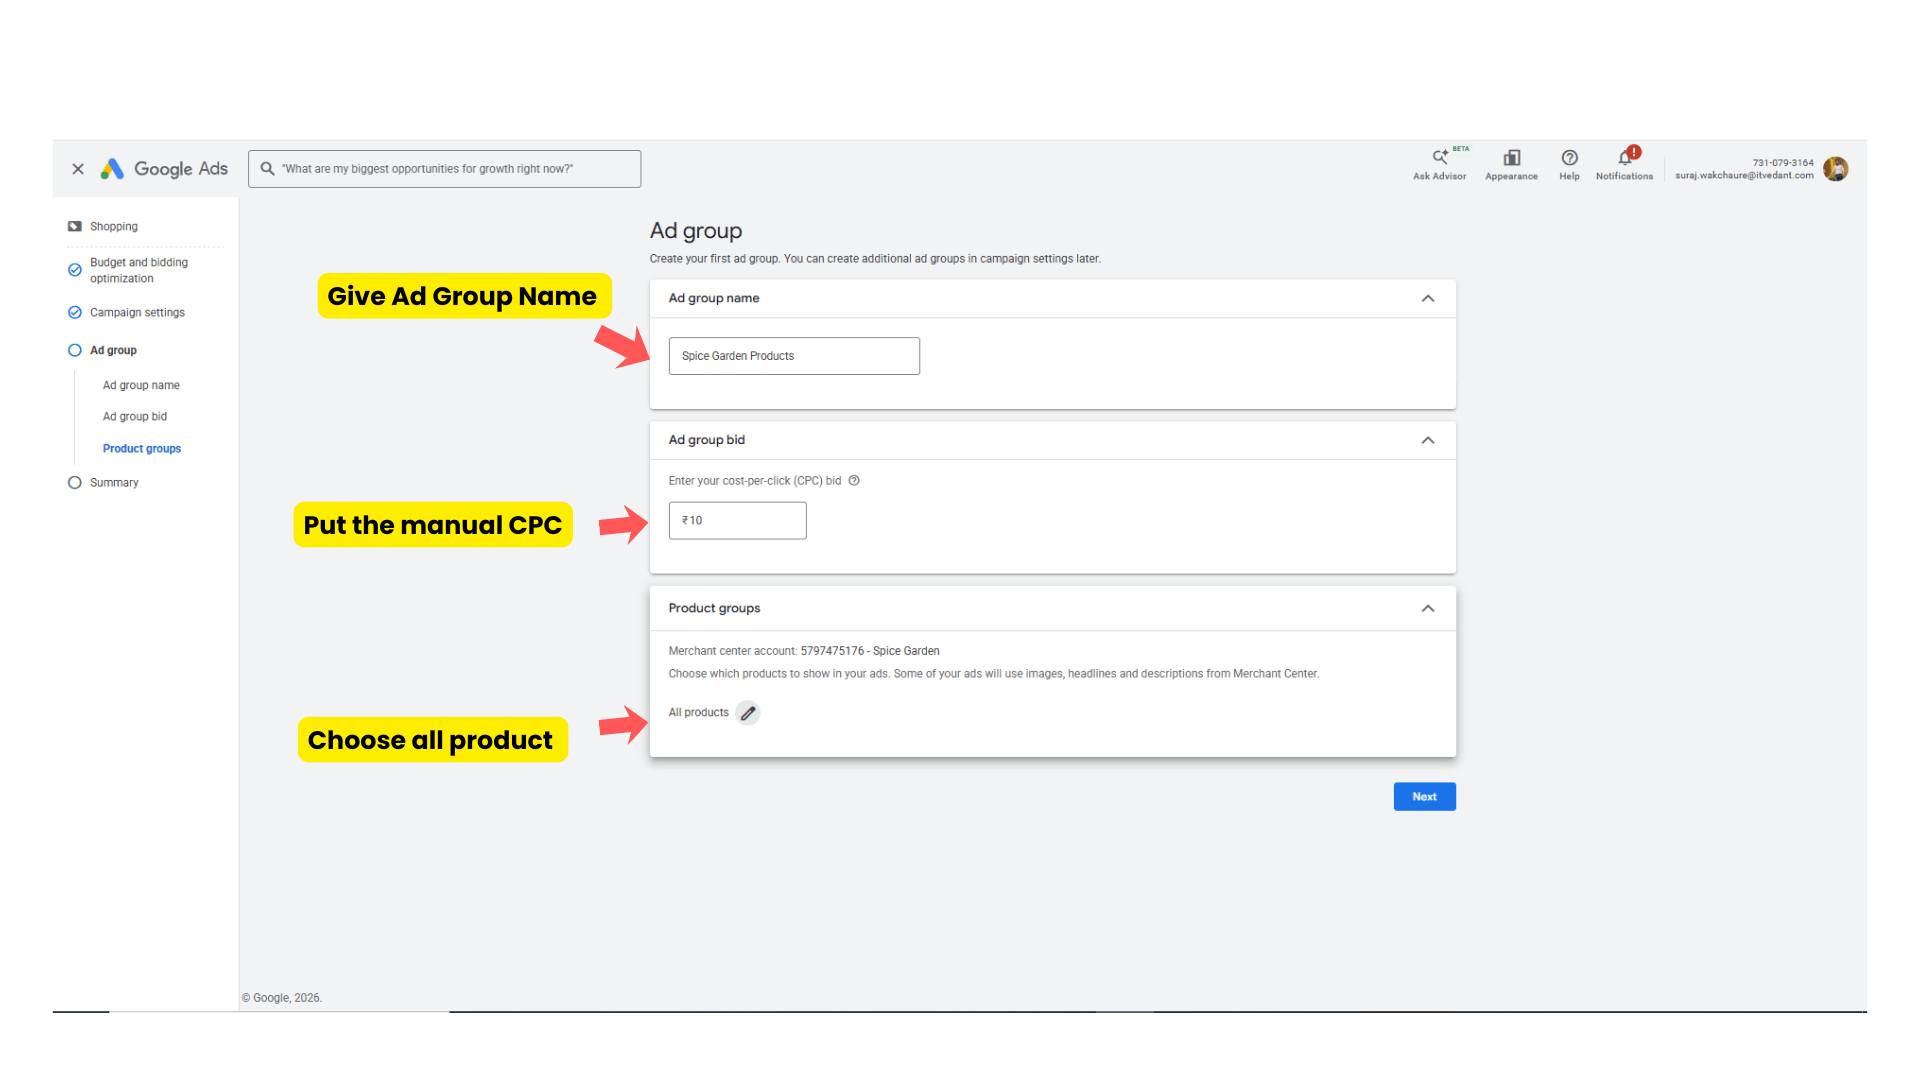
- Ad Group Name - Spice Garden Products
- Ad group bid - Rs 10
- Product Groups - Choose all products.
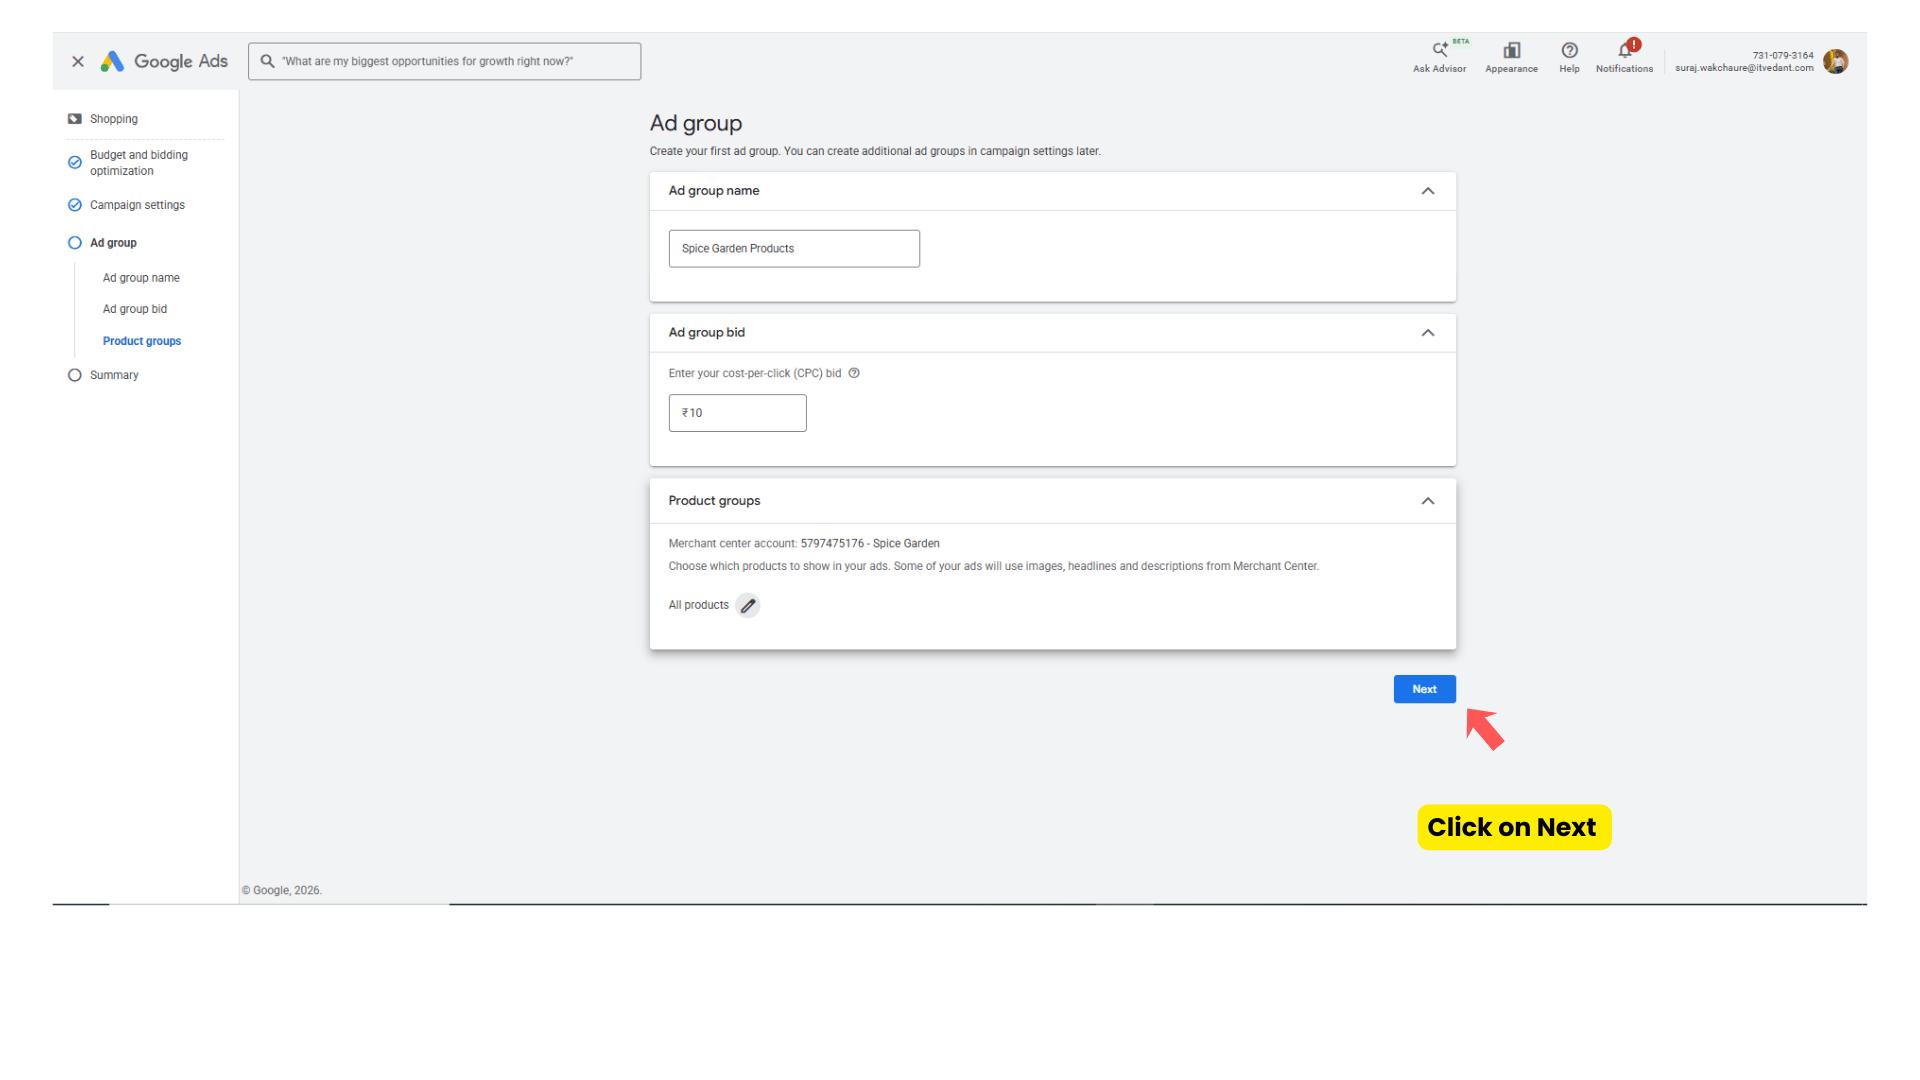
-
Click on Next
Task 9: Reviewing the campaign and its publishing
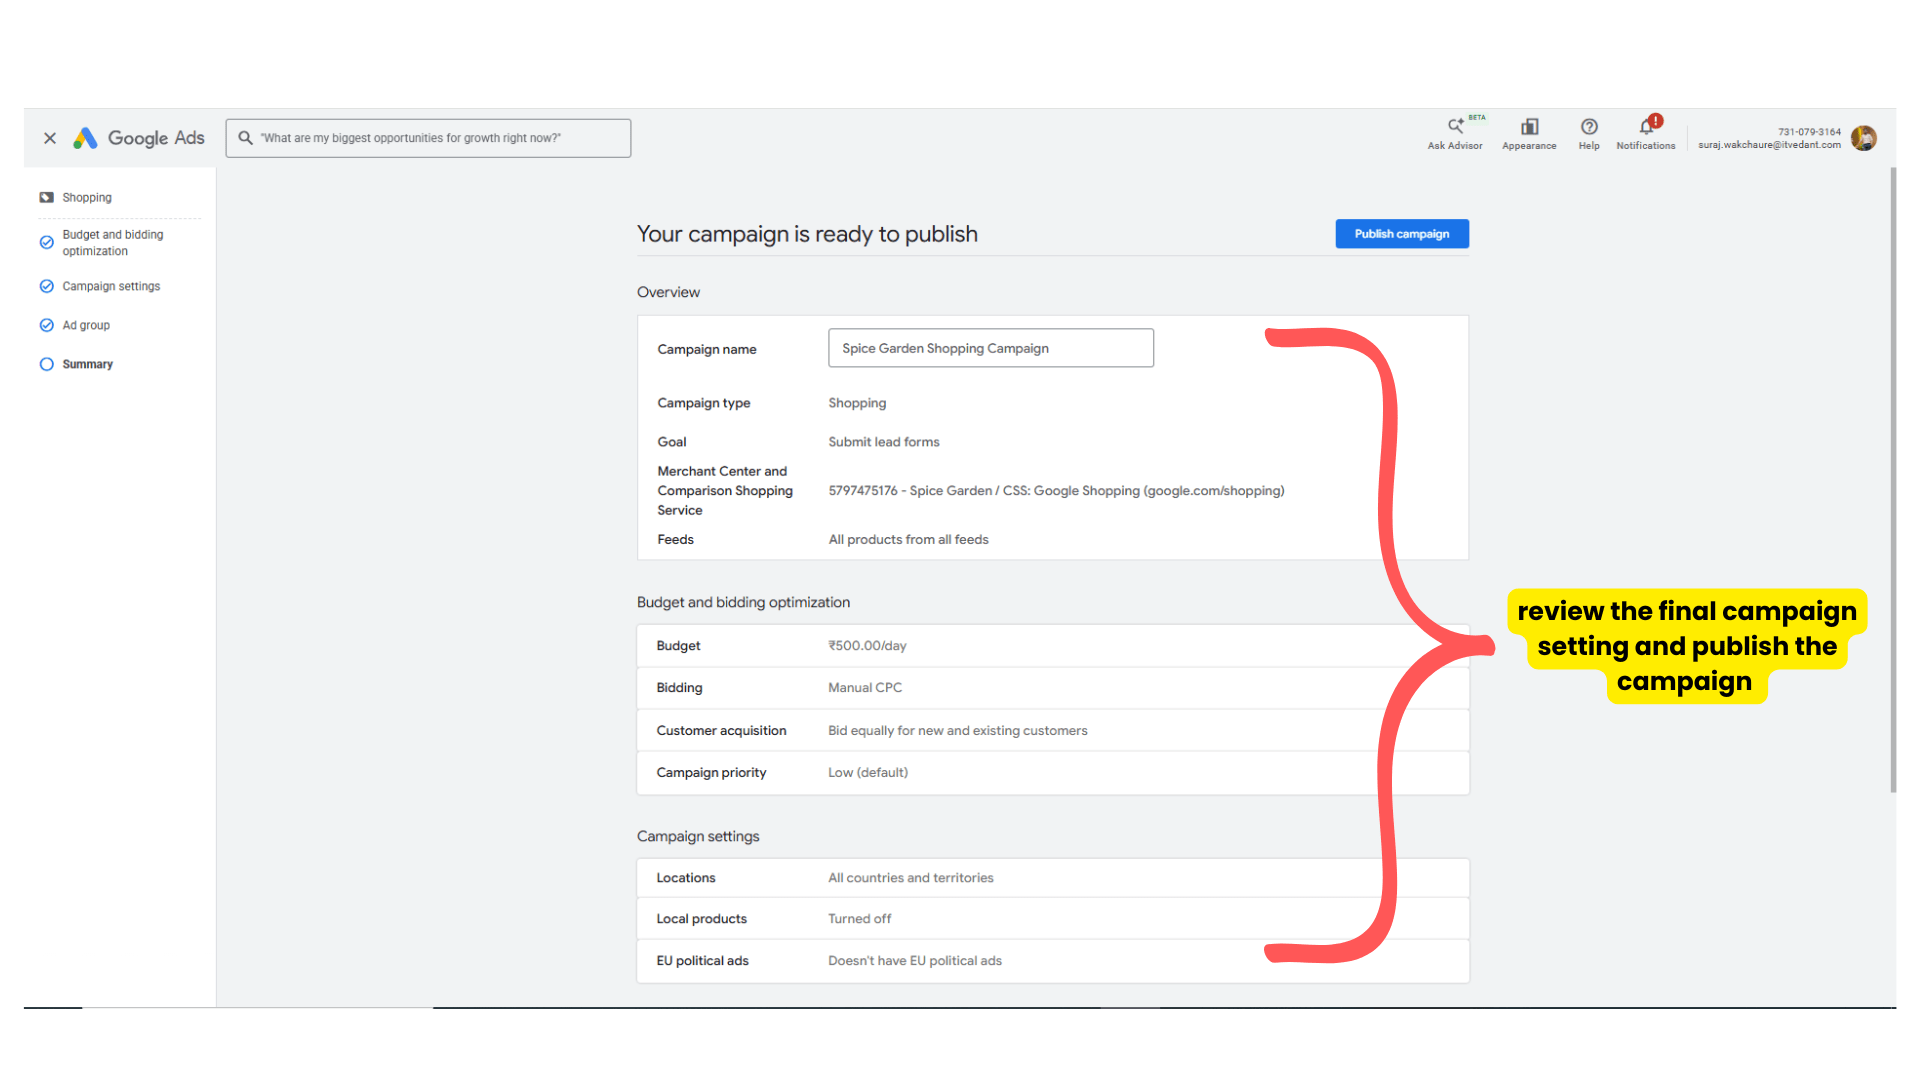
- Review all the setting which you optimize and publish the campaign.
Expected Outcome
After completing this LAB, learners will be able to:
-
Create Google Merchant Center accounts
-
Verify business websites
-
Create product feeds
-
Upload products
-
Fix product feed issues
-
Link Merchant Center with Google Ads
Congratulations!
You have successfully completed the GMC Setup & Product Upload LAB for Spice Garden.
In this LAB, you learned how to:
-
Create Google Merchant Center accounts
-
Verify business websites
-
Upload product feeds
-
Manage product listings
-
Link Merchant Center with Google Ads
Checkpoint
-
Optimizing the Shopping Campaign
This setup will help businesses showcase products across Google platforms effectively.
Next-Lab Preparation
Topic : Working with a Text and Listin HTML
1) Power of HTML text tags
2) Customizing your style with CSS
3) Listing it right using HTML
4) HTML Link up , attributes of tag, block vs inline elements
Pre-Lab Preparation
- Explore different restaurants
-
View food items and menus
-
Add items to cart
-
Place orders online
Topic : Weaving the world of Web
1) Navigating the world of Web
2) Building Blocks of Website,
3) Tag Titans: Fundamental Web Construct.
git pull origin branchName
Git Pull
Task 1: Understanding BRD
Before you start building anything, you need to clearly understand what the client actually wants.So, let’s begin by understanding the BRD (Business Requirement Document) shared by the client.
BRD Full Form is Business Requirement Details.BRD like a plan for building a house. This plan helps the builder understand what to build.In the same way,BRD tells developers what the client wants to build
Click to download BRD : BiteBox_BRD.pdf
Activity
After going through BRD list down the Core Features and Web Pages in the tabulated Format as shown Below.
| Col 1 | Col 2 | Col 3 |
|---|---|---|
| Row 1 | ||
| Row 2 | ||
| Row 3 |
Formula
Profit = Revenue - Cost
Task 2: Create WireFrame
Now that you understand the requirements, don’t jump into coding yet. Before development, we always visualize the layout.
Now lets create a simple wireframe for the homepage.
A wireframe is like a layout plan of a house. Before building, you decide where rooms, doors, and windows will be placed.Similarly, a wireframe helps you plan where elements like headers, images, and buttons will appear on a webpage—before adding design or colours.
Task 3: Code Editor Installation
Good work on completing the planning phase.
Now we will start development. Before that, make sure your system is ready with the required tools.
In this step we will install the VS code editor that will help to Write code efficiently,Organize files , Run and test your application
Go to the visual studio code official website
1
Click to download Homepage Wireframe : Homepage Wireframe
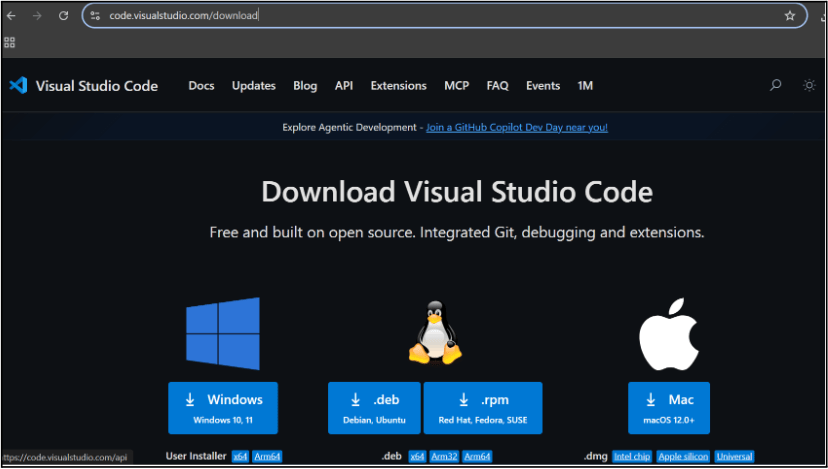
Choose your operating system(windows / Mac) and download the installation file.
Double click on the download app and Accept the agreement and click next
2
It is a long established fact that a reader will be distracted
b
Sub Steps
a
Double click on the download app and Accept the agreement and click next
public class MathSample {
    public static void main(String[] args) {
        int x = 10;
        int y = 20;
        int sum = x + y;

        System.out.println("The sum is: " + sum);
    }
}
public class MathSample {
public static void main(String[] args) {
int x = 10;
int y = 20;
int sum = x + y;
System.out.println("The sum is: " + sum);
}
}
public class MathSample {
public static void main(String[] args) {
int x = 10;
int y = 20;
int sum = x + y;
System.out.println("The sum is: " + sum);
}
}
Great job!
You have successfully completed your first lab on BiteBox Project Onboarding.
In this lab, you have: Understood the BRD, Created a wireframe, Set up your development environment, Organised your project structure, Run your first program
You are now ready to move to the next stage of development
Checkpoint
Next-Lab Preparation
Git Push
git push origin branchNameTopic : Working with a Text and Listin HTML
1) Power of HTML text tags
2) Customizing your style with CSS
3) Listing it right using HTML
4) HTML Link up , attributes of tag, block vs inline elements
Text box Width : 887
Business Scenario, Pre-lab Preparation, Next-lab Preparation, Task, Activity, Checkpoint : 90%.
Steps : 1,2,3 [Sub Steps - a,b,c]
Normal Text, Topic Name : 80%
Subtopic : 70%
Code Box font Size : 16px