Building the ShopKart Home Page

Business Scenario
Hello talented developers!

Our ShopKart project has now been successfully configured with React + Vite, Bootstrap, React Router and React Hook Form.

Today, we will focus on the Home Page foundation.
Pre-Lab Preparation
Module:
1) React Introduction & JSX
2) Deep Dive into Component & Props
We will break the interface into reusable React components and use props wherever the same component needs to display different data.
git pull origin branchName
Git Pull
Task 1:Create the ShopKart Design Foundation
Open index.css - Remove the default Vite CSS if it is still present and add :
1
* {
  box-sizing: border-box;
}
body {
  margin: 0;
  font-family: Arial, sans-serif;
  background-color: #f8fafc;
  color: #0f172a;
}
a {
  text-decoration: none;
  color: inherit;
}
button {
  font-family: inherit;
}
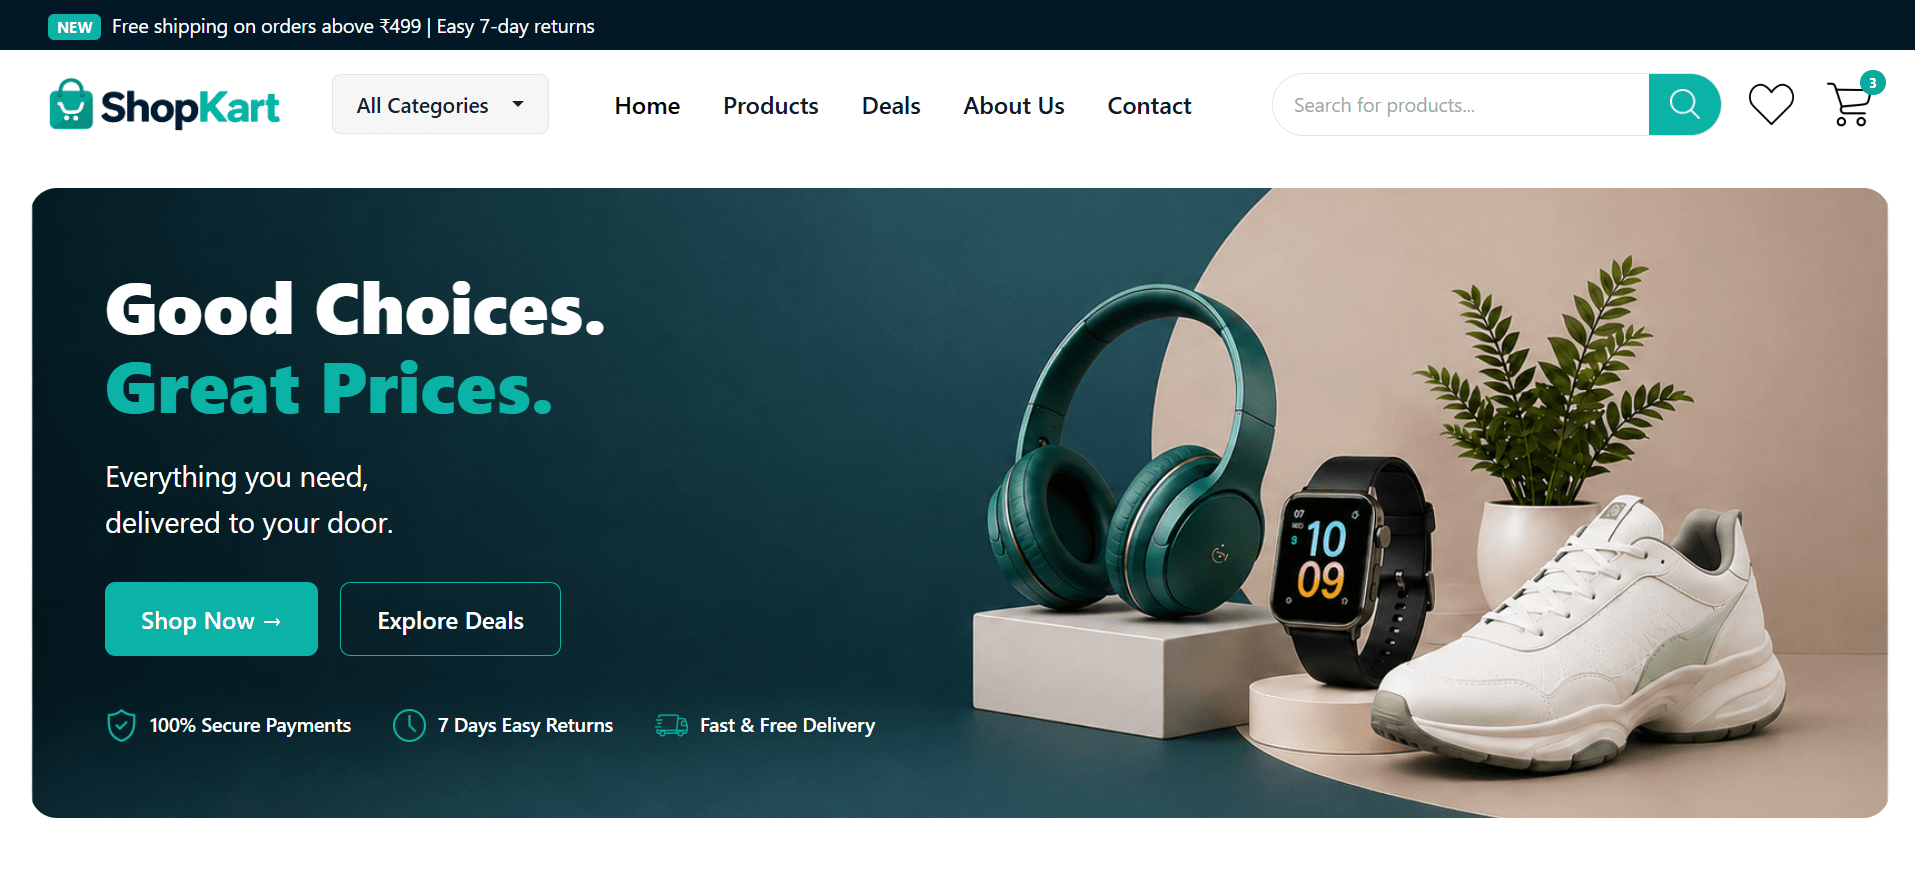
Task 2 :Build the Shopkart Navbar
Open Navbar.jsx and Replace the temporary Navbar with:
1
import "./Navbar.css";

function Navbar() {
  return (
    <>
      {/* Top Shipping Bar */}
      <div className="top-bar">
        <div className="container-fluid">
          <span className="new-badge">NEW</span>
          Free shipping on orders above ₹499 | Easy 7-day returns
        </div>
</div>- Top Shipping bar
 {/* Main Navbar */}
      <nav className="navbar navbar-expand-lg">
        <div className="container-fluid">
          {/* Logo */}
          <a className="navbar-brand" href="/">
            <img src="/images/logo.png" alt="ShopKart" className="shopkart-logo"/>
</a>- Navbar and logo
- All categories dropdwon
         <div className="dropdown category-dropdown">
            <button className="category-btn dropdown-toggle" type="button"
            data-bs-toggle="dropdown" aria-expanded="false">  All Categories </button>

           <ul className="dropdown-menu">
            <li> <a className="dropdown-item" href="#"> Electronics </a> </li>
              <li> <a className="dropdown-item" href="#"> Fashion </a> </li>
              <li> <a className="dropdown-item" href="#"> Home & Kitchen </a> </li>
              <li> <a className="dropdown-item" href="#"> Beauty & Personal Care </a> </li>
              <li> <a className="dropdown-item" href="#"> Sports & Fitness </a> </li>
              <li> <a className="dropdown-item" href="#"> Books & Stationery </a> </li>
            </ul>
          </div>

          {/* Mobile Toggle */}
          <button className="navbar-toggler"  type="button" data-bs-toggle="collapse"
            data-bs-target="#shopKartNavbar" >
            <span className="navbar-toggler-icon"></span> </button>

          {/* Navigation */}
          <div className="collapse navbar-collapse" id="shopKartNavbar">
            <ul className="navbar-nav main-nav">

              <li className="nav-item"> <a className="nav-link active" href="/"> Home
              </a> </li>
              <li className="nav-item"> <a className="nav-link" href="/products"> Products</a>
              </li>
               <li className="nav-item"> <a className="nav-link" href="#"> Deals </a>
                <li className="nav-item"> <a className="nav-link" href="#"> About Us </a> <
              <li className="nav-item"> <a className="nav-link" href="#"> Contact </a>  </li>

            </ul>
- Product search bar
{/* Search */}
<div className="search-box">
  <input type="text" placeholder="Search for products..." />
  <button className="search-btn">
    <img src="/icons/search-icon.png" alt="Search" />
  </button>
</div>- And lastly - Cart and wishlist icons
{/* Icons */}
<div className="nav-actions">
  <img src="/icons/heart.png" alt="Wishlist" className="nav-icon" />

  <div className="cart-wrapper">
    <img src="/icons/cart-icon.png" alt="Cart" className="nav-icon" />
    <span className="cart-count">3</span> </div>
</div>
</div>
</div>
</nav>
</>
);
}
export default Navbar;Inside components folder - create Navbar.css file
2
- You will wirte the navbar css here

Task 2: Build the Home Hero Section
Inside the Home page, after <Navbar />, add:
1
import React from "react";
import Navbar from "../components/Navbar";
import "./Home.css";

function Home() {
  return (
    <>
      <Navbar />

      {/* Hero Section */}
      <section className="hero-section">
        <div className="hero-content">
          <h1> Good Choices. <br /> <span>Great Prices.</span> </h1>

          <p> Everything you need, <br /> delivered to your door. </p>

          <div className="hero-buttons">
            <button className="shop-btn">Shop Now →</button>
<button className="deal-btn">Explore Deals</button>
</div>
{/* Hero Benefits */}
<div className="hero-benefits">
<div className="benefit-item">
<img src="/icons/secure.png" /> <p>100% Secure Payments</p> </div>
<div className="benefit-item">
<img src="/icons/clock.png" /> <p>7 Days Easy Returns</p> </div>
<div className="benefit-item">
<img src="/icons/express-delivery.png" /> <p>Fast & Free Delivery</p> </div>
</div>
</div>
</section>
</>
);
}
export default Home;Style the hero section : Inside pages folder - create Home.css file
2
- Here , You will write css for all the sections of the the Home page
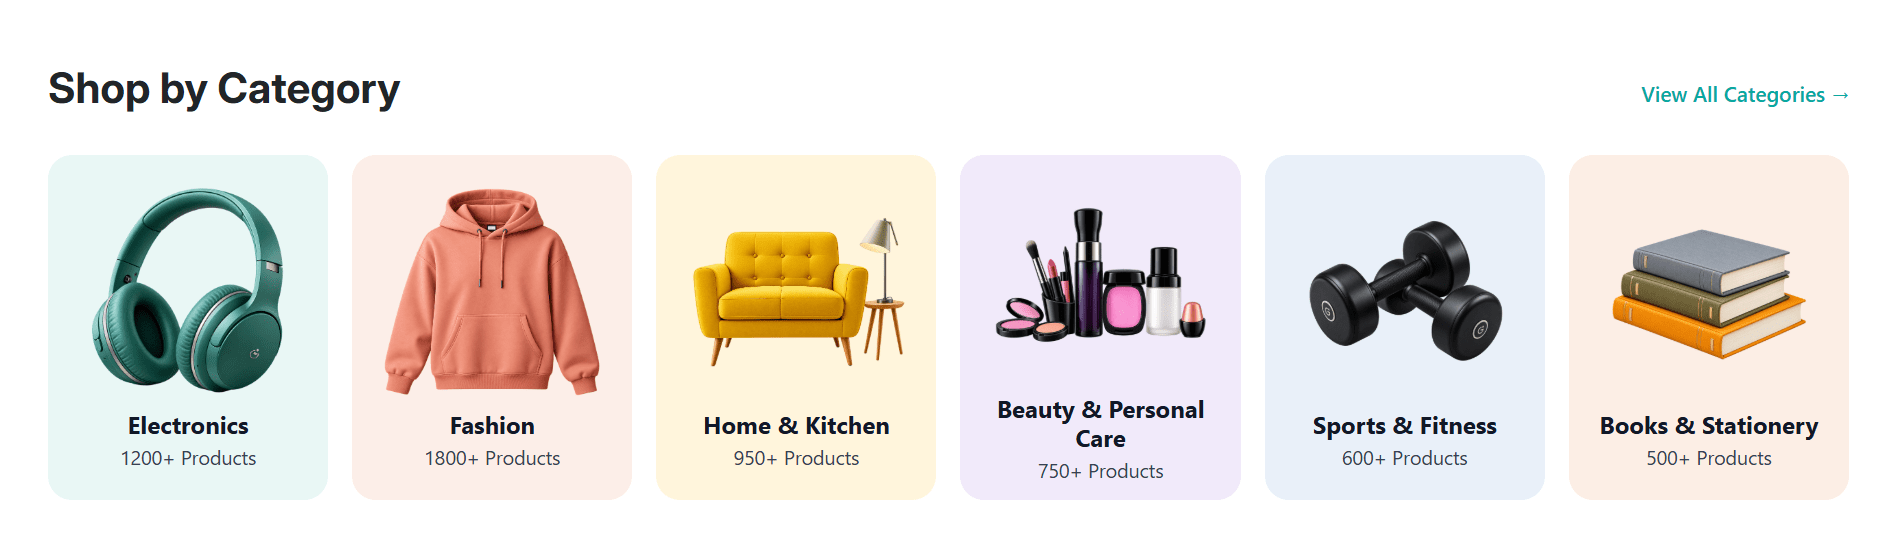
Task 3: Build Shop by Category
Below the hero section we will add Shop by category section
1
{/* Shop By Category */}
<section className="category-section">
  <div className="section-heading">
    <h2>Shop by Category</h2>

    <a href="#">View All Categories →</a>
  </div>


  <div className="category-list">
    <div className="category-card electronics">
      <img src="/images/category-electronics.png" alt="Electronics" />
      <h3>Electronics</h3>
      <p>1200+ Products</p>
    </div>


    <div className="category-card fashion">
      <img src="/images/category-fashion.png" alt="Fashion" />
      <h3>Fashion</h3>
      <p>1800+ Products</p>
    </div>
<div className="category-card home-kitchen">
<img src="/images/category-home.png" alt="Home & Kitchen" />
<h3>Home & Kitchen</h3>
<p>950+ Products</p>
</div>
<div className="category-card beauty">
<img src="/images/category-beauty.png" alt="Beauty & Personal Care" />
<h3>Beauty & Personal Care</h3>
<p>750+ Products</p>
</div>
<div className="category-card sports">
<img src="/images/category-fitness.png" alt="Sports & Fitness" />
<h3>Sports & Fitness</h3>
<p>600+ Products</p>
</div>
<div className="category-card books">
<img src="/images/category-books.png" alt="Books & Stationery" />
<h3>Books & Stationery</h3>
<p>500+ Products</p>
</div>
</div>
</section>Style the shop by category section
2
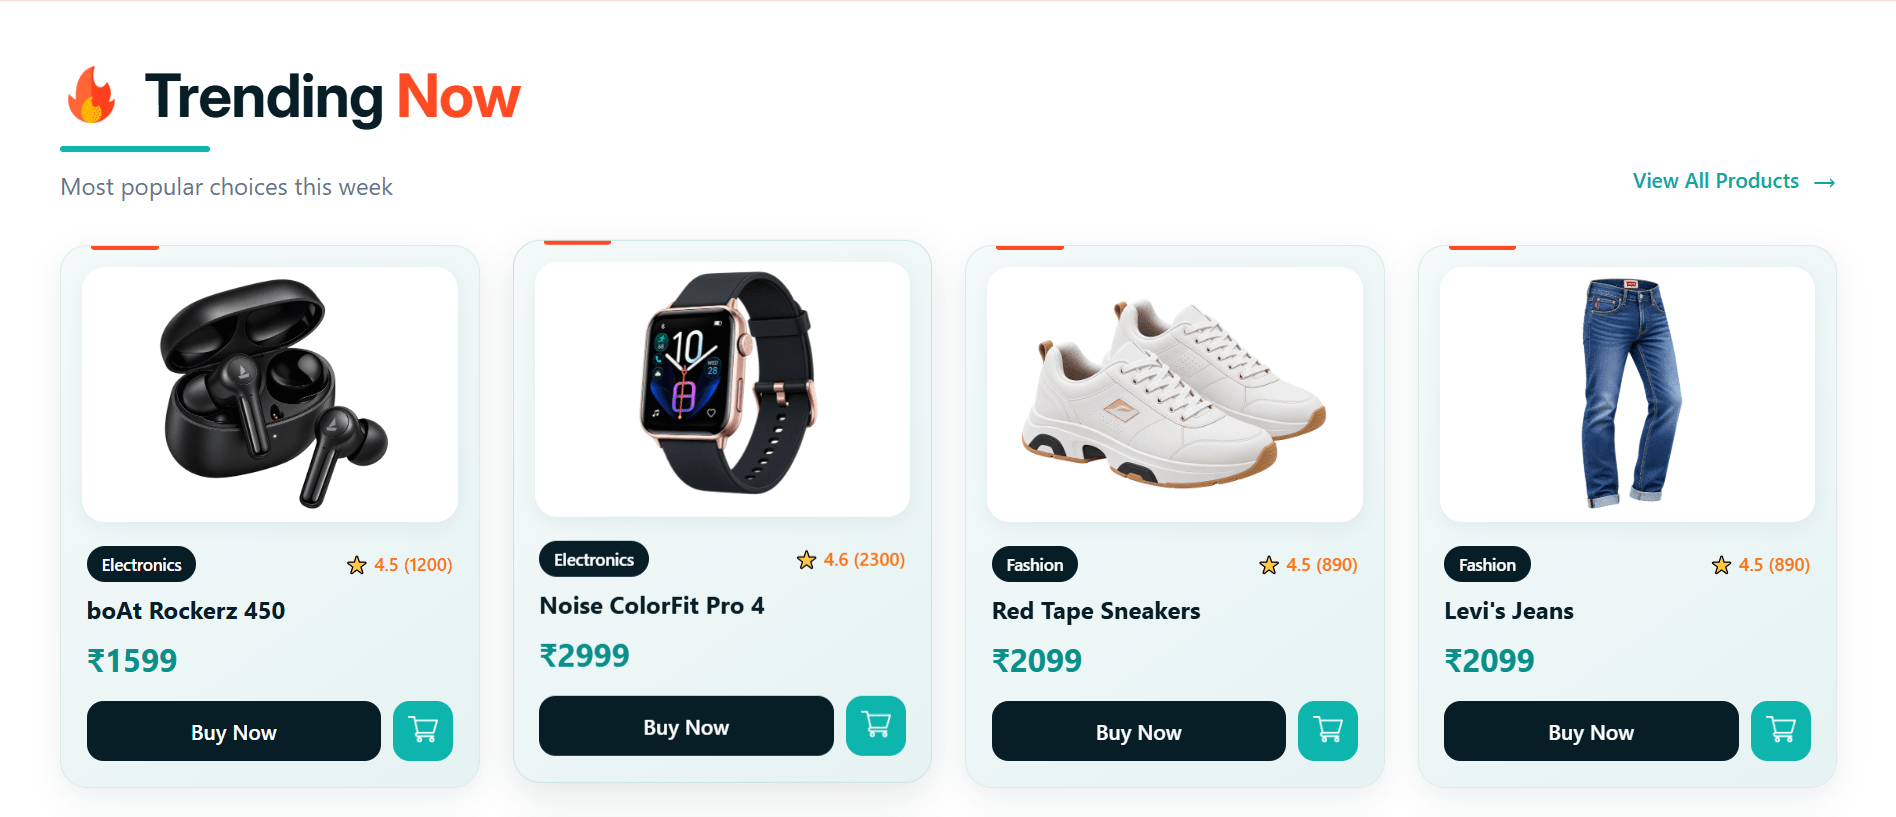
Task 3: Build Trending Products
At the top of Home.jsx, add products list
1
- we can keep a small product list directly in
Home.jsx.
const products = [


  {
    id: 1,
    name: "boAt Rockerz 450",
    category: "Electronics",
    price: 1599,
    rating: 4.5,
    reviews: 1200,
    image: "/images/products/headphones.png"
  },


  {
    id: 2,
    name: "Noise ColorFit Pro 4",
    category: "Electronics",
    price: 2999,
    rating: 4.6,
    reviews: 2300,
    image: "/images/products/noisefit.png"
  },
{
id: 3,
name: "Red Tape Sneakers",
category: "Fashion",
price: 2099,
rating: 4.5,
reviews: 890,
image: "/images/products/sneakers.png"
},
{
id: 4,
name: "Levi's Jeans",
category: "Fashion",
price: 2099,
rating: 4.5,
reviews: 890,
image: "/images/products/jeans.png",
},
{
id: 5,
name: "boAt Airdopes 141",
category: "Electronics",
price: 1299,
rating: 4.4,
reviews: 3400,
image: "/images/products/airdopes.png",
},{
id: 6,
name: "Iphone 17 pro max",
category: "Electronics",
price: 124000,
rating: 4.9,
reviews: 2100,
image: "/images/products/iphone.png",
},
{
id: 7,
name: "Men's Casual Shirt",
category: "Fashion",
price: 899,
rating: 4.3,
reviews: 760,
image: "/images/products/ferrari.png",
},
{
id: 8,
name: "Minimalist Table Lamp",
category: "Home & Kitchen",
price: 1199,
rating: 4.5,
reviews: 540,
image: "/images/products/lamp.png",
},
];Below the category section add product data
2
{/* Trending Products */}
<section className="products-section" id="trending">
  <div className="section-heading">

    <div className="trending-heading">
      <h2 className="trending-title">
        <span className="trending-icon">
          <img src="/icons/trending.png" alt="Trending" />
        </span>

        <span> Trending <strong>Now</strong> </span>
      </h2>

      <div className="trending-accent"></div>

      <p className="trending-subtitle">
        Most popular choices this week
      </p>
    </div>

    <a href="/products" className="view-products"> View All Products <span>→</span> </a>
  </div>
<div className="product-grid">
{products.map((product) => (
<div className="product-card" key={product.id}>
<div className="product-image">
<img
src={product.image}
alt={product.name}
/>
</div>
<div className="product-details">
<div className="product-meta">
<span className="product-category">
{product.category}
</span>
<span className="product-rating">
⭐ {product.rating} ({product.reviews})
</span>
</div>
<h3>{product.name}</h3>
<div className="product-price">
₹{product.price}
</div>
<div className="product-actions">
<button className="buy-now-button"> Buy Now </button> <button className="cart-button">
<img
src="/icons/product-cart.png"
alt="Cart"
/>
</button>
</div>
</div>
</div>
)
)
}
</div>
</section>Style the trending products section
2
Note: Link the Trending 🔥 navigation item to the Trending Now section on the Home page using the #trending section ID, instead of creating a separate Trending page.
We are done with this lab. The latest source code has been uploaded to GitHub. You can access the latest commit using the link below:
Git Push
git push origin branchName
Great job!
Your ShopKart Home Page is now ready and looking like a real e-commerce website. Keep going!
Checkpoint
Next-Lab Preparation
Module: Deep Dive into Component & Props
1) React Events & Props: Handling, Syntax, and Conventions
2) React: Conditional Rendering & State with useState